XCIPTV player application is a streaming software which has it’s unique design and media player engine. I have this app and been working with it for over 2 years, very happy. Smooth playback, neat interface and various functions make it a good choice of an IPTV player. There are features inside this application which will impress you. That’s why I decide to write a thorough guide for XCIPTV app.
Disclaimer: This guide is intended solely for educational purposes. XCIPTV by OTTRUN is a legal app. We do not promote or condone any unauthorized streaming or illegal IPTV services.
What is the official website for XCIPTV?
I would like to get on it right away and clarify something. I see loads of fake and unofficial websites on search engines claiming to be the owner of XCIPTV app. The complete name of this application is XCIPTV by OTTRUN and the official website is https://ottrun.com . Do not get mislead by imposters as there are many. You can also read about OTTRUN to understand when and how they started operating.
What are the main benefits of using XCIPTV player application?
When a user tries to decide between different application to stream with, They should consider various factors. I will help you understand XCIPTV and see whether this app suits you or not.
XCIPTV has External player engines embedded
If you remember the tutorial for IPTV Smarters Pro, we had to install VLC or EXO player on our device and then add them to the app. Here with XCIPTV, these player engine libraries (files) are already inside the software so with a single button you can change them if necessary. This not only saves us time, it also shows that the OTTRUN coders have fine-tuned both VLC and EXO to work perfectly with XCIPTV player app.
Smoothness of function
When you work with XCIPTV player, the thing that you will notice is the slick performance. As I said earlier, Personally been using this software for over a year now and It just works without lags like a well-oiled machine. I did not notice any memory leak or crashes as well.
With XCIPTV you have Scheduled recoding
Talking about recording Live TV, I bet most of you prefer a way to schedule it for a specific show and let the app handle it automatically. XCIPTV gives you this option and does it very well. Later in this tutorial we will fully explain how it works.
What are the cons of using XCIPTV?
There are, however, some downsides about this application which may discourage you from using it. It’s not a major weak point but, you know, it may make you rethink your decision about using this app across all your devices.
XCIPTV player is not available on Apple devices (iOS and macOS)
Wether you have an iOS handheld device or an Apple computer, you should look for other applications. XCIPTV is not available on App Store or as DMG file. I do know and see lots of people these days either using an Apple smart Phone or computer for daily life. This will not be the right choice for them.
It does not have a pubic Web Player version
OTTRUN says they do make a browser version of XCIPTV but only as a rebrand for providers. Unlike Smarters Pro which has a public Web Browser version. Sometimes the device you have with you is so stubborn and limited that you can only run a web browser on it. Having a Web version of the application would be a key feature.
XCIPTV is not available on Google play store
Few months ago, Google Play removed it and you can not install it from the store anymore. However, we will do this with the help of side-loading. I will explain later here.
The API server address might be blocked in some regions
I did not see this being mentioned anywhere but I have tested this and can confirm that the API server address of XCIPTV is certainly blocked in some regions. It means when you open the application, after the first teaser, the login page wont load. But the moment you apply a VPN or a proxy on it’s way, the login page will load up just fine.
How to install XCIPTV on various devices?
So, considering the cons we spoke about above, we can install this application on few devices but not all. It’s okay, at least we have few choices to live with. Walk with me for the installation procedure on available devices.
Installation of XCIPTV player app on Android phone or tablet
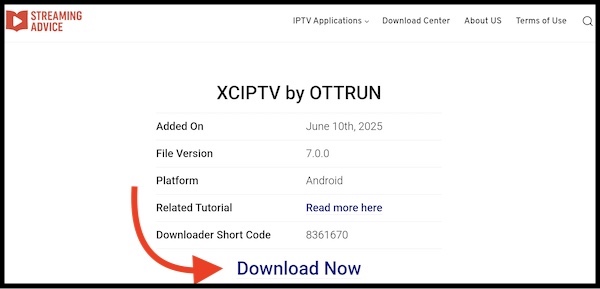
1- On your Android handheld, fire up your web browser and open our download center. There, you can find the latest version of XCIPTV for download.
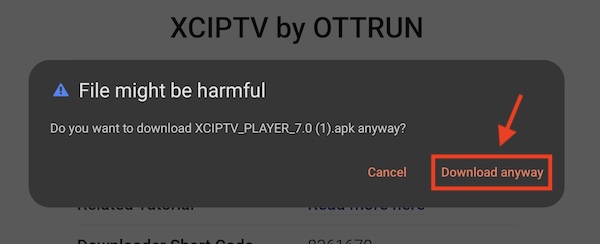
2- This APK file is not downloaded from Google Play Store, so for sure your Android OS will warn you about using it. We can assure you that we got this file from the official OTTRUN website and it’s harmless. Click Download Anyway.
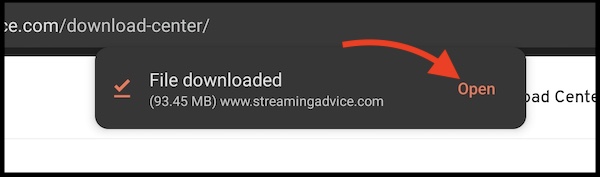
3- Once the file is downloaded, your browser will notify you about it. Open it now.
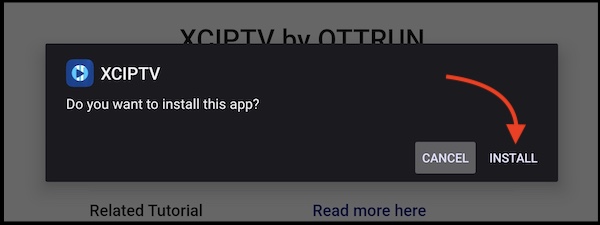
4- Click install.
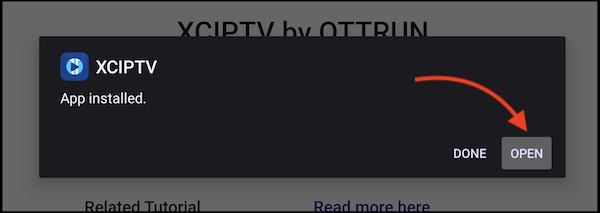
5- Once the installation is successfully done, you will be prompted to open the app. Please do so and proceed.

6- The login page will show up. App is ready now on your Android device.
How to install XCIPTV on a Fire TV Stick or Fire Cube?
XCIPTV is not available on Amazon App Market. Therefore, we need to side-load the application. The process below will help you through this procedure.
Adding a Downloading Software
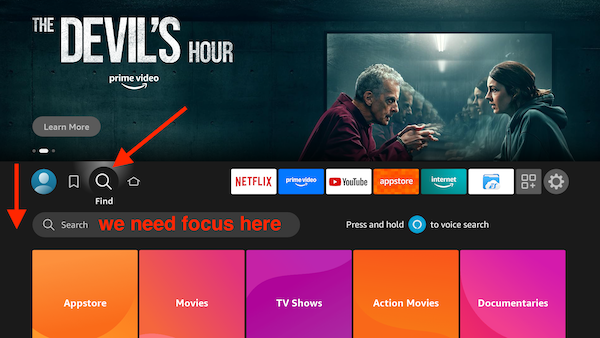
1- From the homepage of your Fire TV Stick, move over to the magnifier icon, then click down arrow on your remote to move the focus on the search field.
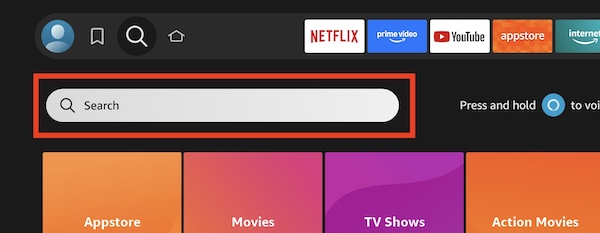
2- Now that the focus is on the search field, please click OK button on the controller to bring up the virtual keyboard.
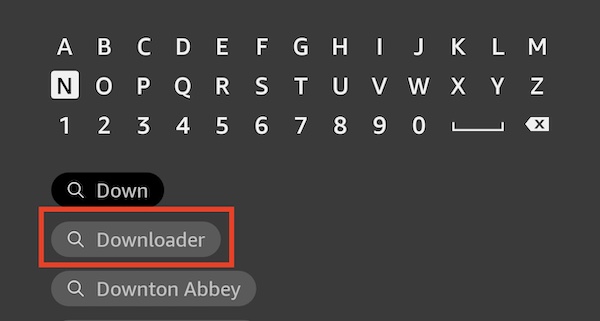
3- We are looking for an application to let us download the installation APK file for XCIPTV. This app is called Downloader. Search that word in the pop up keyboard. As you can see above, I have done that and the moment I type in “Down”, it appears. Move over onto that and click OK.
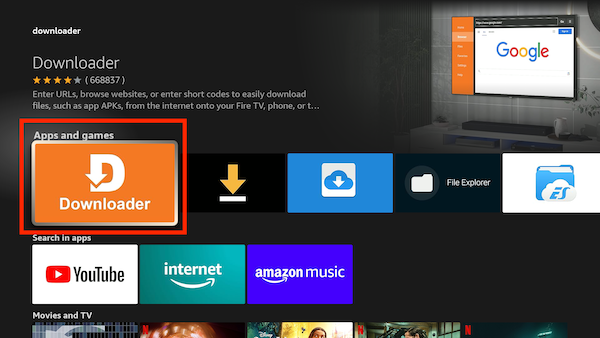
4- Once the logo of the application appears, click on it to proceed with installation.
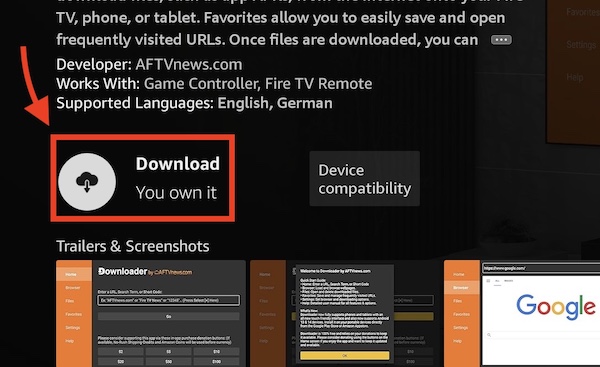
5- Click Install. In the above picture it is showing as Download because I already had it in my Amazon account.
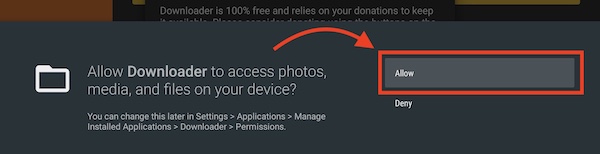
6- If you are an old user of Firestick devices, you must have seen this message before. We want to download and operate with a file, therefore we need access to SD card memory of the device. Choose Allow.

7- In the homepage, the focus is on GO button, click upward arrow to move it on the field above that and then click ok so the keyboard appears.
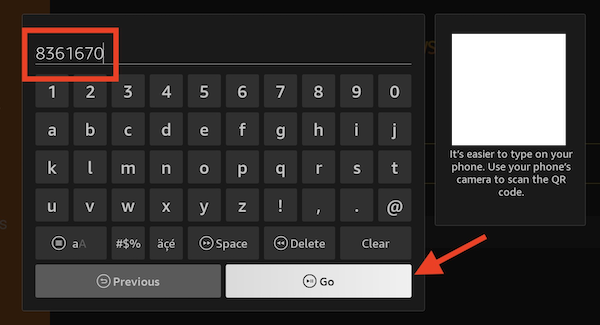
8- The Downloader short code for XCIPTV app is 8361670 . You can always check our Download Center for the address to the file or latest codes. At the end, please click GO.
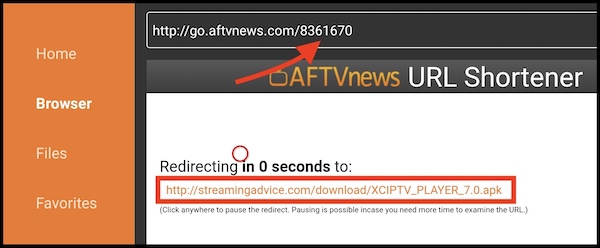
9- No need to do anything at this step.
Jail Break
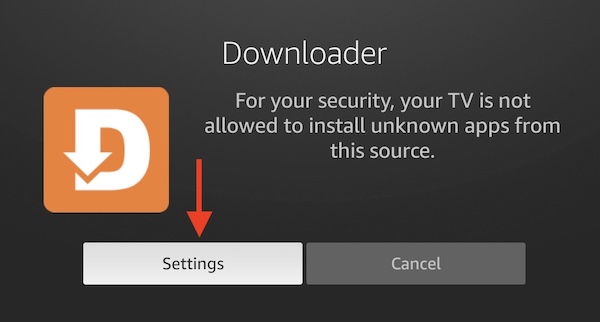
10- We need to provide access to Downloader so it can install applications from sources other than Amazon. Click Settings and proceed.
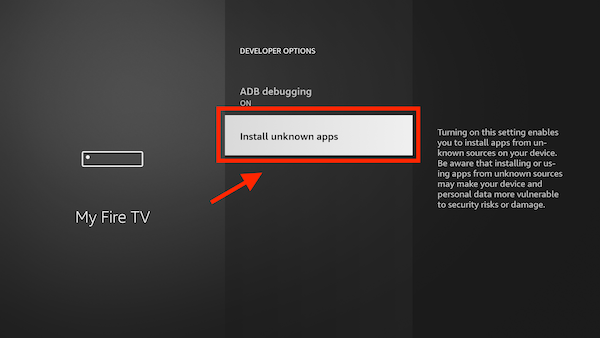
11- The Developer options section in the Fire TV Stick settings will show up. Click Install Unknown Apps.
Note: If developer options do not appear for you, and you are in About my Fire TV Section, move over on ABOUT and click OK on it 7 times so Developer options appears.
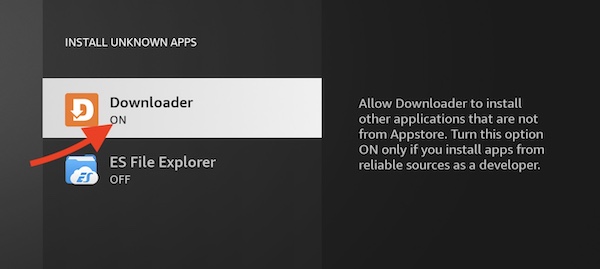
12- Find Downloader in the list and click OK on it once so the access status changes to ON. Then click Back button on your remote 2 times to go back to the installation process.
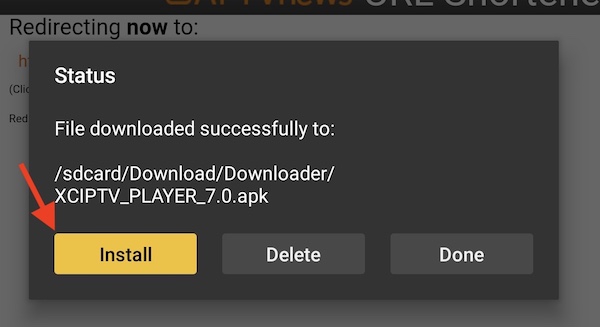
13- Click Install.
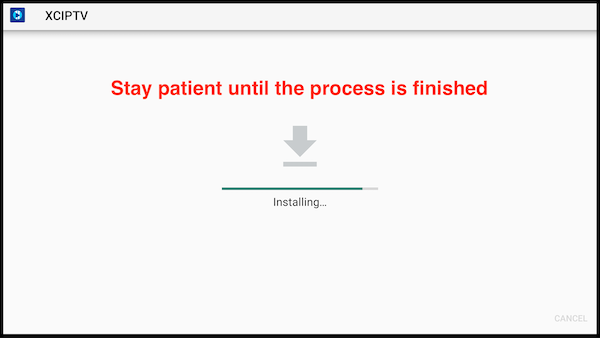
14- The installation of XCIPTV app on Fire TV Stick is in progress, wait for it to finish.
15- The app is installed and ready for streaming.
How to add an IPTV playlist into XCIPTV?

Before going through with this section, there is a settings icon at the bottom right corner of the login page which I would like to explain first. You can simply proceed and input your login details on the default form available in front of you but remember our job here is to master all settings and functions first. Click that settings icon.
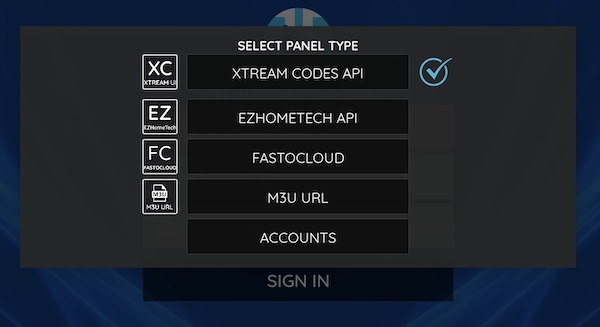
There are 4 different methods with which we can add our IPTV playlist on XCIPTV player application. They are all the same, sort of, but the difference between each sits in the background which I will explain.
Different Login Method on XCIPTV
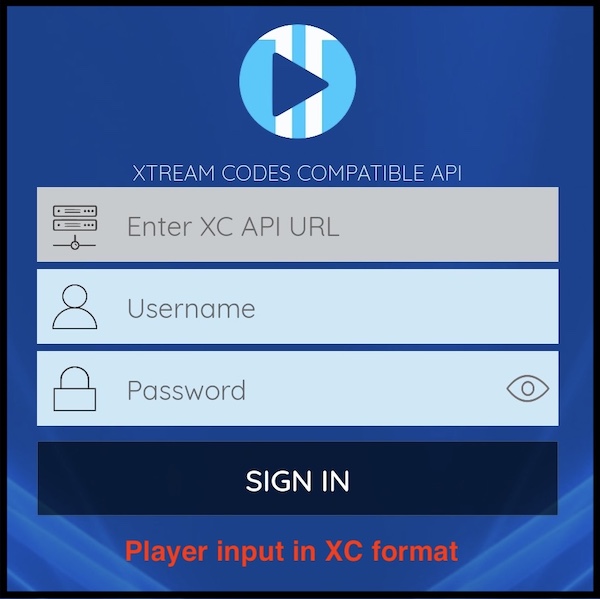
Xtream Codes API is the easiest way of adding streaming line details of your playlist into most applications. I have already explained how this works so please have a look at the guide for Xtream Codes API and then come back here and continue. That guide will explain how you can enter a M3U streaming line into the login page.
M3U URL is the long streaming line string which most providers supply their clients with. If you have that, you can easily paste it in the field and then click Sign IN.
Uncommon Methods
EZHomeTech API is referring to an OTT CMS panel. Basically if your provider is using that content management system as their software, they can provide you with a specific API address. It has it’s own channel listing and category structure, “Memory-based data storage” and “zero-delay channel zapping”.
FastCloud is yet another OTT CMS to create and manage streaming content. Should your provider use that one, they can offer the URL address to that API with username and password credentials.
I recommend using the default (first) method to enter your playlist. Once done, proceed.

After clicking SIGN IN, XCIPTV will start pulling data from your provider’s core server. Wait until the process to finish.
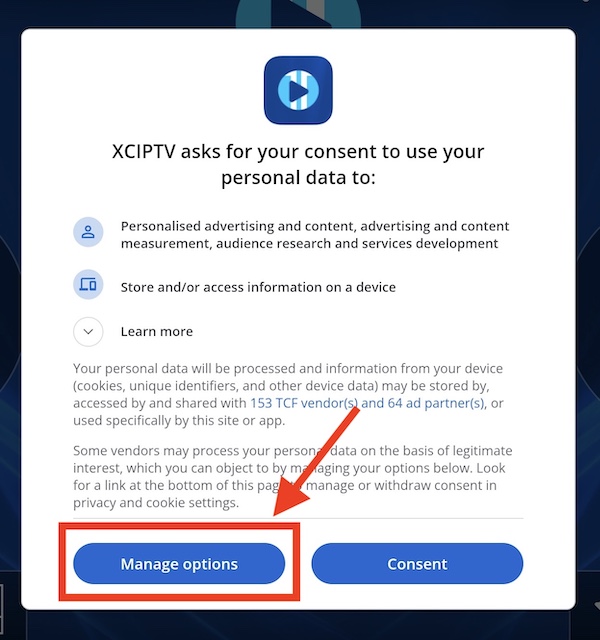
Right the moment dashboard loads, you are prompted with Advertisement Consent for personal data use. It is basically the application asking for your permission to use your personal data to show relevant ads. Yes, XCIPTV is a free app, developers make money by showing ads on it.
To limit the number of ads, and make them disappear to a big extent, I recommend doing few things. Click Manage Options.

The next page should be the one shown above. All you need to do is to scroll down and disable any option which is already enabled. Finally click Confirm Choices. The dashboard will emerge. Believe me when I tell you, The fun begins 🙂 All those settings are so easy and understanding them is a breeze. I will explain every part in details.
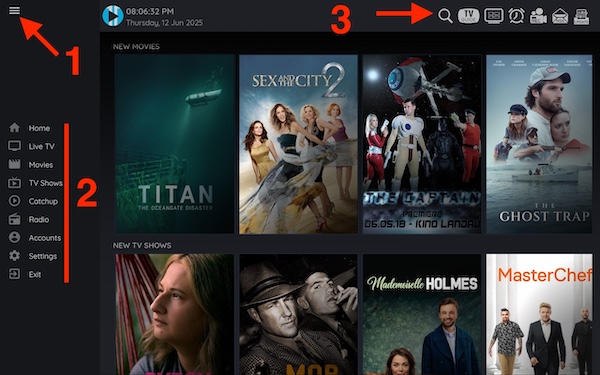
Understanding the dashboard of XCIPTV player application

When the app loads up, this is the sight you will face. I really like the tidiness of the design, everything has it right place. I do agree that on Smarters application we have the same neat dashboard but for some reason, at least in my opinion, this app is more likable. All functions and features are unlocked and what you have in front of you is the full potential of this software.
How does live TV work on XCIPTV?

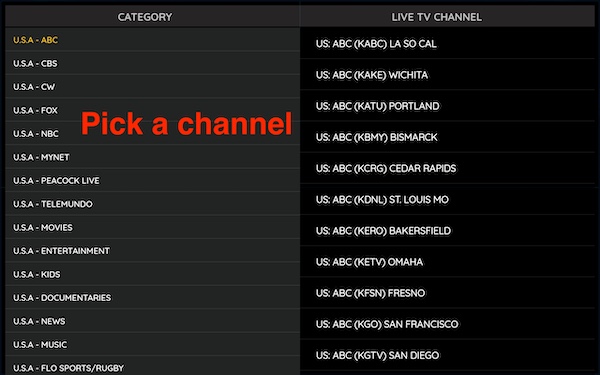
Once clicked on Live TV from the main page, you should see the channel listing. Categories on the left, channels on the right. You can sort channels as per your preference using A-Z button at the top. Right beside that there is a Search button. It will search through the whole channels among all categories which is very helpful. By clicking and holding on a channel logo, a Star icon will appear next to it showing that it’s been added to favorite.
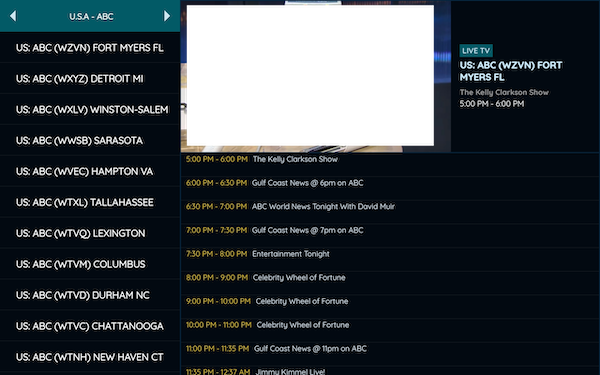
when a channel is selected from the main listing, you should have the above section. Full content of the category inside which the selected channel is will load on the left, a minimized version of the channel will show at the top with EPG underneath. Tap on the screen again (or just click OK on the remote) to maximize the screen – next step below.
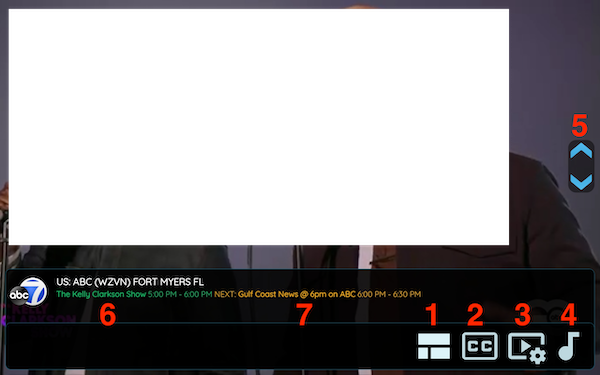
When a channel is in full screen mode, by clicking on the screen once, you have access to some controls. Aspect Ratio (1) will change the dimensions of the screen. Subtitle button (2) allows you to change between subtitle tracks if available. If the video track has different versions streams, you can change that (3) too. Audio track on the channels (4) can also be checked and changed. The up / down controller on the right (5) is the switcher between the previous and next channel on the list. EPG for the current program (6) as well as the upcoming one (7) are under the channel name.
Live TV EPG table

On dashboard, there is the EPG. It’s a program guide table where you can check for your favorite TV content, see when it’s going to be on air. From the top, categories can be selected and on the left, channels inside that folder will be listed. Then the guide will show next to them from old to new (left to right). You can swipe the page right-to-left and see the newest content. Also, by tapping on any of the EPG’s, the related channel will be opened and streamed.
VOD (movies) and Series Section

Here is the main movie list. All the recently uploaded movies are listed in the Recently Added (1) folder. By holding the selection on a movie, it gets favorited (2). Sorting based on the date of addition is possible (3). The outline of movies can be sorted in different ways (4). And the search function (5) does look into all movies categories, not just one.

This is how a movie playback is. On the screen, after tapping once, these controls show up. Movie name, rating and date of addition (1) are the first thing catching the eye. Previous (2), Pause (3) and Next movie (4) are the first 3 buttons. You can change the size of the screen (5). Subtitles (6) are accessible if available on the content. Video playback settings (7) and changing the audio track (8) are other possibilities. You can also record a movie (9). Note that recording starts immediately after the button is clicked.
In series, the playback and settings are identical to the movies, so you can use the same guide above for that section too.
Upper right buttons on dashboard

Continuing with the dashboard, there are five very handy functions on the top right corner. At least 3 of them are definitely of good use. So I am not going to let you neglect them 🙂
The Master Search (1)
We have a global search feature (1) in XCIPTV and to be honest I have never seen such useful, and at the same time broad look up function in any other IPTV application. It’s definitely worth a look.
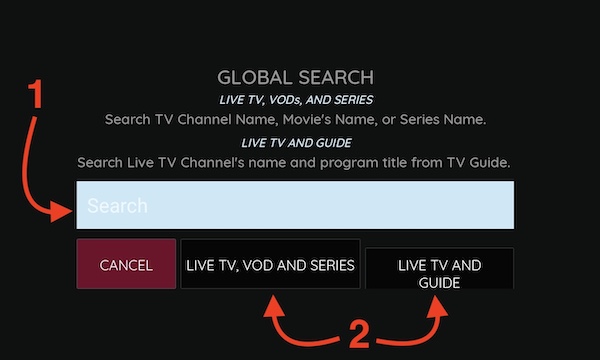
So the Global Search, right? 🙂 now let me explain why this is so one-of-a-kind. First you put your desired search query in the field. Then as for the next step, you should choose where you want the app to look for it. The middle button is “Live TV, VOD and Series” meaning the search term will be looked for in those sections. But what if you want to search for something in the TV Guide (EPG)? that is also possible with the other button. This is best when you are trying to find an upcoming program but you are not sure when it is gong to be aired.
Program Reminders (2)
It might come a situation where there is an hour left to your favorite program and you have nothing to do until then. In for a movie? sure but what if you forget the start of that TV content? thats where Program Reminders steps in. You can easily set XCIPTV to notify you when that show is about to start.
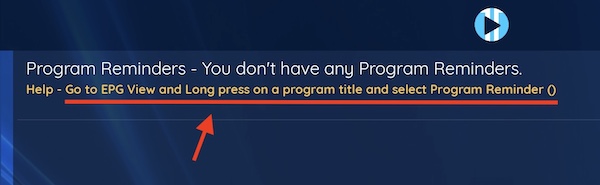
From the dashboard, click the clock icon and the above should appear. This is where the reminders are listed, but they are not configured here. We need to set them from EPG table.
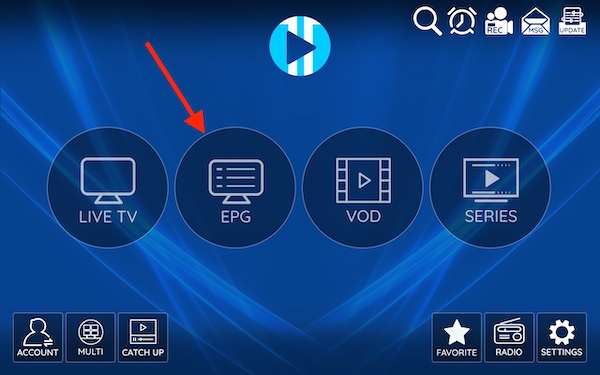
From dashboard, choose EPG with Table.

Now that Live TV program guide table is in front of us, choose the program you like and then tap and hold on it’s entry.

From the pop up menu, select Set Program reminder.
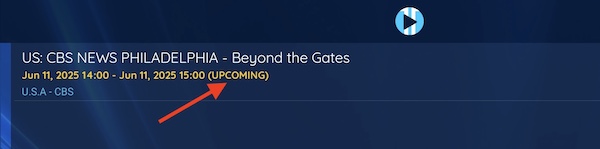
Now, recheck the reminder page again, the desired show has been added and you will be reminded for it. It’s time to tune to your favorite movie worry-free as XCIPTV will not let you miss anything.
How to use Scheduled Recording on XCIPTV? (3)
Yeah I know you have been waiting for this part. We did show how to manually record a TV channel, Movie and Series. But what if we want to set the application to do it by itself on a specific time? Scheduling a recording is the ideal option in these situations and it will run in the background.

When clicking on the camera icon, the following will pop up. This is where you can manage your recordings and also schedule one. Before we proceed, I’d like to point out something first and thats the Location folder where you can store the files. From the top right click the Select Location.
Checking the Storage Location

The android tablet I am using for this tutorial has a total storage of 106 Gigabytes and 89 of it being free to use. You can see that the storage is selected as Internal. If I add an external storage, it will appear here and can be selected. So keep this as a reference for when you want to sort this on your device. Now let’s get on with the recording.
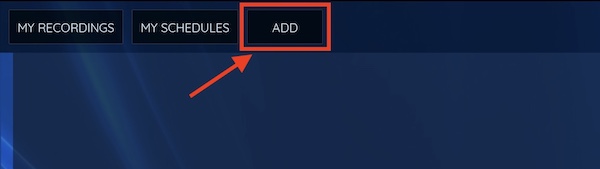
Back to the recording page, from the top left, click on Add. We’re going to add a schedule for our recording.

Channel list should show up along with the favorites. Please find and choose the Live TV station that you want to record.

Here you can set the time and date for the start of the recording process. First thing to do is to click Pick Date and Time.
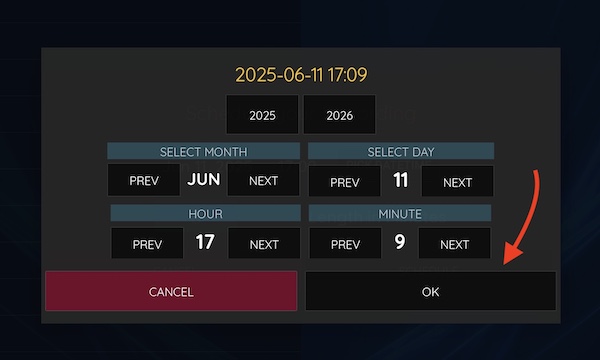
This is the calendar and the clock picker section. The date and time you choose here will be the initiation point for the recording. Once done, click OK.

For the sake of this example, I have set June 11 2025 as the date and 17:13 PM as the starting time. I have also set the duration to be 1 minute. Once you set yours, click Schedule.

The scheduled is set. On the left, you can see the name of the channel, the date and time when the recording triggers and also the duration, and below that the path to the result file.
Checking the recorded File

The green tag on the right confirms that the operation has finished and the file is ready. Click on the file path.
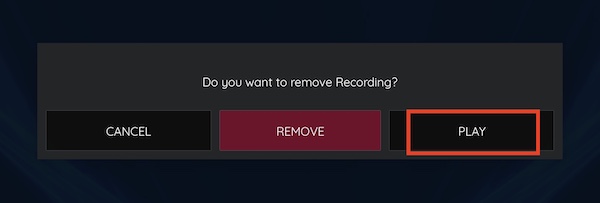
After selecting the recorded result file, you can choose whether to play or remove the file. Let’s play it and see what happens.

XCIPTV is now playing the saved file of channel which we had scheduled for recording. All signs also confirming the settings we used for the setup of this. You can now either watch it or just extract and export it to another device.
How to update channel listing on XCIPTV? (5)
In settings, which we will cover soon, there is a possibility to configure the interval based on which the listing of Live TV, VOD and Series get updated. However, there is a very straight forward way of doing this manually.

From the front page of XCIPTV, click on Update which is located at the top right corner.

The whole content is updating. The app is downloading Meta Date from the provider’s side. This should only take a second or two. Do not touch anything while progressing.
Once done, you will be automatically redirected to the main dashboard and thats when everything is updated. You can now browse through your desired content, whether Live TV or VOD.
Bottom side controls
There are 4 controls at the bottom of dashboard which I want to get out of the way first then we get to the Multi-screen and Settings.
Account has the details about your added playlist. You can add unlimited playlists from different providers.
Catch UP refers to the recorded version of Live TV from days before. Some services do offer that and if they do, it will show up here.
Favorite which has a star icon on it is the place where you can immediately access the selected TV stations.
Radio is radio basically 🙂 not all but some service providers do offer that.
Understanding settings pages of XCIPTV
There are 15 different entries inside the settings page of this application. Knowing them will prove useful one day as some of these are very handy and help you troubleshoot issues.
Application info
In the App section, we can find details about the copy of the XCIPTV we are using.
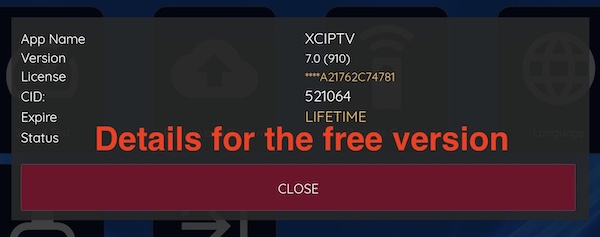
The version of the software, the license number, CID. If you face issues and want to report to OTTRUN, they may ask for these details.
Account info
If you are looking to find details about the IPTV subscription (the playlist) that you have added on the XCIPTV app, this is the place to look into.
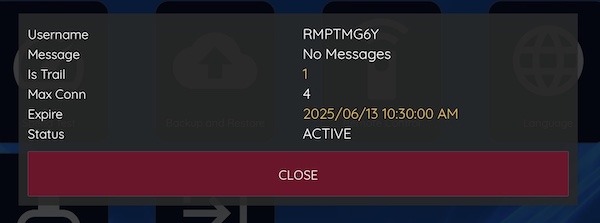
The sub I have added to the application for this tutorial has RMPTMG6Y as the username. I have no messages from OTTRUN of course, but in the rebranded versions you may get notifications from your IPTV provider. The account is a trial, and it has 4 concurrent connections which is a crucial info when you are into recording or multi-streaming. It’s not expired yet so the status is Active.
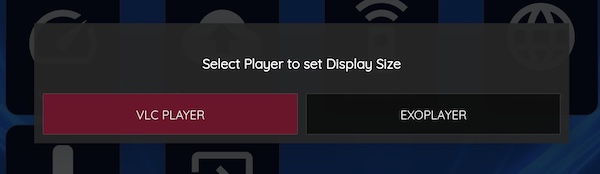
Player Settings
In this part, we can configure the behavior of our media player engines, of which we have 2 inside XCIPTV. After clicking on Player Settings, the choice between 2 will show up. I will explain each.
VLC Player
VLC Media Player by VideoLan is one of the oldest multi-media players. It’s codec library includes almost anything and if you assign it as your engine, it will allow you to play whatever you want smoothly. Click it to see and configure the behavior for VLC.
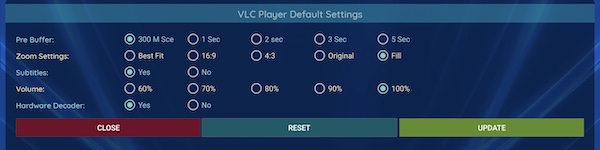
Here, we can decide how VLC behaves when active as the media player engine. We will cover it in the next step.
Pre Buffer is the value which determines how many seconds the content is prepared ahead of the playback, For instance if you set it to 1 Second, when watching a channel, the next 1 second is prepared before shown to you, this helps resolving buffering to some extent on some connections. Zoom Settings deals with the aspect ratio of the screen. You can set this depending on the monitor or projection device you are using.
Subtitles can be turned on automatically but if that bugs you, set it to off and it wont show unless you enable it in future. Volume can be adjusted to a specific value which helps avoiding the sudden raise of sound when switching channels.
Hardware Decoder, when set to Yes, will let the Graphic Processor Unit (GPU) be in charge of processing certain video contents, mostly the H264 video stuff and takes the load off your CPU. If your device is new and you know it has good graphics card on it, always leave this option enabled. For instance my android tablet is pretty new and has 4k playback capabilities so for sure it has a competent GPU, therefore I will leave this enabled.
Once the desired settings are set, and you can try the default before making any changes, click Update.
EXO Player
EXO is another media player which has been developed by google for Android devices. It has various possibilities for customization and very versatile when it comes to playing media files, whether audio or video.
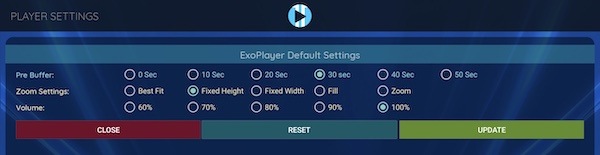
Configuration options are identical to what we explained above, only the Zoom Settings and Pre Buffer are a bit different but perfectly understandable.
Player selection
This is where we decide which media player engine is assigned to which content. Do you want your Live TV to be played via VLC Player or EXO? same choices you have for Movies, Series and more.
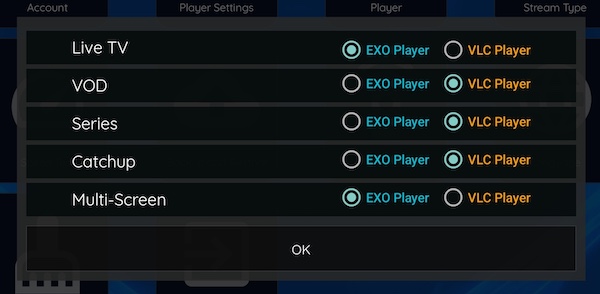
As I did describe earlier, you can choose between two great media player engines and assign them to your desired content. However, speaking from experience, I would like to add an input about this.
Should I use EXO Player or VLC Player on XCIPTV? Which one better for Live TV and VOD?
In my opinion, based on what I have seen on user reports and also during the time I used this application, EXO player works best for Live TV content (Catch up included), but there are channels, especially the ones with 60 FPS (Frame Per Second) that did show slight buffering with EXO but worked just fine with VLC Player. For Movies and Series, I highly recommend VLC.
Stream Type
This is all about the extension of the live stream, the format by which the data is transmitted to your application.
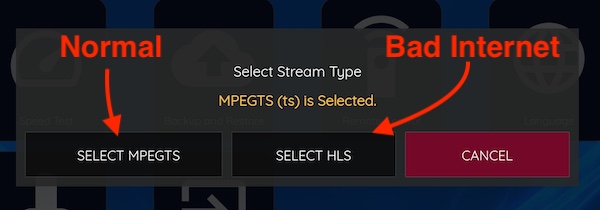
I do like to write an article on this as there have been many cases with bad buffering on unstable internet connection and changing this setting has actually helped.
On normal basis, keep MPEGTS. Even XCIPTV already has that set by default. But if, and only if, you are on an internet line which may have instabilities, like bad jitter, up and down ping latencies … you can try HLS.
Update Contents
We have already explained how to quickly update the content manually from dashboard. But just for the sake of it, there is another function for it in settings
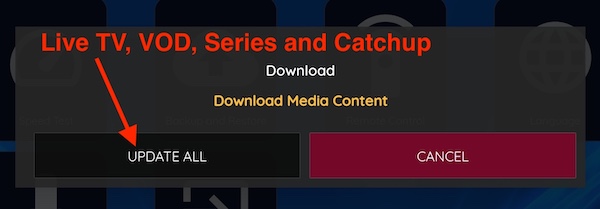
It does update all and every media content on your playlist.
Parental Control
I think we all know what this section does, so many of us had our parents stopping us from watching certain content in certain age, right? 🙂

Now it’s your turn to do that for your kids. Tap on the shown field and set your desired password if you want. The default one is 0000 . Now if you set a password and forget it, you can contact OTTRUN and with the code given here so they reset it for you.
Speed Test
If you suspect your internet speed and latency, XCIPTV has a function allowing you to evaluate your connection.
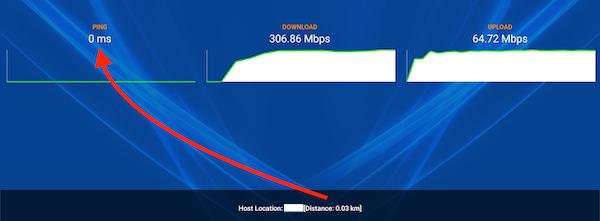
Funny thing is, my distance to the test server is almost 30 meters, it’s in my pocket basically. Internet speed test here showing good bandwidth both in upload and download. However, again, I will write a deep article on how you can evaluate your internet bandwidth and quality for IPTV purposes soon and will also link it here.
Back up and Restore
One good feature that XCIPTV app has is the possibility of taking backup from all the settings, favorites and every other configuration.
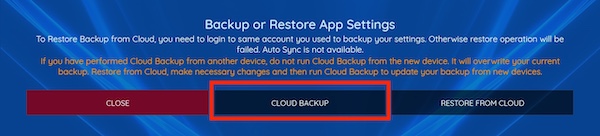
There is no need to have any cloud accounts, OTTRUN cloud will handle that. Simply click Cloud Backup button to initiate the process.
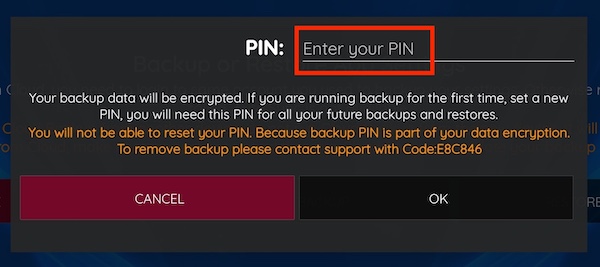
Since it is getting encrypted for security, a PIN is necessary. Enter your PIN number and click OK.

All settings and configurations on XCIPTV have just been backed up and stored on cloud. Later when you want you can restore it.
Remote Control
There are some applications available on online App Stores which serve as global remote controller. You can pair almost anything with them, your air conditioner to your TV. XCIPTV allows that as well.
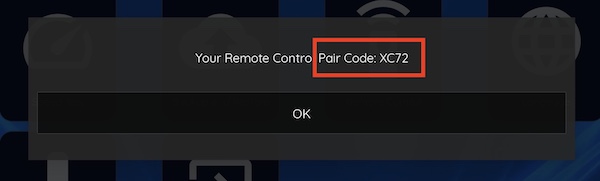
Once you have installed that app on your smart phone, turn on bluetooth and wifi on both devices and use XC72 as the pairing code. It syncs and you can remotely control the app.
Language
Its pretty obvious, you can change the global language on the XCIPTV to your preference. It supports 17 of the most common languages in the world which is pretty awesome.
Support
The support button in the free version does nothing. It is useless.
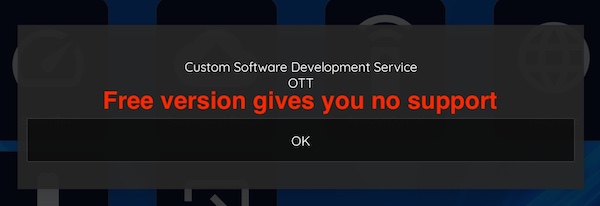
That said, in the rebranded versions of XCIPTV, this section will enable you to directly be in touch with your IPTV provider.
Other Settings
This section includes the miner options for which there were no major settings section.
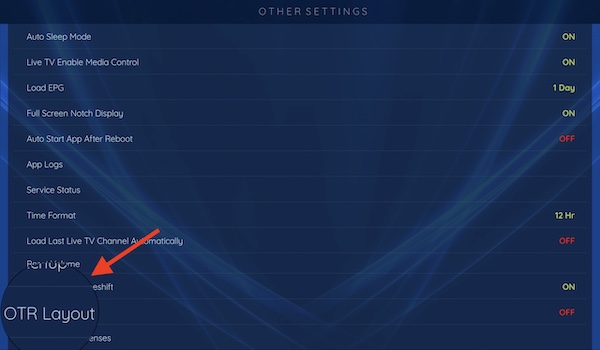
These settings are self explanatory and I wont be wasting your time on them. However, one of these options is actually very interesting. Did you know XCIPTV has another user interface? OTR layout is the name and you can change the skin of the app with a single click. By clicking that, the application reloads and prompts you for login, username and password already inputted so just click SIGN IN.
This is OTR layout. In the first row, you should see the Movies that provider added recently. Below that you can find TV series by their latest episodes. From top left (1) you can collapse or bring up the menu. The left column has content entries to select and on the top right side (3) other options are accessible. This layout will grow on you, I promise.
Clear Cache
And the last setting to look at is the Cache controller. But what is Cache?
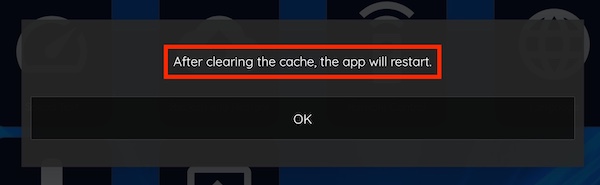
Cache is a component that the application requests for it frequently and therefore the software stores it in the application memory. Next time when the app tries to load those elements, the process will be much faster as it will come from local cache. These components can be video particles, images and various other files.
However, it is possible that sometimes cache is corrupted and results in malfunction of the software in various ways. Using the Cache Clear button, you can manually remove and refresh it.
Sign Out
If you ever decide to log out of an account on XCIPTV, this is where you can do it.
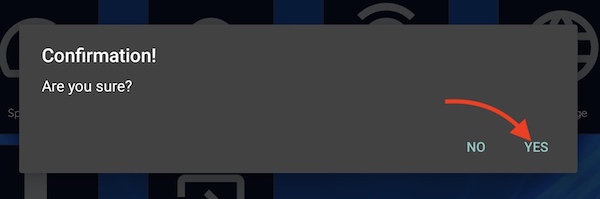
After clicking Yes, the application will reload and redirect you to the login page where you can re enter or edit the playlist details.
How to watch multiple channels at once with XCIPTV app?
I have had this case myself many times, when there is a football match going on, formula 1 race is live and also there is a news development which I would like to tune into. This is only possible through Multi-Screen feature.
Before we proceed, I would like to have your attention to something first. If we want to stream multiple channels at the same time, our IPTV account requires multiple concurrent connections as well. As you can see above, my trial account has 4 connections allowed, meaning I can watch 4 channels at the same time, or even watch 3 and record 1 simultaneously. So, see how many concurrent connections you need, purchase that from your provider first, then proceed here.
Adding Multi Screen
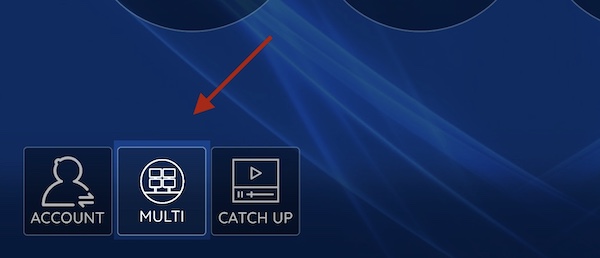
From dashboard, click MULTI in the bottom left corner.

This is the first sight you will see after stepping into the Multi-Screen phase. It’s a split-screen into four by default. I will go ahead and tap on one of them see what happens.
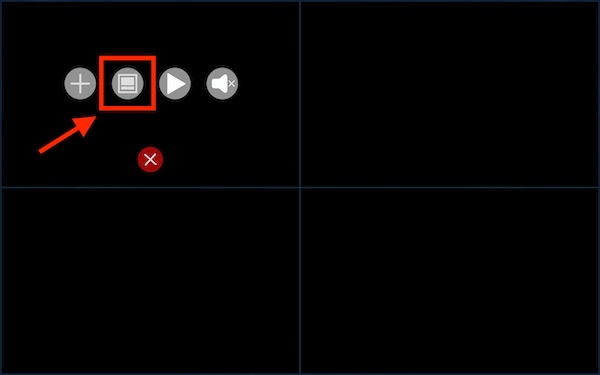
I have clicked on the top left and as a result, we can see few control buttons appear. First thing I recommend is having a look at possible layouts for the multi-screen. Please click on the designated button in the picture above.
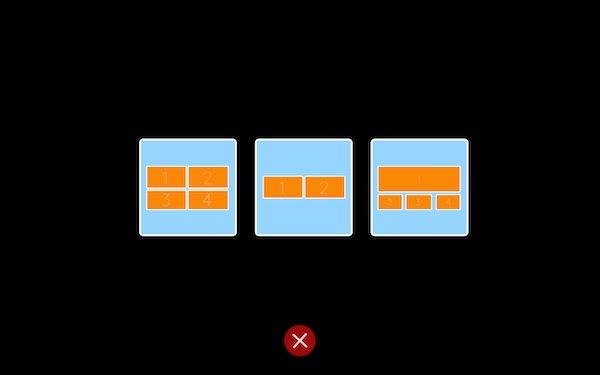
There are 3 possible layouts you can choose from. I would want to go for the first one since I want to watch 4 channels at once.
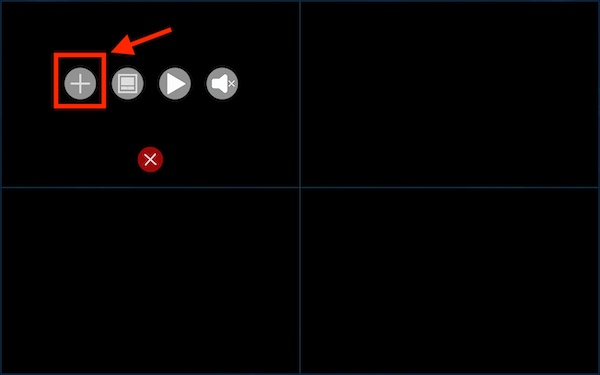
Now, click on the Add button to include the first channel.
The categories of the Live TV channel listing will load up. This is where we can pick the desired channel and add them into the multi-screen. Choose the channel and proceed.

We now have added the first channel. You can now add up to 4 channels based on the allowed connections on your account form the IPTV supplier.
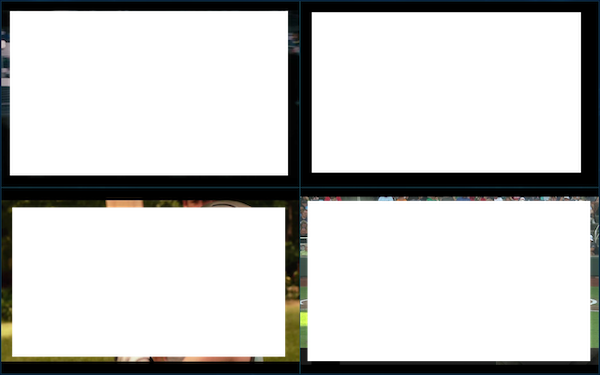
All 4 channels are streaming at the same time. We can now enjoy watching our desired TV channels simultaneously. Do note that only one of them can stream sound. So you can click the tile (channel) you want to hear and click the speaker icon.
Frequently Asked Questions about XCIPTV player application
I would like to sum up the article by answering some FAQs about the app
Which devices can I install XCIPTV on?
You can install XCIPTV on all Android devices for sure. ON Samsung and LGTV is not available. None of the Apple devices, whether iOS or macOS, have it available. On Microsoft windows it is also not available either. Although a great application, it is not accessible on all platforms.
What does separate XCIPTV from other applications?
XCIPTV by OTTRUN has schedule recording which is a very handy feature and not available on many apps. It also has both VLC and EXO player libraries built-in inside. This is probably the one feature which you can not see on any other IPTV player. I personally think it works very smoothly comparing to many other competitor softwares.
Does this app require a premium license to access all features?
No, you will have all and every single benefit of it for free. It may include some advertisement, but if you follow certain steps explained earlier, those will not bug you.
Can I have XCIPTV web version on my browser?
Unfortunately that is not an option. Web version is only available for rebranded version and not the free one.
Is XCIPTV available in the Google Play Store or do I need to sideload it?
XCIPTV is not always available in the Play Store, especially in some regions. It’s common to sideload the APK using the Downloader app or direct APK link on Android-based systems like Firestick or Android TV.
Can I load multiple IPTV playlists or accounts in XCIPTV?
Yes, XCIPTV supports multiple user profiles or playlist entries. You can log in using different M3U or Xtream Codes credentials under different user tabs.
Does XCIPTV support EPG (TV Guide) and Catch-Up TV?
Yes, it fully supports EPG display, including now/next views and full week grid (if your IPTV provider offers it). Catch-up also works if your playlist includes those links.
Is there a way to hide adult channels or categories in XCIPTV?
Yes, the app has Parental Control settings. You can set a PIN and hide specific categories, including adult content, from the main screen.
Can I use external players like VLC in XCIPTV?
No need — VLC is already built in as one of the internal playback engines. You can choose between EXO or VLC inside the app’s settings without needing external installations.
Why is XCIPTV crashing on my Firestick or Android TV?
Common causes include using outdated APK versions, low device memory, or corrupted IPTV credentials. Uninstalling, reinstalling, and using fresh login details usually fixes the issue.
No comments yet