
Tivimate IPTV Player has been the only one application attracting the attention of users in almost every way. This app has everything a user may ever want. A world of features, a very engaging interface as well as smoothness of playback will definitely encourage you to not only use it, but also go for the Tivimate premium paid version. You dont even need companion application anymore.
Pros and Cons of Tivimate
It’s a great application, there is no doubt about that, but nothing is perfect, that is also true. I would like to point out few things first before we proceed with this tutorial. This will help us understand what we can and can’t expect from this software.
It has every feature (Pros)
It is safe to say that Tivimate has all and every feature that an IPTV user is looking for. from multi-screen to scheduled recording. If you use this app, you will never want to use any other.
Essential features include in paid version (Cons)
From channel listing categories, to Xtream Codes API login form, to any other important features, they are all available in the Premium version. However, I assure you going paid is the right choice and it is totally worth it.
Only works on Android devices (Cons)
The developers of this product have decided to go with Android version only. You cant blame them for that though, because android is the only platform that enables developers to easily embed various features on the app. Imagine application like IPTV Smarters Pro which has Recording and Multi-screen feature on Android version yet nothing on iOS.
Tivimate is not optimized for handheld devices (Cons)
If you would like to stream IPTV on your phone or tablet, I’m afraid you should use this app wisely. As per Tivimate developers confirmation, this product may not work properly on handheld devices.
However, I have tested this app on my android tablet and I can confirm it worked without any issues. Sometimes some functions may stumble into problems, like when you are trying to see the seasons of a series which requires scrolling down with a downward action button. But other than that all runs fine.
Original website and authenticity of Tivimate installation file

Yeah, so Tivimate was not always available at their official website. People used to be asking questions like “what is the official website of Tivimate IPTV Player?”. It was available on Google Play store and some dodgy APK files available online. This also opened an opportunity for those scammers to run fake websites and exploit the situation, as well as putting some infected APK files on the web.

In 2024, Tivimate developers decided to launch their official website and put an end to this madness. The screenshot above is from Web Way Back Machine service, confirming when this website appeared on the web.
We’ll now continue with the installation on the available devices.
Installing Tivimate on Amazon Fire Stick / Cube
Sadly, Tivimate is not available on Amazon App store, hence we are going to side-load it.
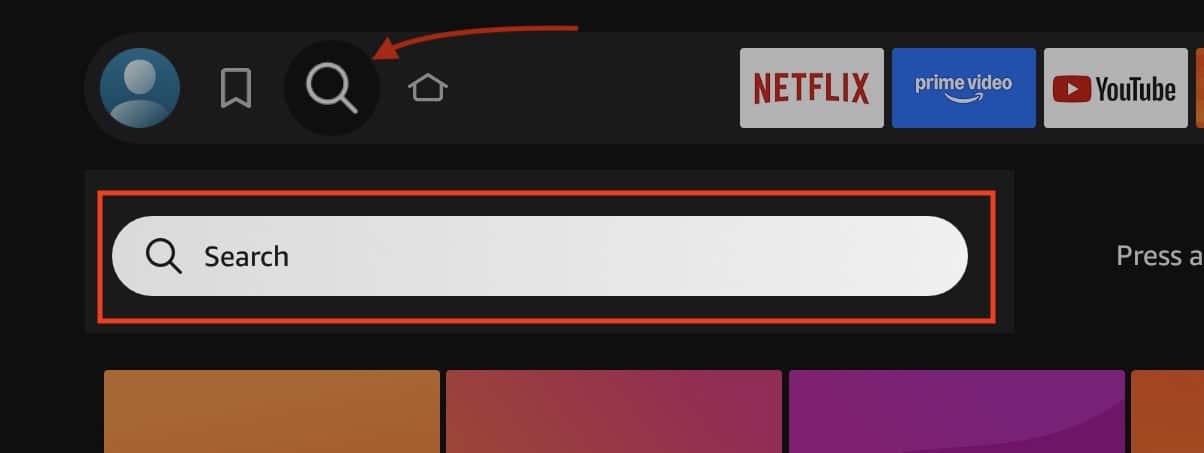
1- From the Dashboard of your Fire TV Stick / Cube move over to the Magnifier icon, then click the downward arrow on the remote to highlight the search field.
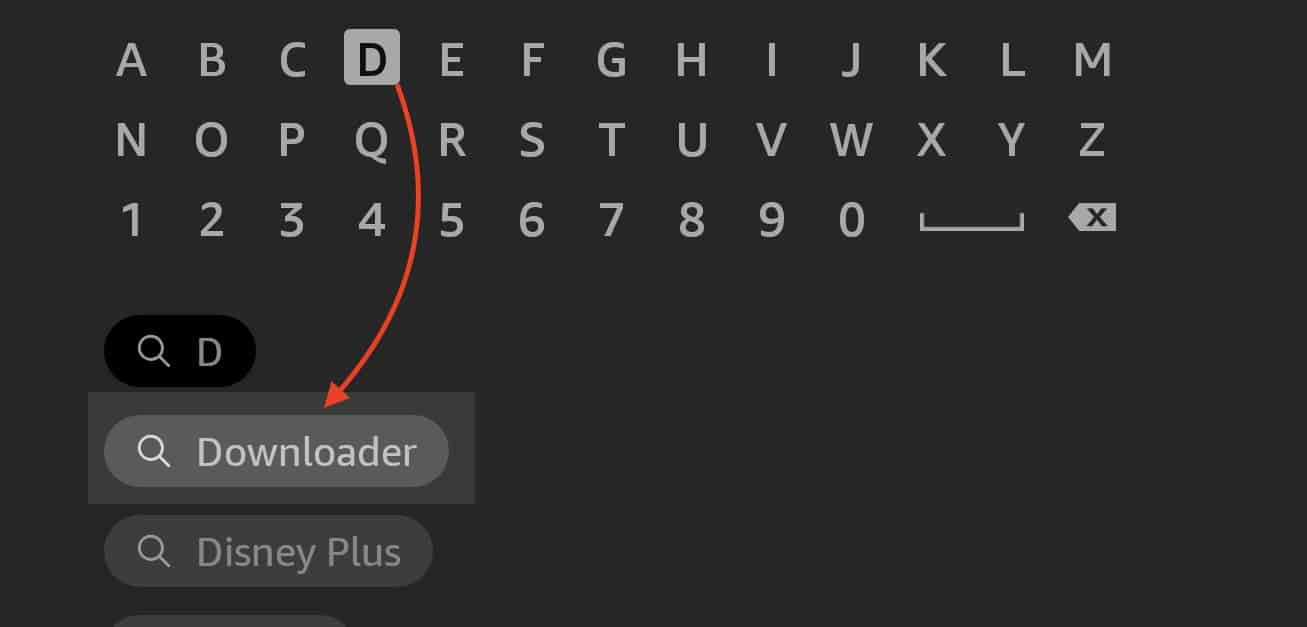
2- Once the virtual keyboard appears, click the letter D. You should immediately see that Downloader is the first suggestion, you can imaging how many people have done that already 🙂 Click it.
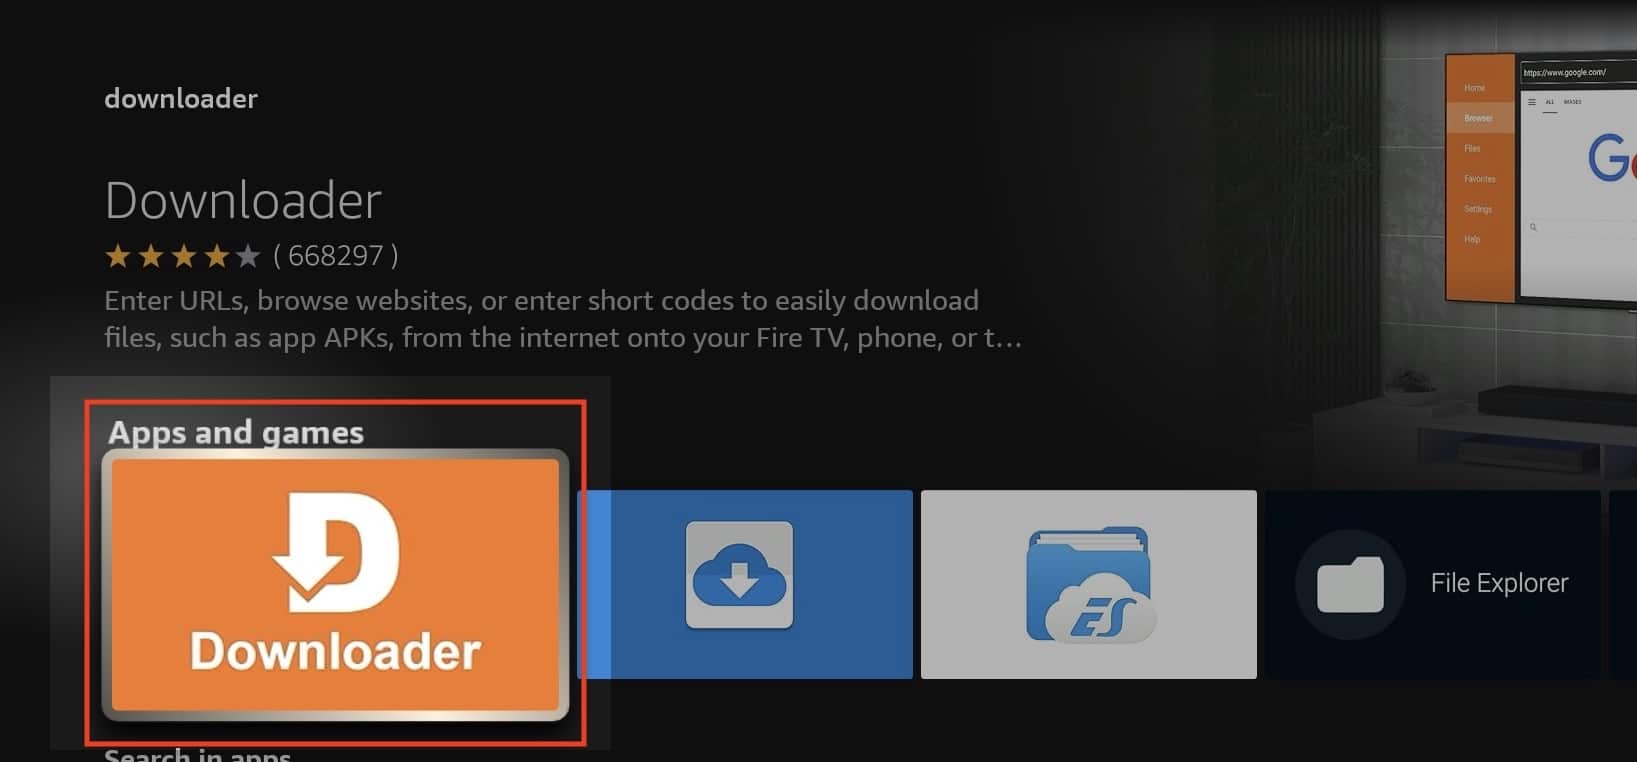
3- Once the app appears, click on it to initiate the installation.
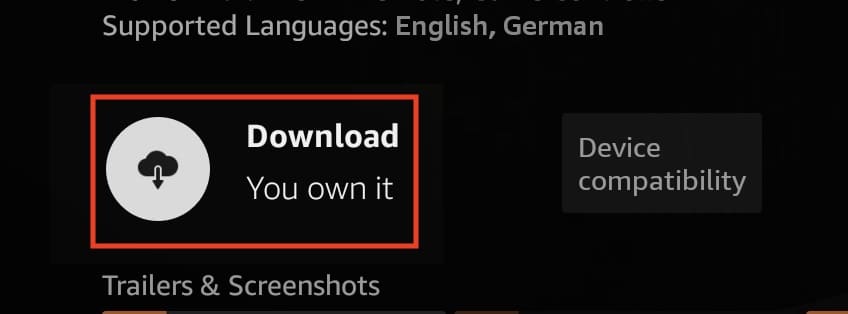
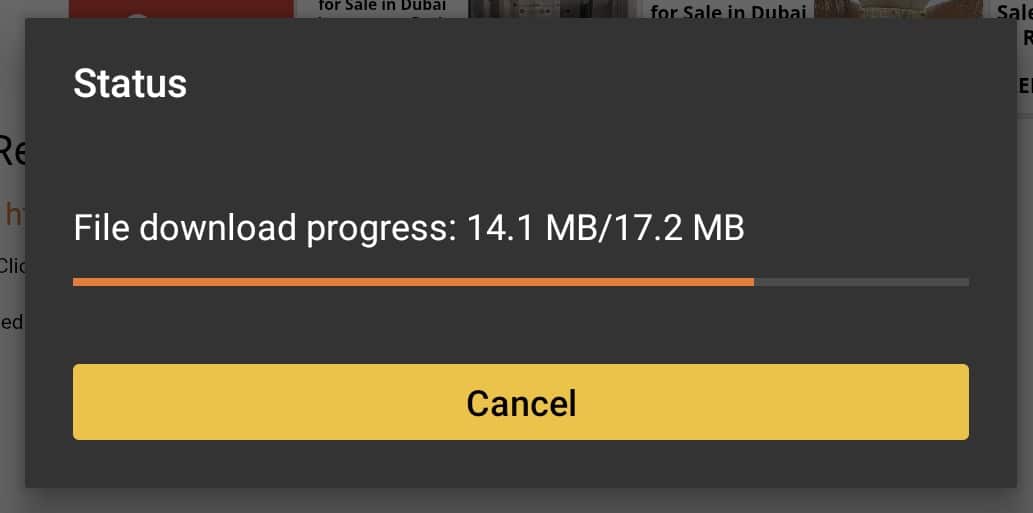
4- Press the Download button and proceed with the installation. Wait a few seconds until the process finishes.

5- Downloader needs to have access to your media and files to be able to get and install apps on your Amazon device. Click Allow to grant it the permission.
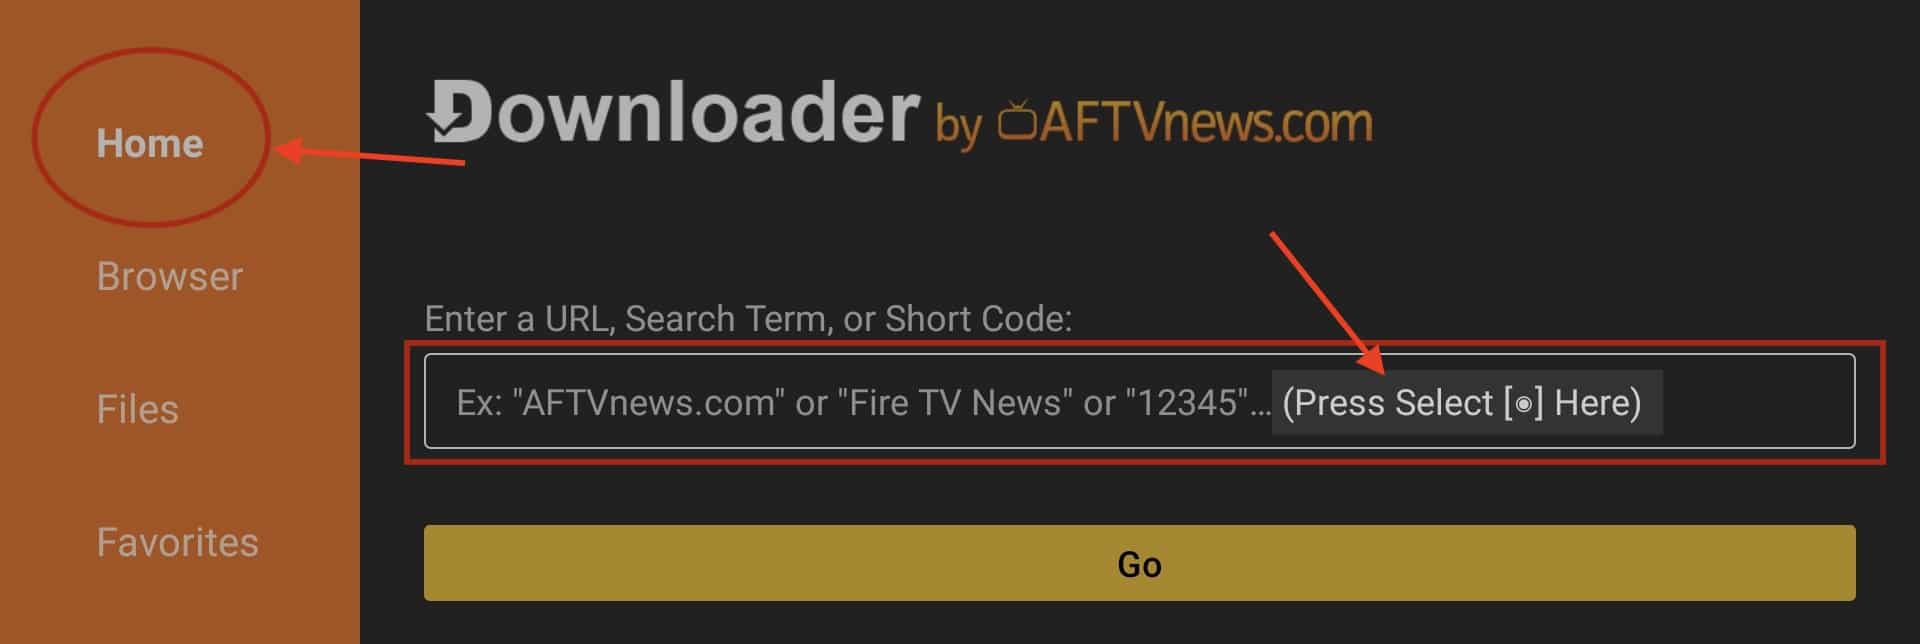
6- It is ready. I’d like to point out something: I hear many users having issues when they try to install an app using this software. Please note that from left column, you must be on HOME, so that the above shown function is available.
Now please click the upward button on the remote to move the pointer focus on the search field and click the Center button (enter).
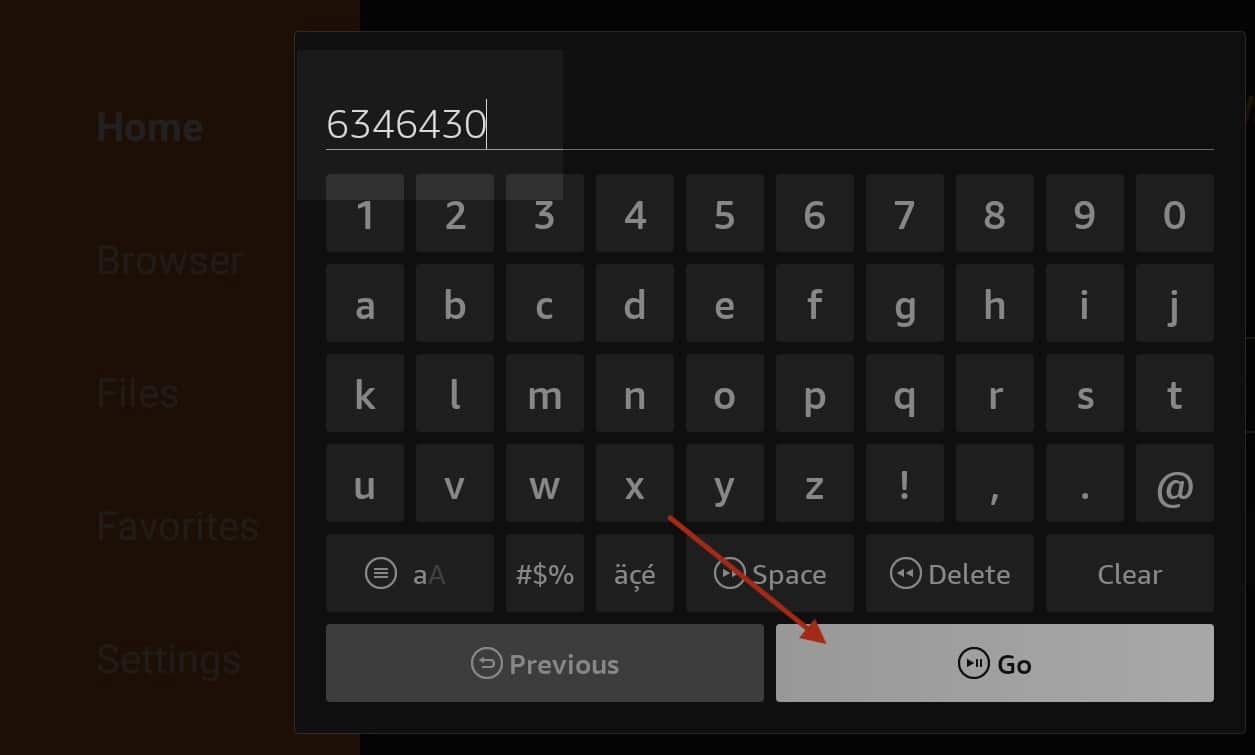
7- Here, we need to input either a url or the code for the Tivmate to download and install.
You can use our application Download Center where we provide you with the official codes and APK files for all the IPTV related applications.
Our Downloader code for the official Tivimate IPTV player application is 6346430. Type that in and click Go.
8- Don’t touch anything while the installation is underway.
Allowing installation on Amazon Device
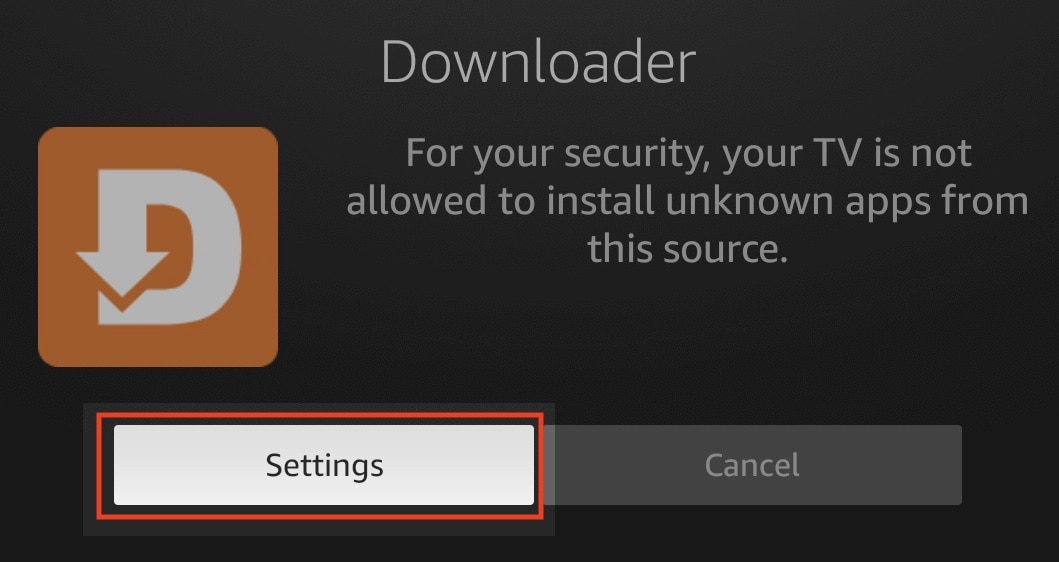
9- Logically, amazon devices do not allow installation of apps outside their App store. This is a protection measure. However, you can allow access for certain files if you are sure of their safety and authenticity.
Click Settings.
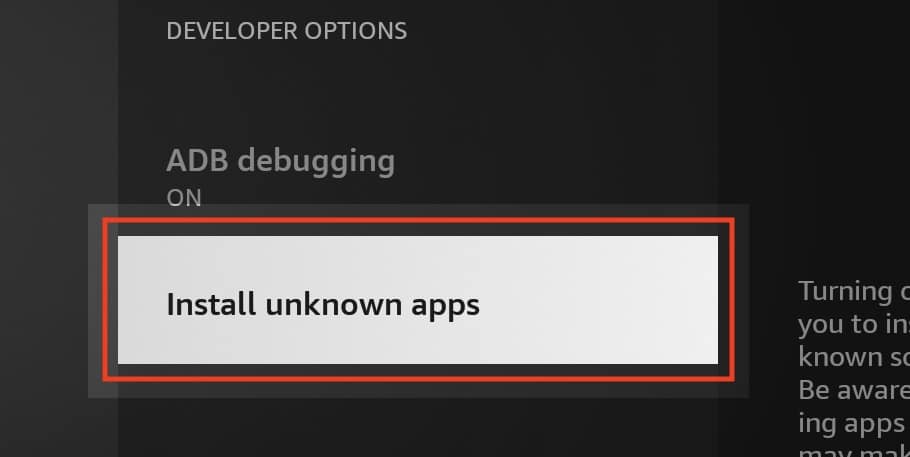
10- After clicking Settings, Developer Options section opens. Click Install Unknown Apps.
Note: If you are not seeing this section and instead My Fire TV section pops up, move on About to highlight it and click the OK button 7 times so Developer Options appears. Read here about how to fix developer options hidden on Amazon devices.
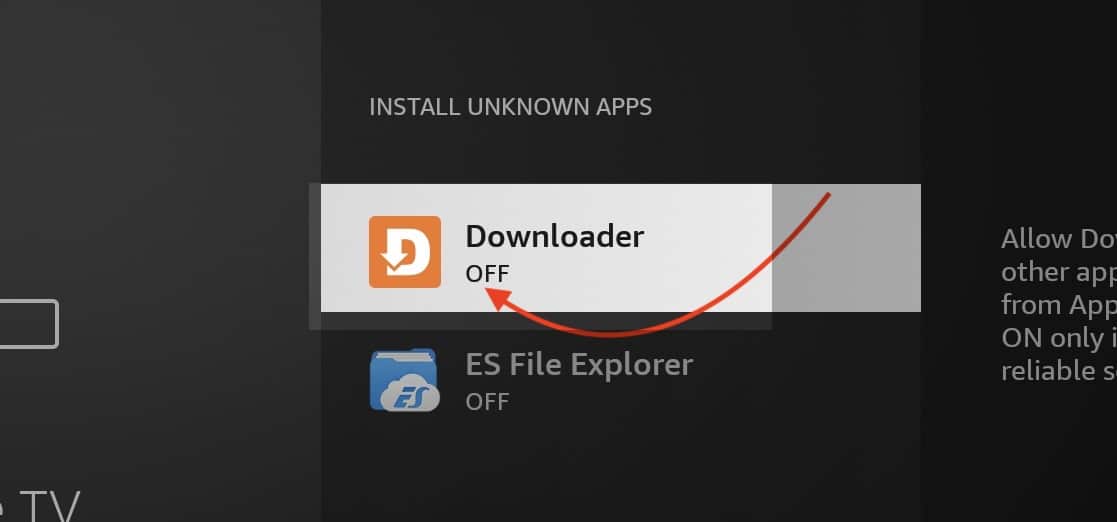
11- While selection is on Downloader in the list, click on it once so the OFF changes to ON.
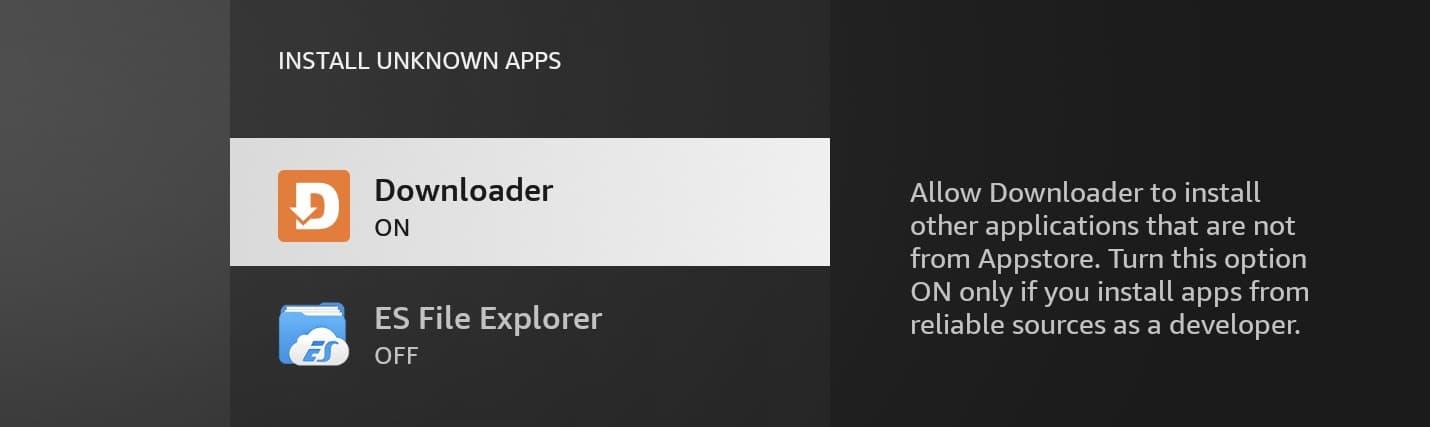
12- That’s how we want it to look. Now, click the back button on your remote twice to go back to the installation process of Tivimate IPTV player.
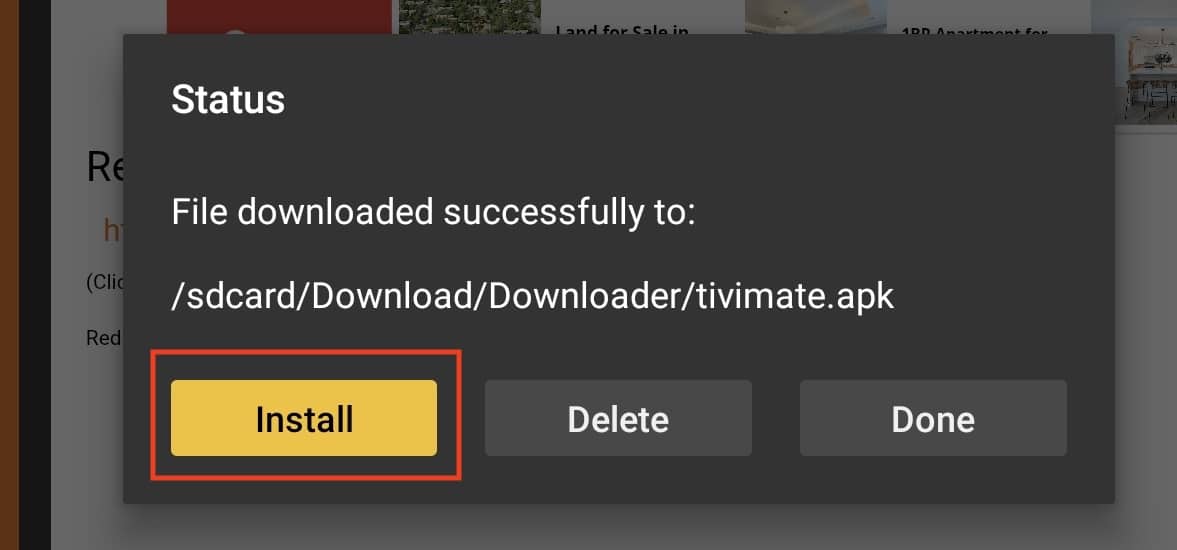
13- You can now see that the installation is available. Click Install to proceed.

14- From bottom right, Click the Install button. Make sure to click down and right so the selection highlight is on Install.

15- Please be patient while Tivimate IPTV player is installing.

16- Application is ready, click Open.
17- App is up and ready. Later in this tutorial, I will cover the different methods of adding an IPTV playlist on it.
Installation of Tivimate on Android Tablet and Mobile
By handheld, I mean Phone and tablet. However it is advised to use tablets rather than smart phones as it is made for Big Screen devices.

1- Open a web browser on your device and download the APK file. You can either use the one on Tivimate IPTV Player official website or use our Download Center.

2- Since the APK file is from outside of Google Play Store, the system will warn you about the authenticity of it, which is fine. Click Download Anyway.

3- Open the file to initiate the installation.
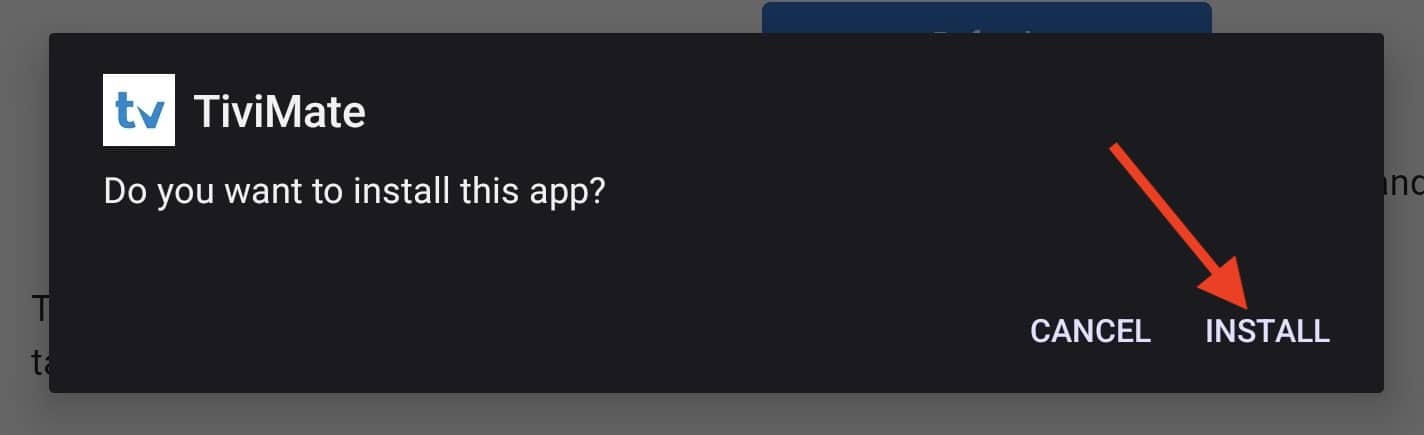
4- Click Install.

5- It has been installed on the tablet successfully, let’s open it.

6- When we installed the app on Fire stick and Android TV, there was no such messages. This shows why Tivimate IPTV player dev team insist on not being optimized for small screen devices. However, it’s not impossible to use the app. We just need to adjust it. Click Settings.

7- Select the application from the list.

8- We are going to allow this app to open on top layer, above all other open apps for better performance. Enable the feature, Then click the back icon from the top left side twice so you are back to the application interface. Later in Picture-in-Picture mode you will understand why we did this.

9- And that’s the notice we spoke about. Click Use Anyway.

10- App is ready for use.
How to Purchase and Activate Tivimate Premium License?
I never get tired of saying this: if you’re looking the beast mode, go with Tivimate Premium! This application has so much good features inside. The paid license is €33 euros (£29.99 and $33.99) with taxes if applicable. The price is also very much affordable and one license can be used on up to 5 devices.
No need for Companion app anymore
It used to be like you should have an android device, install Tivimate Companion on it, to activate the premium license. But now, thanks to the official website, you dont need any 3rd-party method to purchase the license.
Features of Tivimate Premium
You might be thinking what do I get with this paid subscription. Well the answer is pretty lucrative.
- Support for multiple playlists: You can add multiple IPTV accounts to Tivimate premium
- Favorites Management: Live TV and VOD content can be added in your the Favorite list
- Catch-Up: Also known as TV Playbacks or TV Archive – if offered by your IPTV provider of choice.
- Customizable EPG Update Intervals: You can set how often your Electronic Program Guide data is refreshed.
- Customizable Panels Transparency and Timeout: Tivimate premium pages have a transparency theme which can be adjusted.
- Manual Channels Sorting: You can sort channels Alphabetically, vice-versa or manually.
- Turning on last channel on App Start: When you start Tivimate IPTV player, it can resume playing the last TV channel you had on.
- Auto Frame Rate: It’s such a cool feature, automatically tries to smoothen the playback on the channels by balancing the FPS.
… Are only some of the things you get with the paid version.
Step by step guide on purchasing the premium Tivimate license
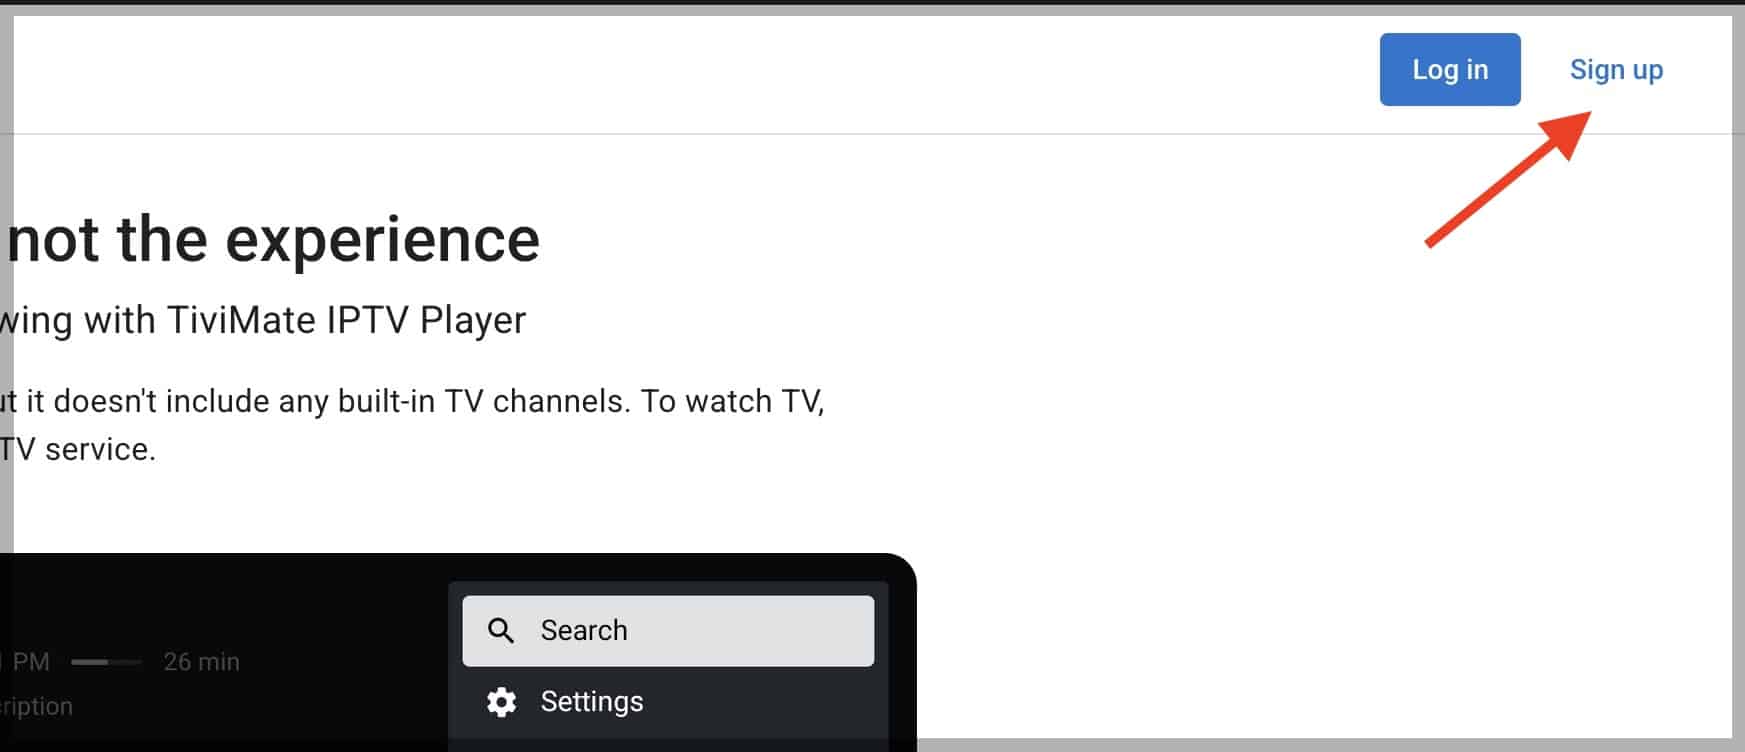
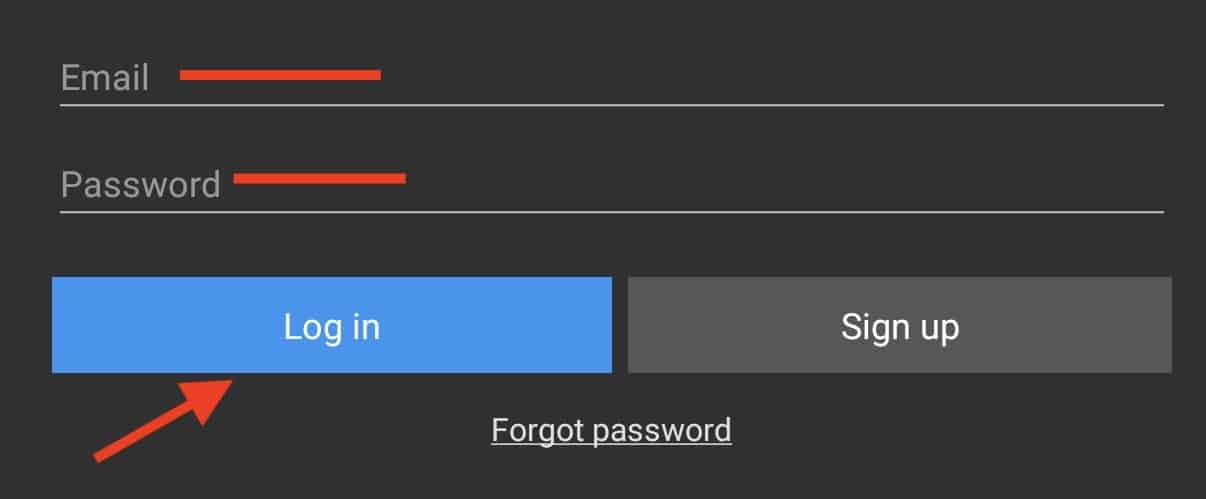
1- open Tivimate official website and from the top right side, click Sign-up.
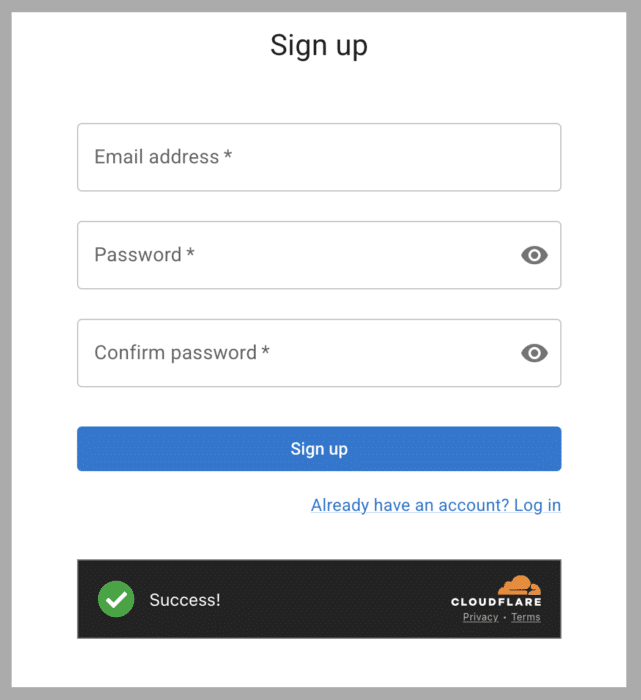
2- On the sign up page, put in your email address and a password. This is going to be your Tivimate premium account where you purchase the premium license and manage them.

3- Immediately after the sign up, you will be logged in and redirected to the dashboard. The left column has Device section selected so in the middle of screen you should see that there are no devices listed yet.
Click Subscription from the left column.

4- There is no such thing as a price list. It’s just one plan available which is “Lifetime for 5 devices”. Click Continue.

5- Confirm the disclaimer by clicking the Continue button.

6- The payment gateway should appear. It’s a Stripe gateway so you can pay the invoice using your Credit Card.

7- Immediately after a successful payment, you will be redirected back to the portal dashboard. You should notice a message in the middle of the screen saying “You have the lifetime subscription”.
Activating the license on the app
8- Go back to the Tivimate premium app, click Settings.
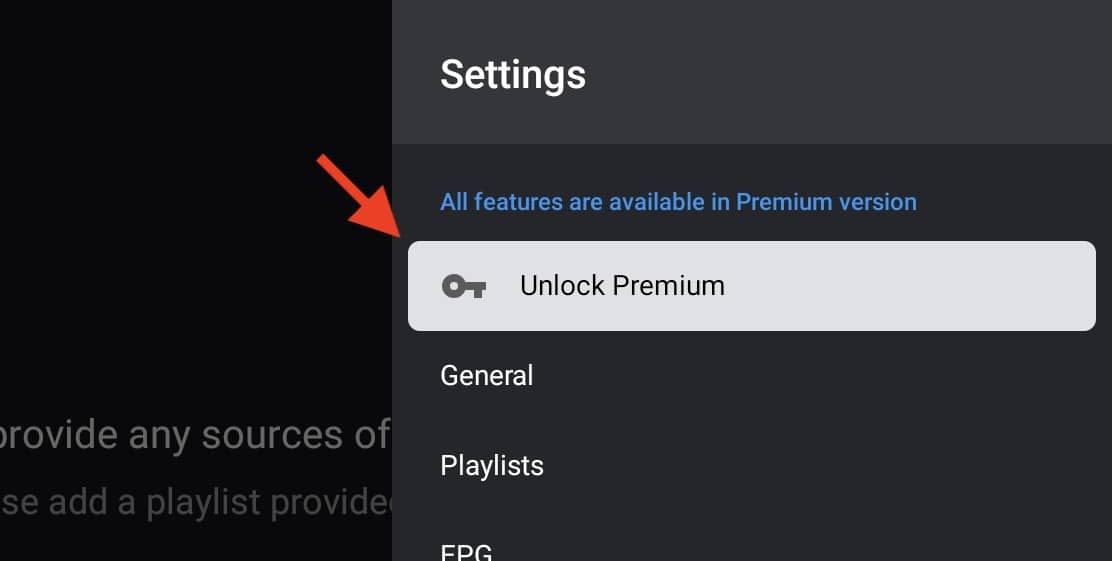
9- Click Unlock Premium.
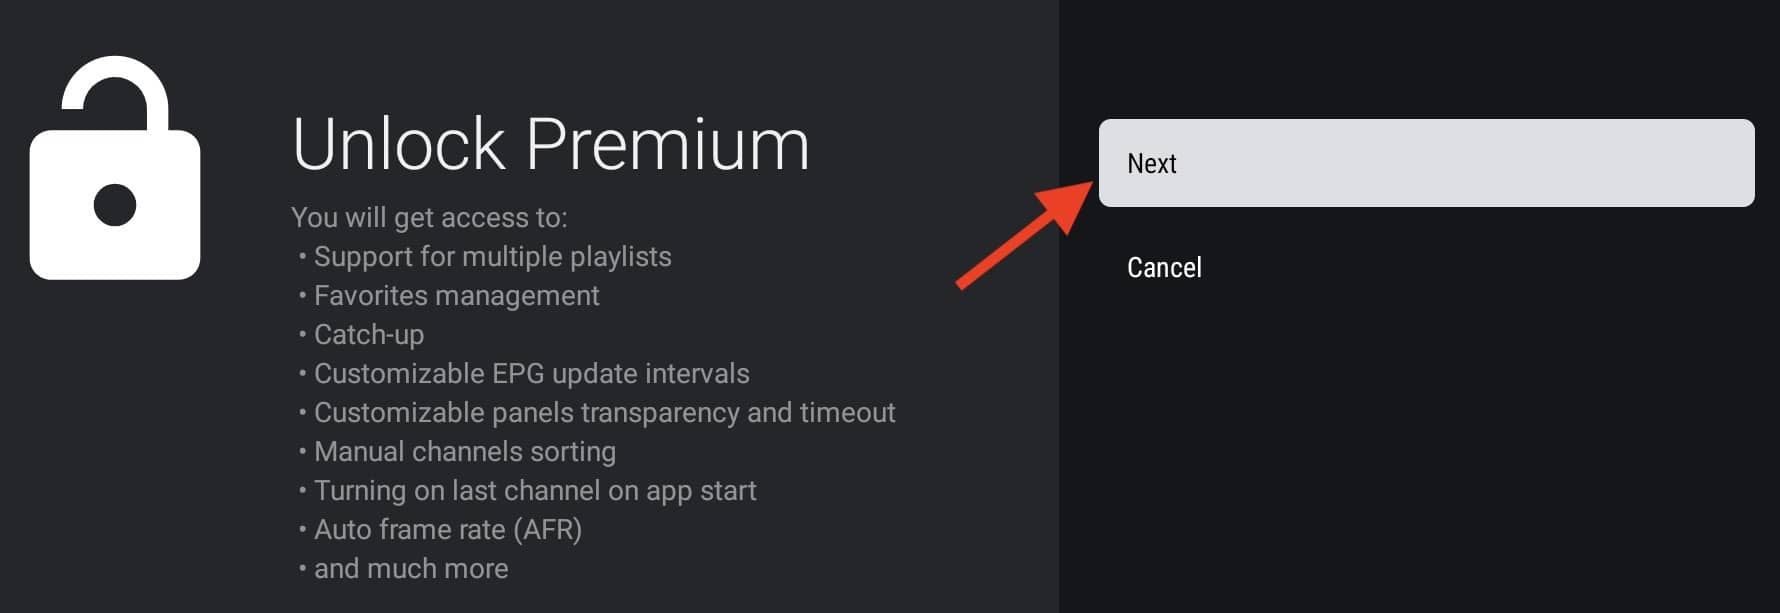
10- Click Next to proceed.
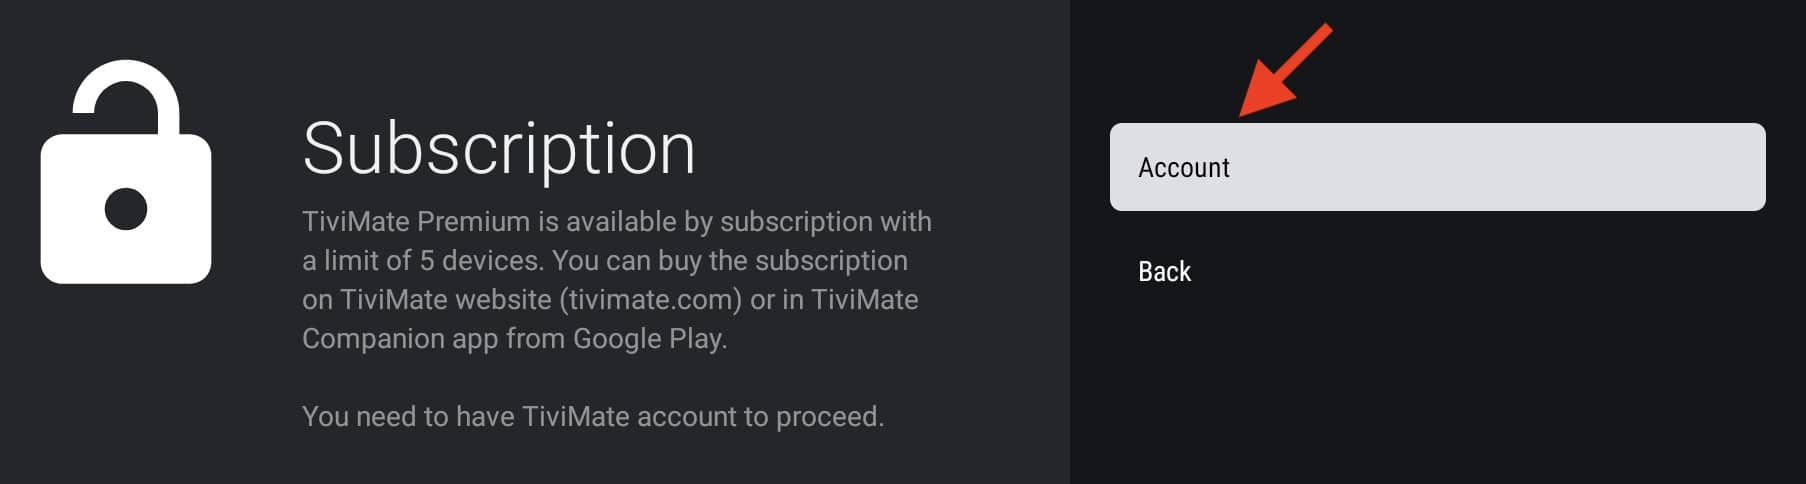
11- Choose Account.
12- Put it the email address and the password of the Tivimate premium account we created earlier and has a paid lifetime subscription on it.

13- On the left, you can see that subscription is logged in, showing your email address. Click Next.
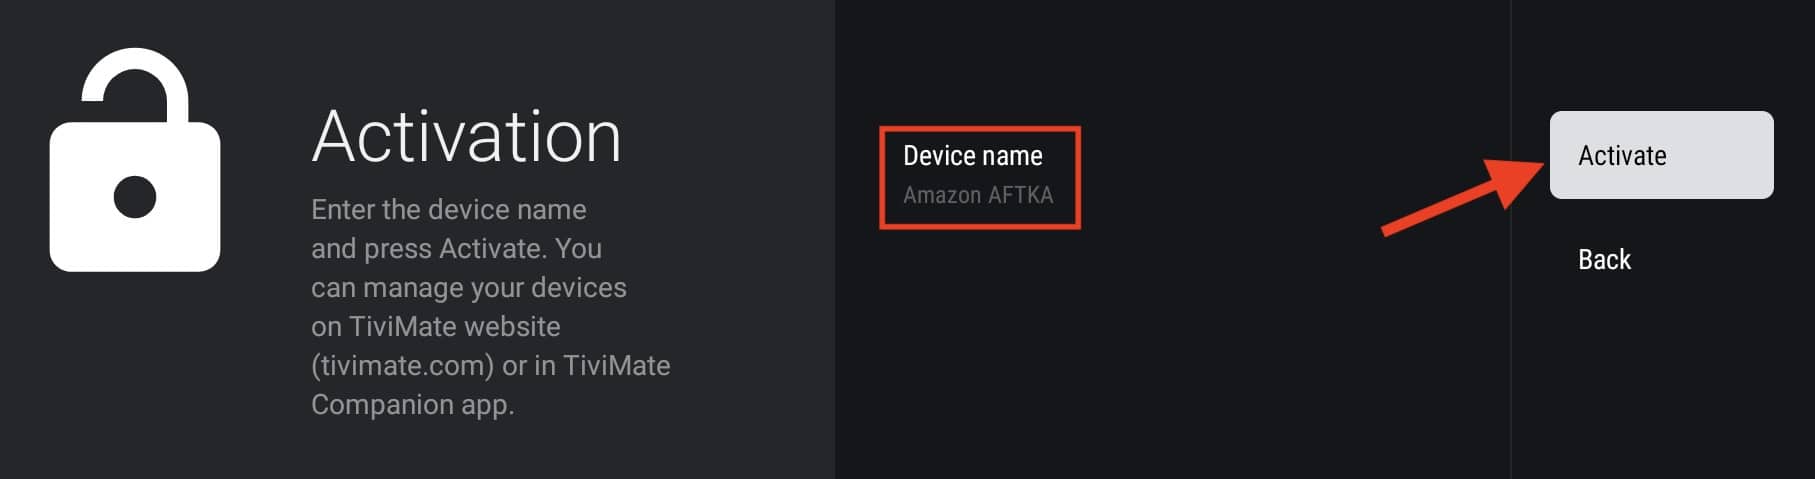
14- Middle of the screen, as shown with the red box, the hardware we are on is validated as an Amazon Fires Stick and has a name assigned to it, you can hover on it and change the name. Doing so will help you understand which device is using this license when you activate more than one app. Click Activate.

15- Tivimate Premium license has been activated successfully. Click OK.
16- As you can see, that Unlock Premium notice is now gone. Your Tivimate is now fully premium and all features are enabled.
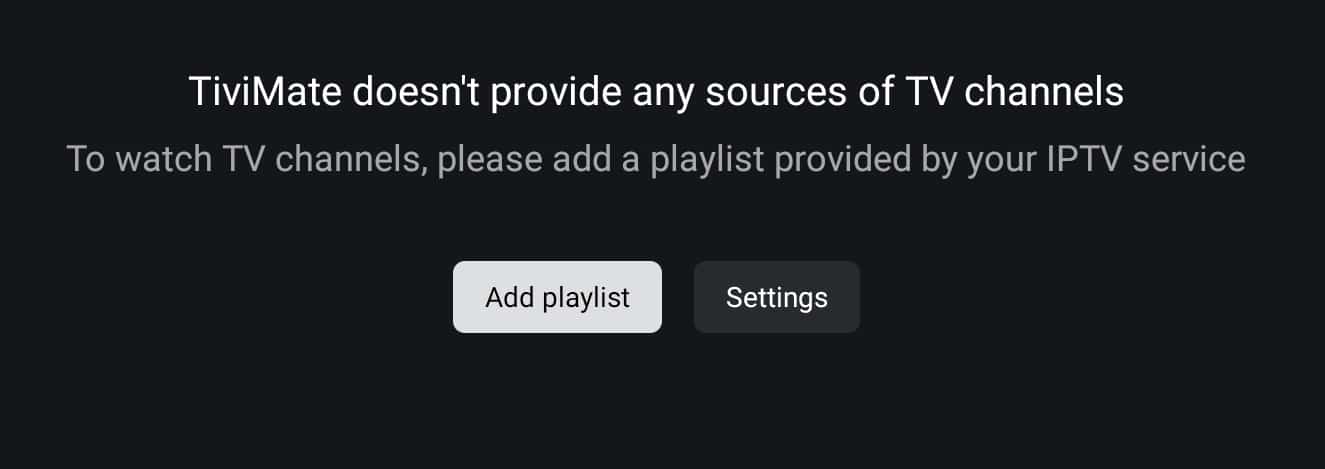
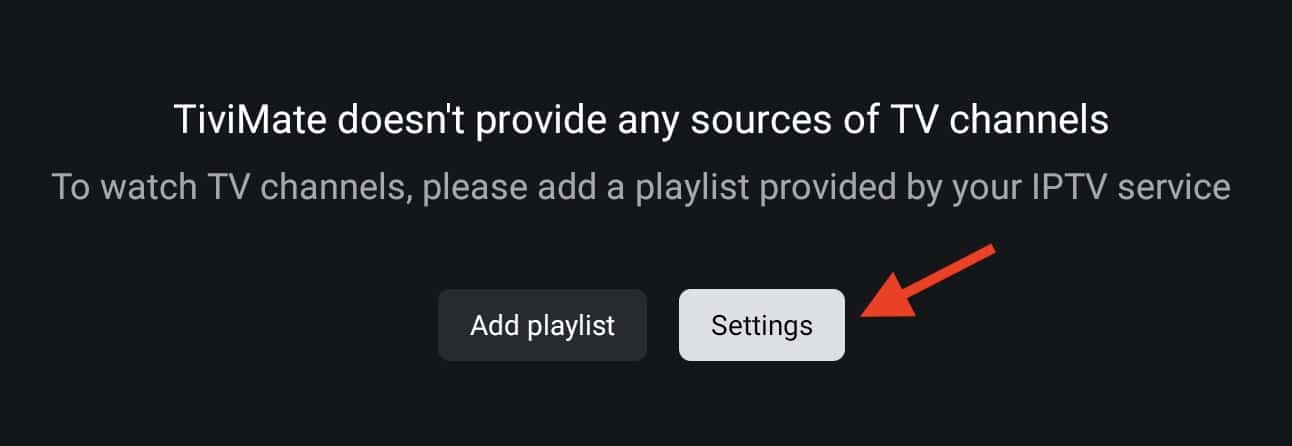
How to add a playlist on Tivimate?
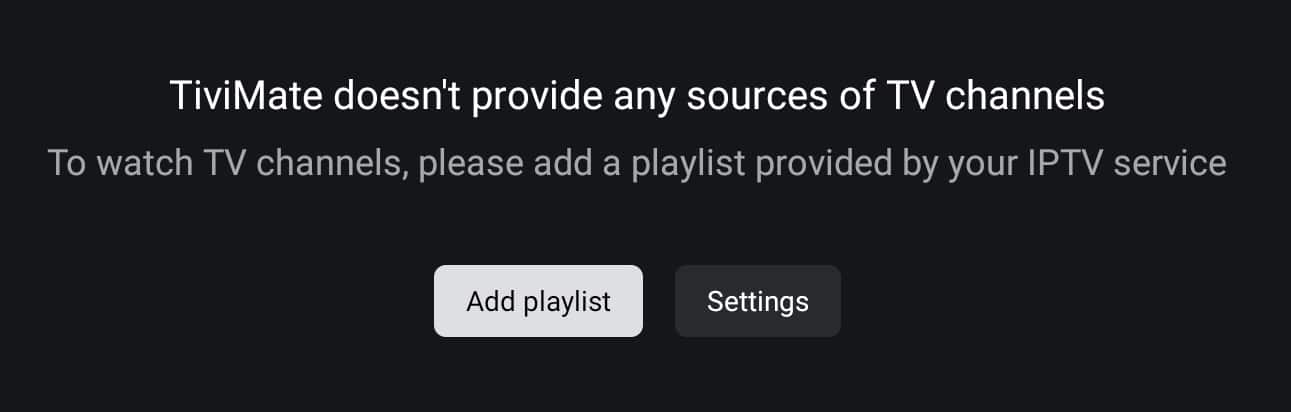
The next step would be adding an IPTV playlist to the app. There are 3 ways you can do this.
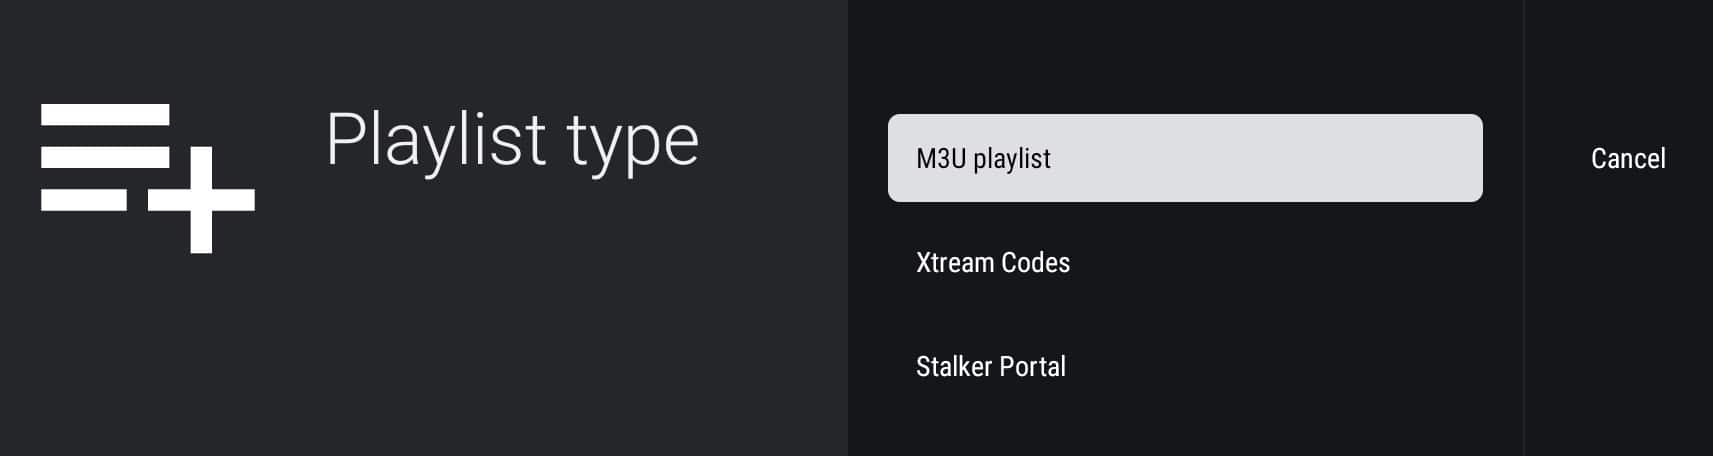
M3U Playlist
If you have a M3U streaming line available to you, you can add a playlist to Tivimate using the full string. It’s not the most ideal way but some might prefer that in a specific situation.
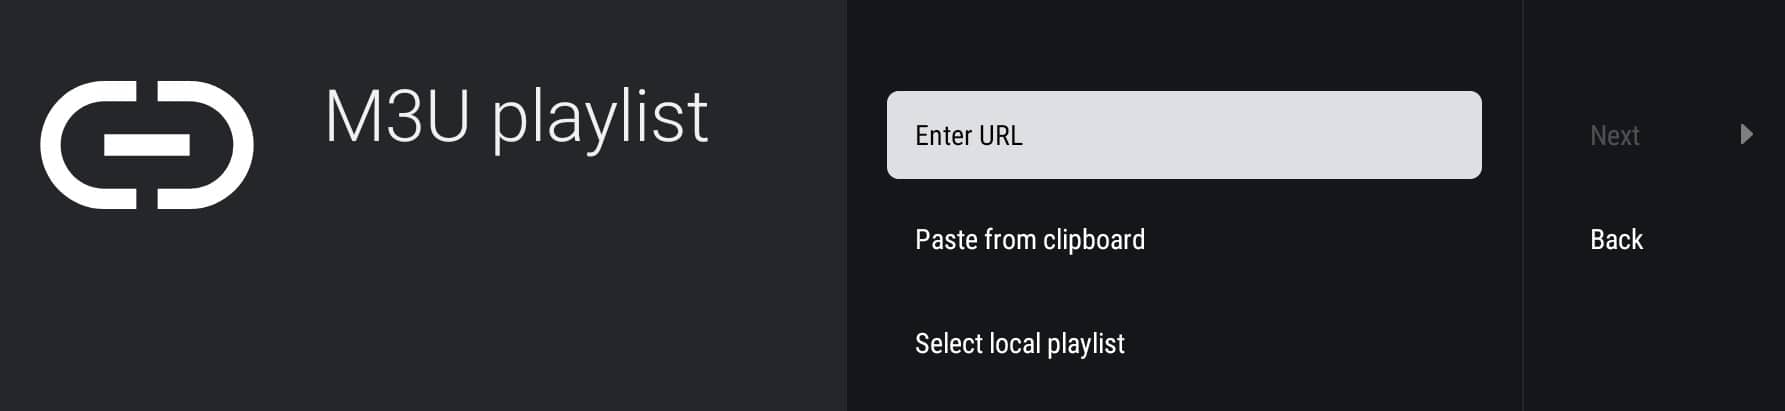
You can use the first option and enter the URL manually. You can also go with the 2nd Option and Paste From Clipboard which basically means you have copied the link from somewhere else and by clicking this section it gets pasted inside the app.
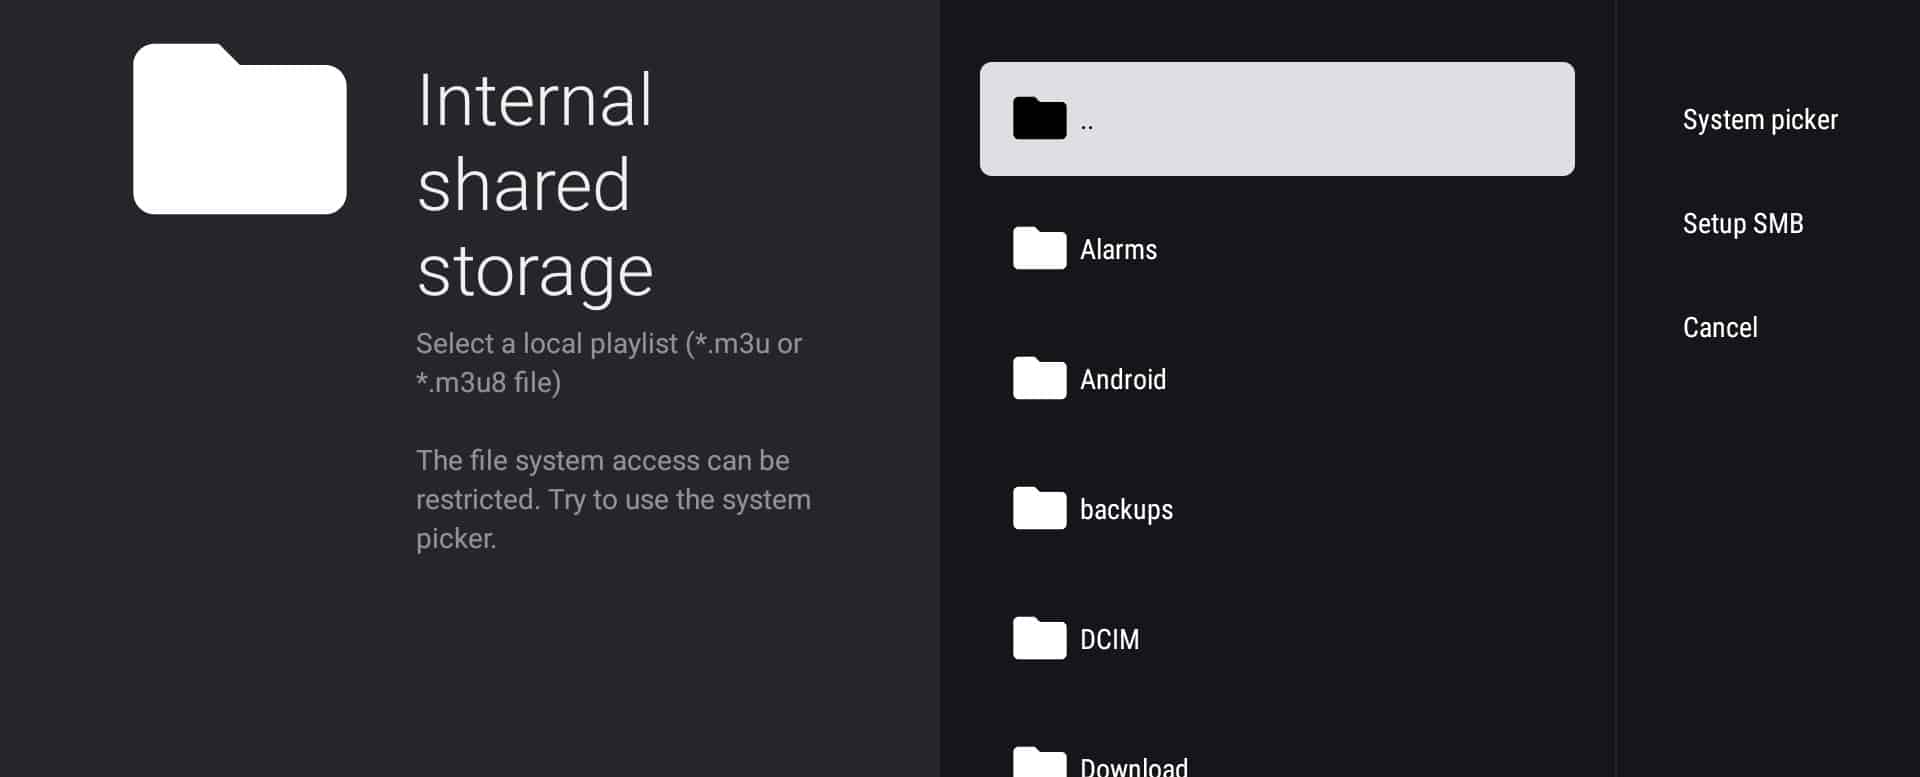
There is another way you can do it as well which is called Select Local Playlist. You need to download the playlist and transfer it into your device, then load it manually by browsing to that playlist file. Do note that the format must be .m3u or .m3u8 .
Xtream Codes
Here it comes, the most common and the easiest way of adding a playlist into any IPTV application, including Tivimate.
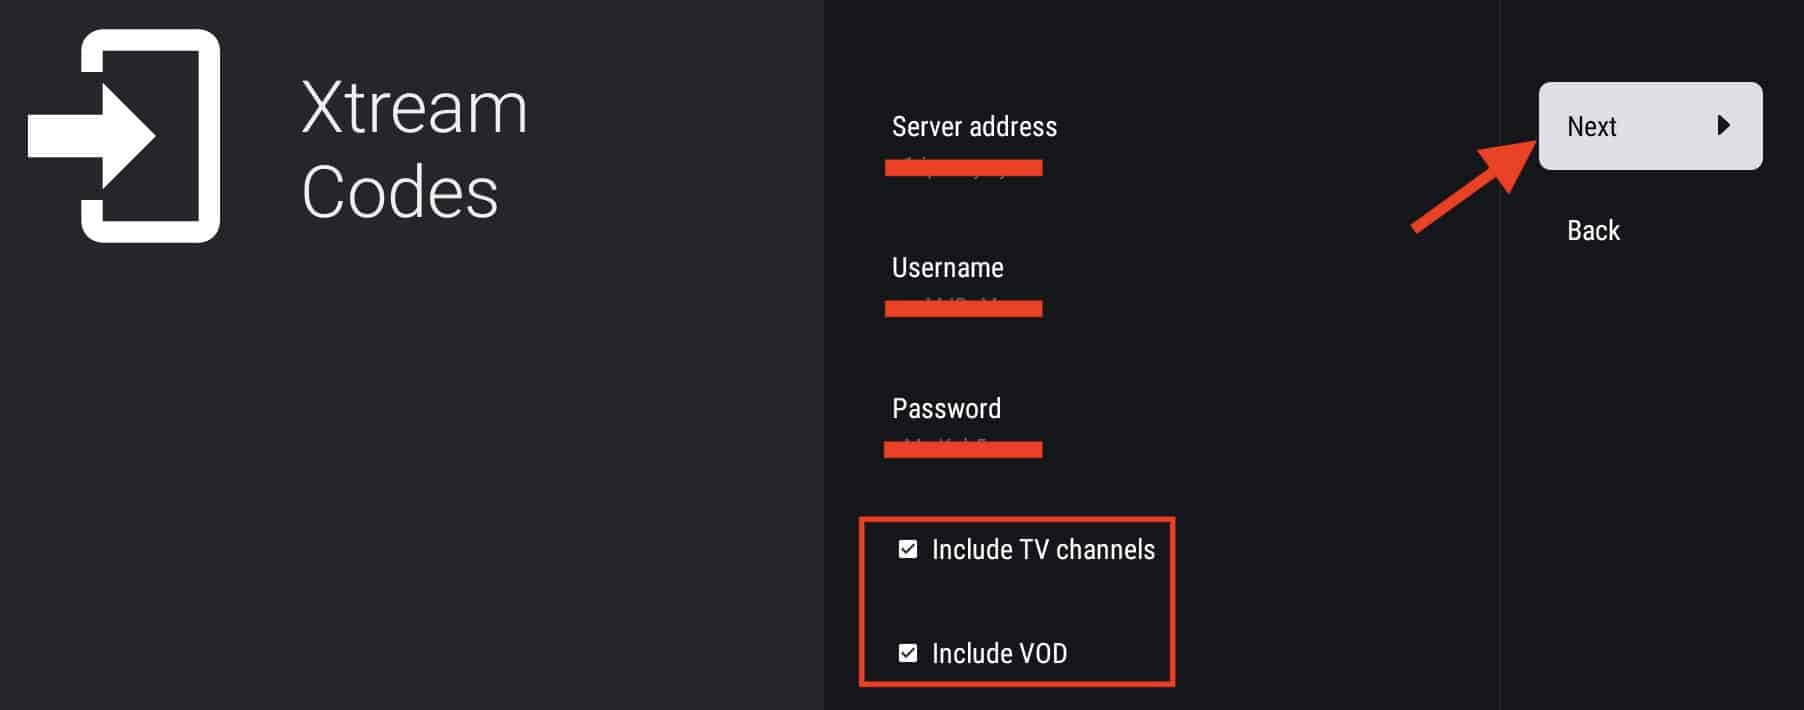
1- After clicking on the method, the above should appear. Now I have already added the details into each field that’s why I have marked them out. If you are unsure how to fill-in this section, simply read the guide I wrote on Xtream Codes API Login and then come back here.
One thing to note is making sure that the two check boxes at the bottom are ticked. It will ensure importing all the content from that playlist into the Tivimate player. Click Next to proceed to the next step.
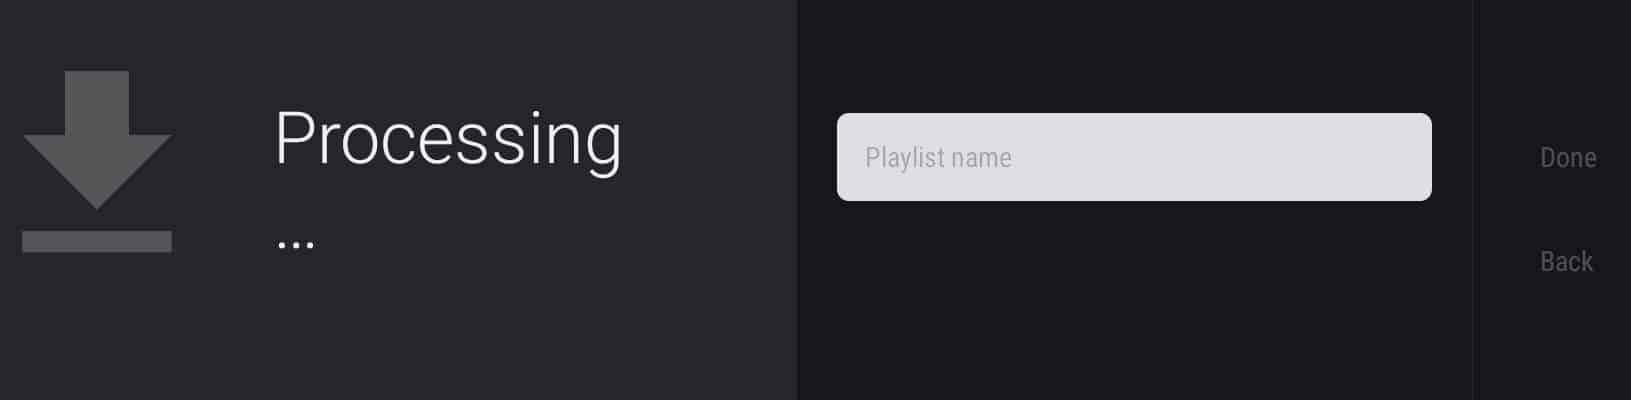
2- All you need to do in this step is wait. The playlist data is being pulled from your IPTV provider server(s) and fetched into Tivimate.
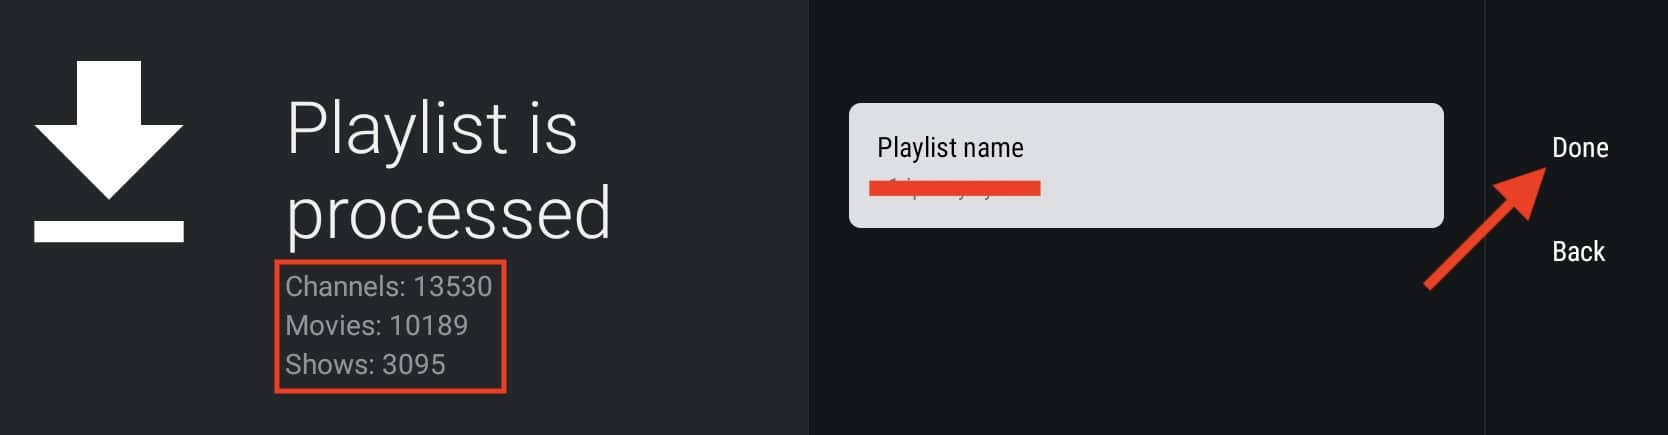
3- All data is properly verified and prepared for fetching into the app. In the middle you can click Playlist Name and set your desired title for this list. By default it is named after the server address, no need to worry and you can edit it to what you want. Then click Done.
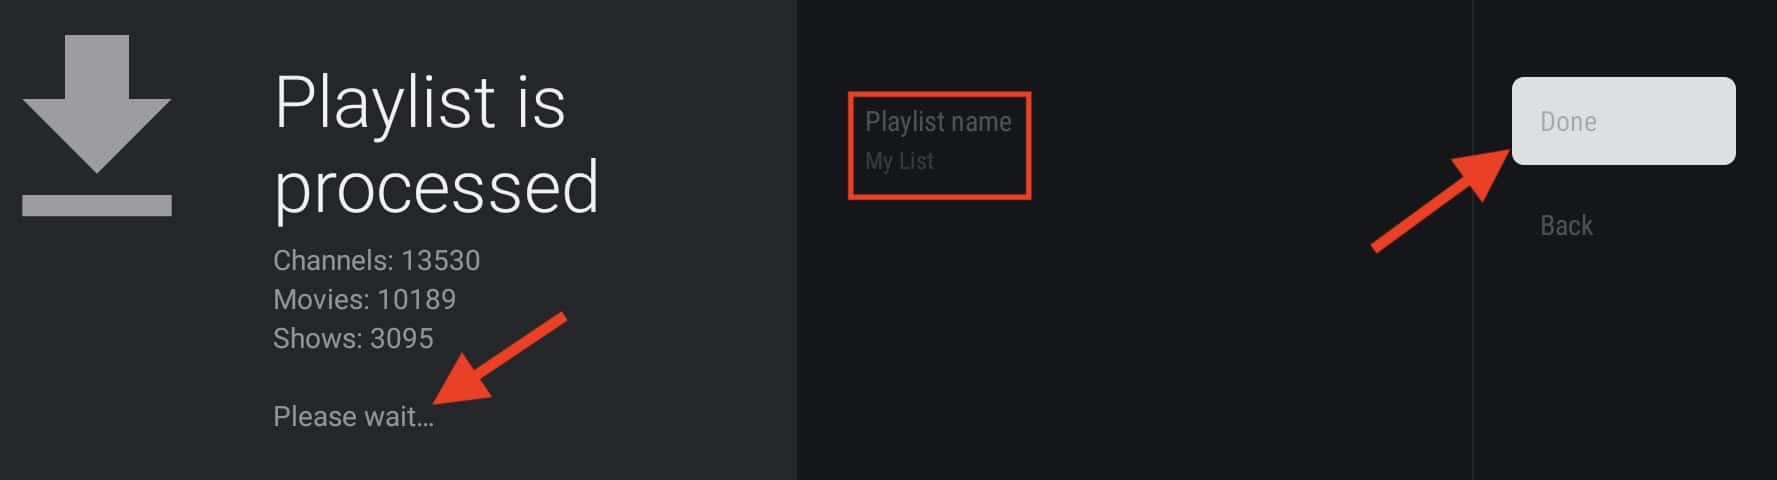
4- Wait a few seconds while Tivimate is fetching everything.

5- This is the first sight that you should see. A channel will start playing with EPG being visible in tables.
I’d like to point out that adding an IPTV playlist for the first time requires a few minutes for Program Guide propagation. Therefore do not be surprised if you can not see the EPG in the first few minutes.
Stalker Portal
Tivimate also has Middleware capabilities, allowing you to add playlist using stalker interface. We are talking about playlist activation like MAG boxes, or Formuler devices. In this method you provide the device MAC address to your IPTV provider and once they activate it, you can use their Stalker Portal url in your app to propagate the playlist.
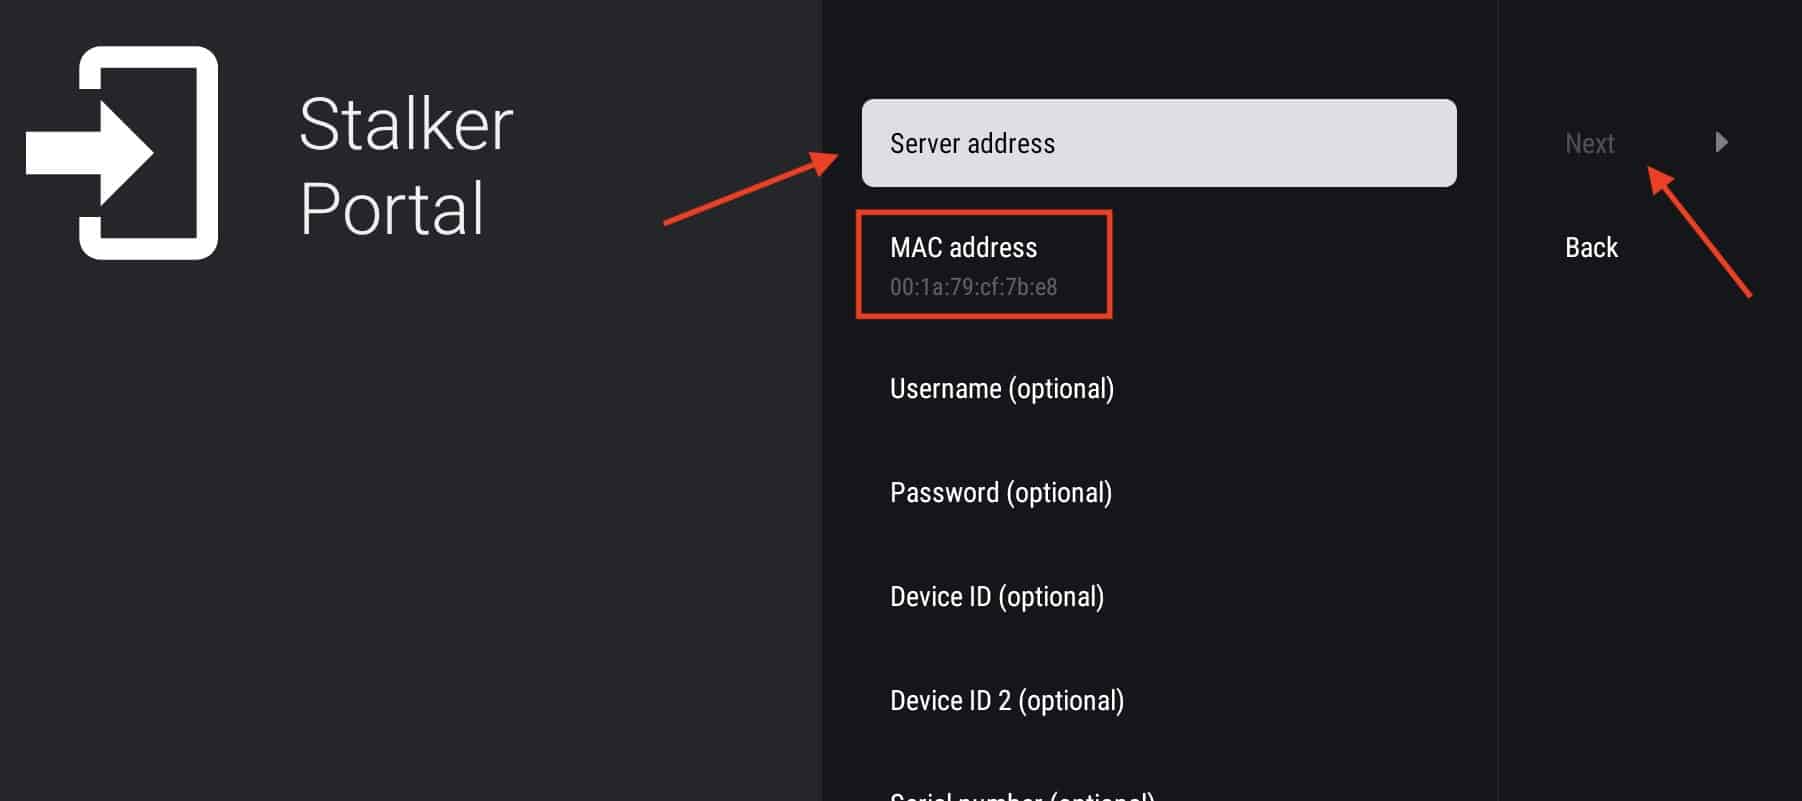
The MAC address is a virtual one, generated by Tivimate. Send that to your IPTV provide for activation. Once they respond with their portal address, place it in the first section. Finally click Next and proceed with the steps.
Overall, Xtream Codes method would be the most ideal as it will definitely work with any provider.
Live TV on Tivimate
TV Channels are available in the Live TV. By default, whenever you open Tivimate, the last channel you were watching before exiting the app should show up and start playing (it can be changed from settings). Click back button on the remote 3 times so you can see something like below.

From the left column, the Live TV is chosen, in the middle column, that’s where we select the desired category. On the right side, the channels inside that category are shown. The small blue play button shows which channel is playing.

Now, if you are on this window and looking to bring up the left column, clicking the left-ward on the remote or back button will help you achieve that.
Customizing Live TV Categories
Tivimate allows you to customize the category folders inside Live TV section. You have the ability of doing various changes to each category. Let’s take a look at this handy feature.

1- When on the Live TV overview page, move over on the desired category, then click and hold the OK/Center button on the remote. On touch devices, touch and hold.
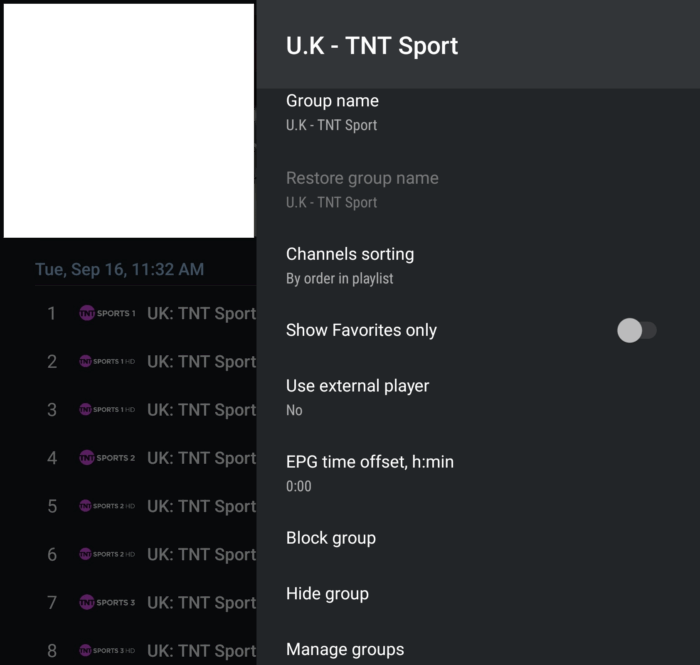
2- This is the Category Options page of the selected folder earlier, name of that folder is showing at the top. Now lets see what we can do to it.
- Group Name: This is the name of the category, you can click and edit that.
- Restore Group Name: If you edit the name and later want to revert, this section will help you do that.
- Channel Sorting: Does what the name says, it’s about channels inside this category. There are various options like Order in Playlist, Name, Date added (when the provider added the channel) and Watch Time which is basically how long you have watched this channel.
- Show Favorites Only: By enabling this, only the favorite channels inside this category will show in the main list. Good way of getting ride of the channels you don’t watch often.
- Use External Player: This will allow you to load channels with a different media player engine. We will later cover this subject.
- EPG Time Offset: If you find the Program Guide a bit behind or ahead of the your time zone, here you can adjust it.
- Block Group: If that group contains private channels, or for some reason you want to block it, use this section and put a 4-digit pin number on the category.
- Hide Group: You can ignore the group from showing on your listing, easily reversible.
Manage Groups
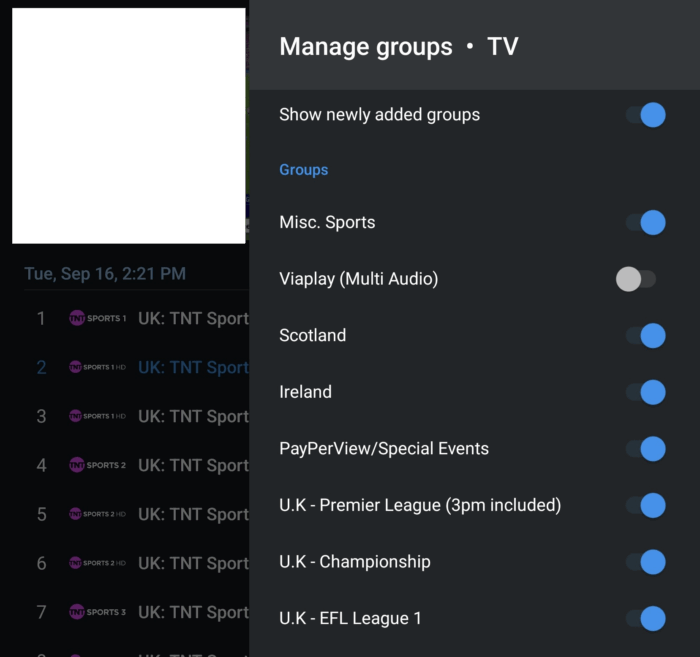
From the previous section there was a Manage Groups section which I wanted to explain separately as it has a great thing about it. Imagine you want to exclude certain categories from your Live TV listing, here is the section for you. Simple click the toggle next to each folder and they wont show anymore.
The thing is, sometimes you want to exclude certain categories from your TV section and not all providers are able to provide such deep bouquet customization. Tivimate allows you to do this locally.
Settings of a live TV channel (long press a channel)

1- From the channel list overview page, click and hold on a channel you want to see extra options for.
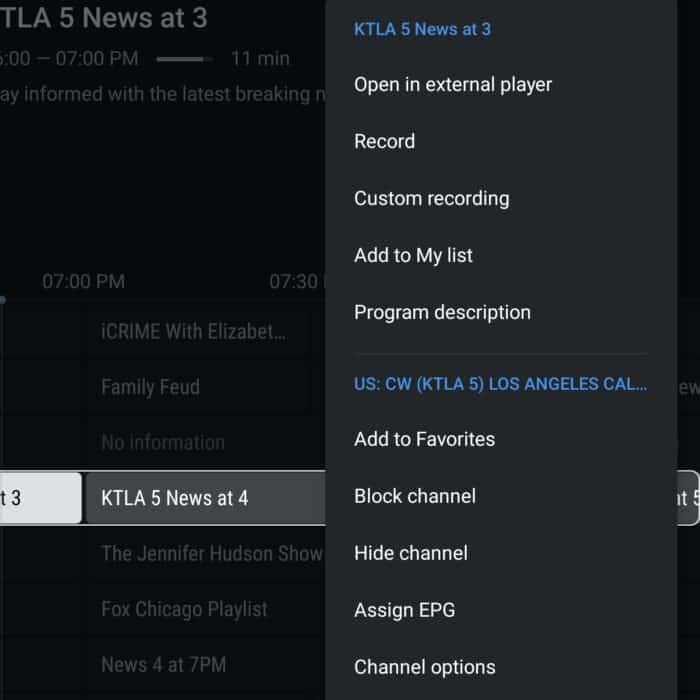
2- The following left column should appear with many options to pick from
- Open In External Player: It’s playing the channel using a different media player engine other than Tivimate. We will cover this soon.
- Record: Immediate recording, will soon explain this in details.
- Custom Recording: You may have seen this in other apps as Scheduled Recording. Nice feature and soon I will explain this thoroughly.
- Add to My List: My List is similar to Favorite but its a more customized list to which you can add Live TV, Movies and even TV Series from the playlist for quicker access. It’s accessible from the left column and we have showed it earlier.
- Program Description: Will show the currently streaming program description – details of EPG
- Add To Favorites: Does what the name says, will soon cover this thoroughly.
- Block Channel: You can set a pin on the channel, prevent access to others who maybe using your playlist on this device. Good for adult channels if your IPTV provider does not set password protection on those channels.
- Hide Channel: You can temporarily remove a channel from showing up on the playlist.
- Assign EPG: If you think the guide on the channel is wrong, or maybe if you know the missing EPG of a channel is the same with another, click this so the full program guide list appears, then you can choose from the loaded list of entries which are pulled from the default source. It could be your IPTV provider or a 3rd-party source if assigned.
- Channel Options: Here you have the possibility of changing the channel name, Change the Audio and Video decoder which basically switches between hardware and software renderers, and so on.
And this is the next part of the block when you scroll down. Most of these options, we have covered them in previous sections, but some of them will be explained soon in details.
Controls while in Full Screen
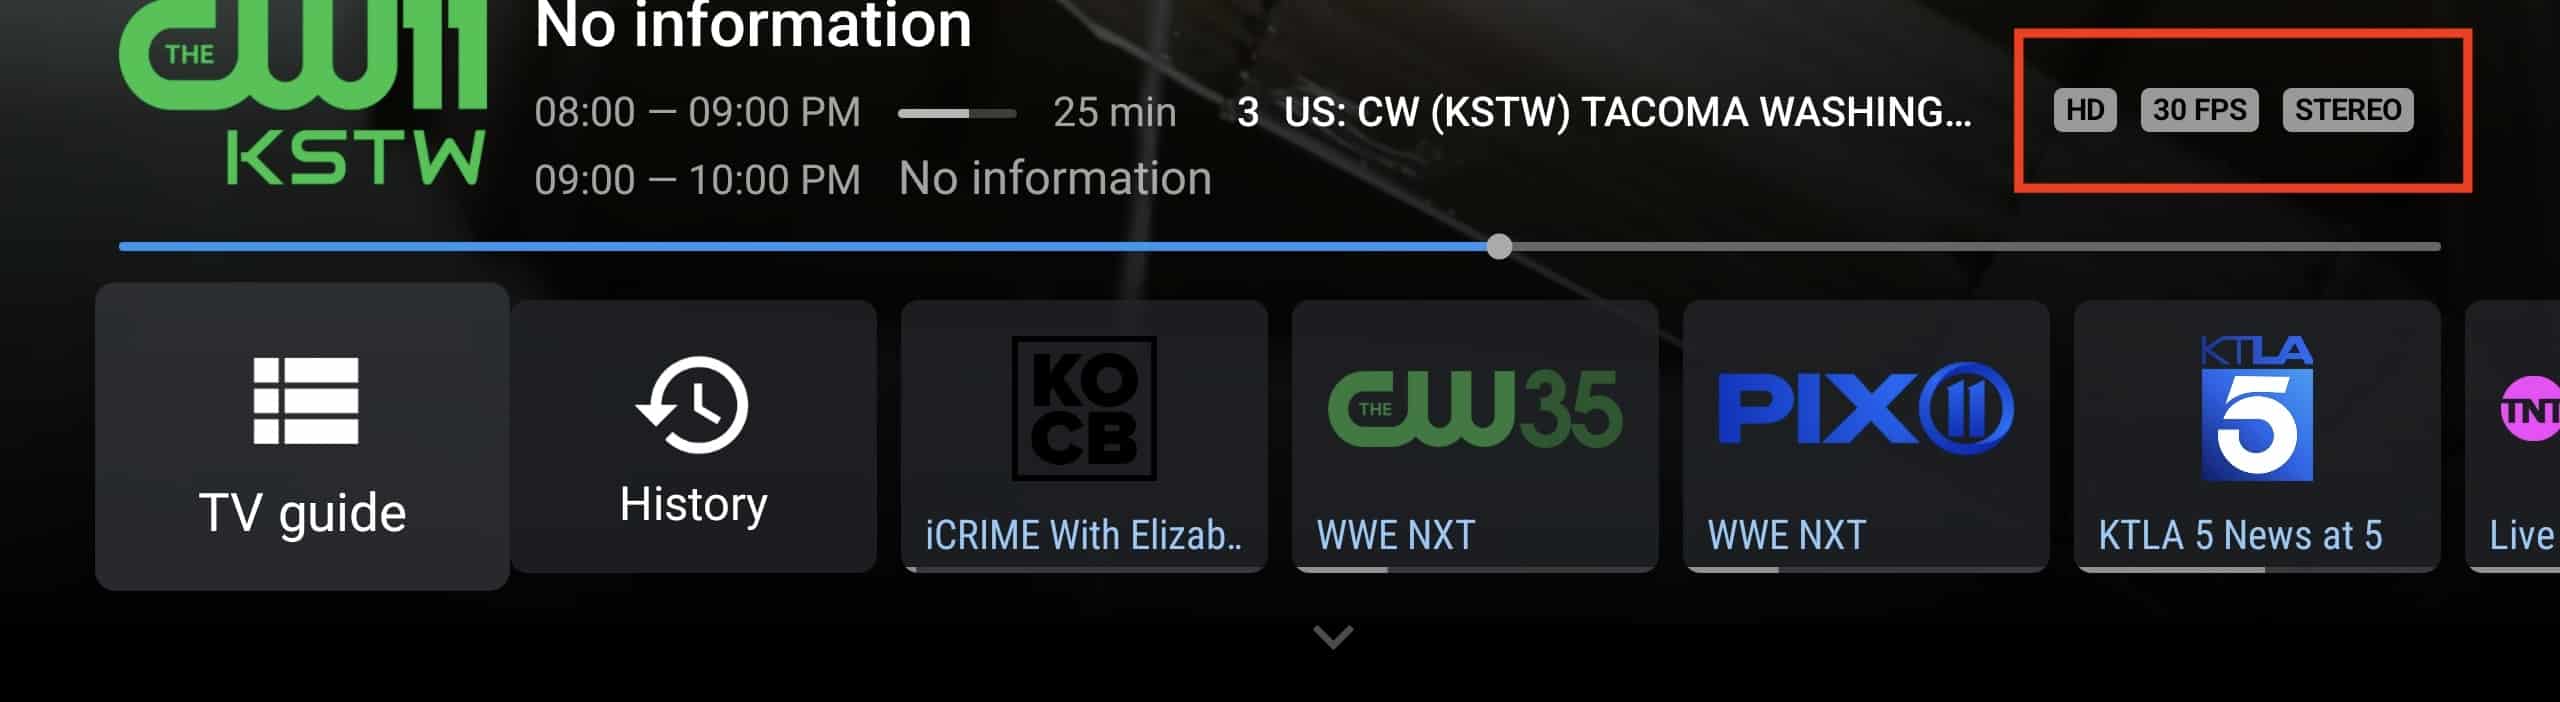
While a TV channel is being played in full screen, click OK button on the remote or just tap the screen if you are on a touch device. The following toolbar should show up from bottom of the screen. It shows the channel name and the icon, program guide details and the duration of the current show, Video quality (HD or SD) and so on.
Below those, You can bring up the TV guide overview page as well as previously watched channels.
Now click the downward button on the remote or just tap on the downward icon at the bottom of the screen.
1st part of the bottom menu bar

Being on Full screen, long pressing the OK button will also bring this up. Few controls appear, some you know and some I will explain here:
- Search: Going through other channels from the channel listing for a quick jump – if you know the name of it.
- Channel List: Brings up the channel list inside the same category you are on.
- Recordings: Here is a good place to track your already scheduled recordings or the ongoing one.
- Multiview: If your account has more than 1 connection allowed, based on the amount of allowed connections, you can add extra screens and watch multiple channels together. I will dive deep into this soon.
- Picture-in-picture: You can minimize the Tivimate to the top right side of the screen and go to the home dashboard of your device, maybe check other applications in the meantime.
- Video Resolution: It shows which video resolution is set as default for the channel. Some streams do allow you to pick multiple e.g. 720p, 1080p and you can pick them from this section.
- Audio Channel/Mode: Same with the Audio, some channels do provide more than one audio channel/quality, here you can switch between them.
- Audio Offset: If you notice a syncing issue between audio and video, you can easily fix it here. This is usually fixable by reporting the matter to your IPTV provider, but if you rather fix it yourself or they cant do anything about it, this section comes handy.
1st part of the bottom menu bar

Continuing with the options:
- Subtitles: toggle between subtitles on/off.
- Screen Modes: you can choose various screen modes: Normal (which is the default), Full Screen, 4:3 and many more.
- Sleep Timer: Set a countdown timer so Tivimate goes to sleep and application shuts down. As a result your device will go to sleep mode, too. It’s a good way if you know you are going to fall asleep during watch and want the device powered off.
- Add to Favorites: Will explain this soon.
- Channel Options: This has been explained above, earlier.
- Settings: This brings up the main Settings page of Tivimate.
How to add / remove channel to / from favorites on Tivimate
If you are looking to add your most watched channels into a list for quicker access, Favorite function is for you. However, there are various ways to do that:
While a channel is being played in Full Screen

1- while a TV channel is being played in full screen, hold the OK button. Once the bottom toolbar appears, click Add to Favorites.

2- You can see that the title of the button has changed, meaning the desired channel has been added to the Fav list.

3- To access the favorite list, while the TV section is selected from the left column, you can see the list at the top of the category column.
When on channel list overview

1- If you are on Live TV overview page, you can also attempt and favorite a channel. Simply press and hold the OK button on a channel from the list.

2- Once the right column appears, click on Add to Favorites.
Managing multiple favorites at once (mass action)
Tivimate allows you to add or remove multiples channels to / from favorite at once using the mass action.

1- While on channel overview page, press and hold on a channel name and from the right column choose Manage Favorites.

2- You will then see stars appearing next to each channel. The ones which are empty are the channels which have not been added to favorite, you can select to add them. Same way can be used to deselect a channel. There are some controls that can be used:
Leftward button click: If you click the leftward button on the remote, all selections will be reset and all channels will be removed from favorite.
Rightward button click: however, choosing the rightward button on the remote will add all channels in the same category to your favorite list.
Setting only favorite channels to show
One of the good features that Tivimate has is allowing users to exclude all the unwanted channels from showing on the channel listing and let only the favorite channels to show up.
Imagine you are in a category which has 200 channels, yet you only watch 10 of those. You can simply favorite the desired channels, and then enable the feature which I am about to show you.

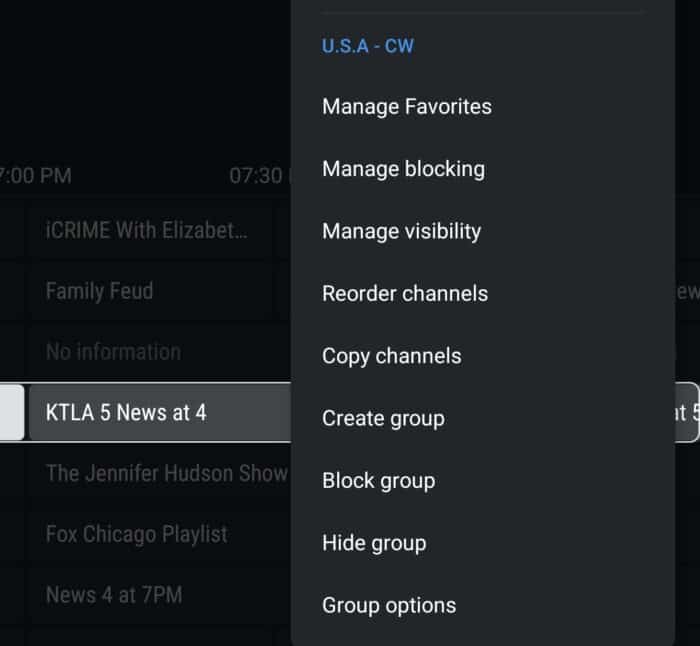
1- press an hold on a channel, then from the right column, scroll down and choose Group Options.

2- Find Show Favorites Only and toggle it to enabled. With this settings, only favorite channels will show up in the category.
How to set program reminders on Tivimate?
This app allows you to set up reminders on Live TV channels, a good way for making sure you’re not gonna miss an upcoming program. First things first, we need to configure or make sure we know the Reminders behavior and settings before doing one.
Initial configuration for the Reminders

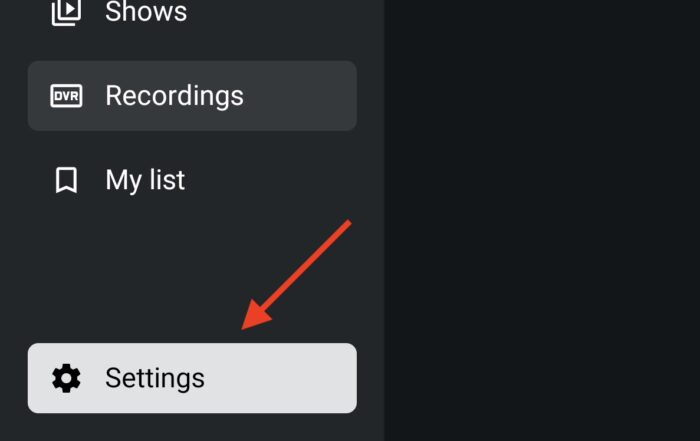
1- Click the settings icon to open up general settings. This icon can be found in multiple places on Tivimate. One of the is through the left column.

2- Click Others.
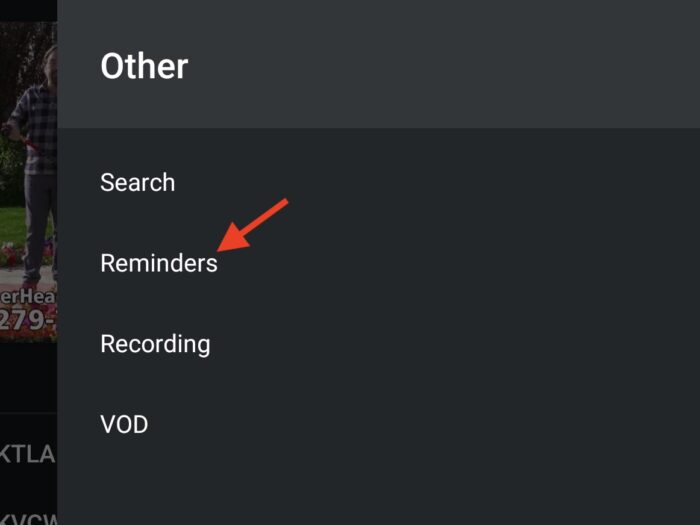
3- Choose Reminders.
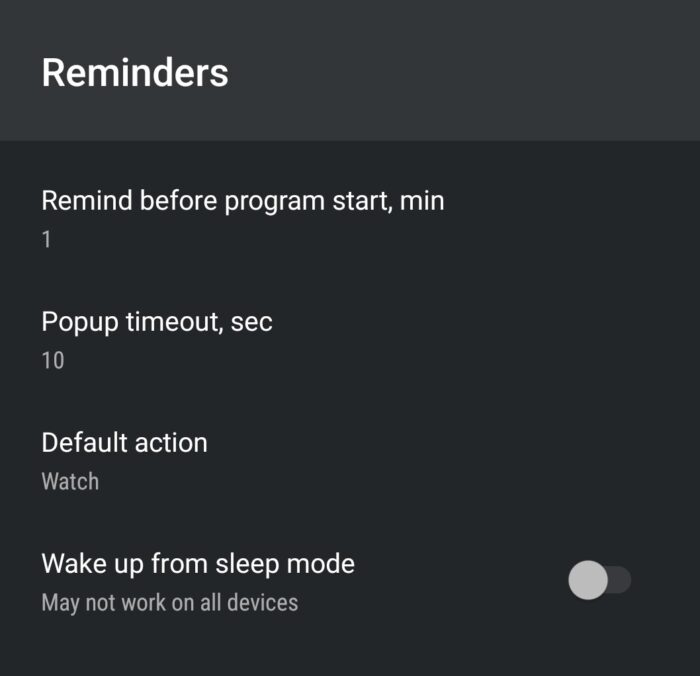
4- So here is where we configure the behavior of Reminders on Tivimate. You do it once and it will apply on all of them.
- Remind before program starts (min): Determines how long (in minutes) before the start of your desired program the reminder notification should show up on the screen.
- Popup timeout (sec): The period (in seconds) that the popup notification should stay on the screen.
- Default Action: Choose what you want the app to do when the notification is shown. Watch means Tivimate IPTV playerswitches to that program automatically.
- Wake from sleep mode: If the device is on sleep mode, and the time for that program has come, it will automatically wakes up the device. As the app suggests, it may not work on some devices.
Now that we know how the Reminders are going to work, let’s see how we can create one.
Setting up a program reminder on Tivimate IPTV Player
If you are watching a program and want to set a reminder, here’s the shortcut.
1- Click OK button on the remote once, or on touch devices tap the screen. After the bottom toolbar pops up, click TV Guide.

2- The first thing you should pay attention to is the fact that “you can only set reminders for upcoming programs”, meaning if you select an ongoing program, the Reminder option wont pop up, which is logical.
So, select an upcoming content, you can use the direction buttons on the remote to highlight the desired program from the TV guide table, Then tap on it or click OK.

3- Click Remind.
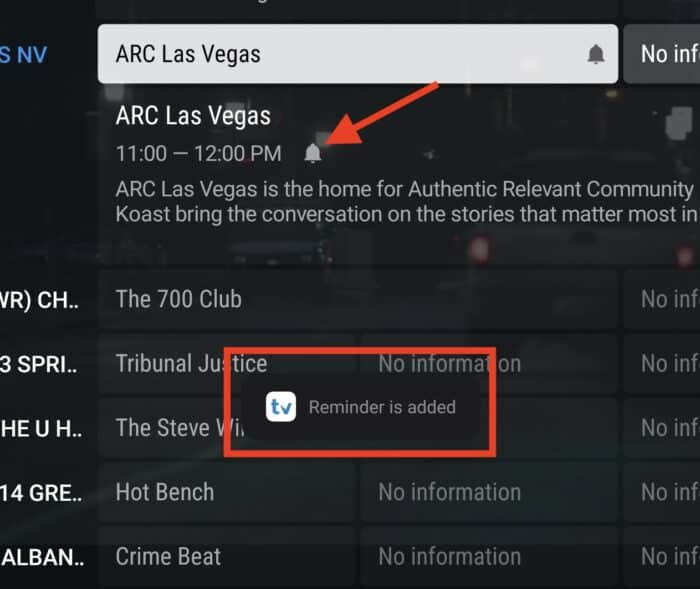
4- A reminder has successfully been set. The bell icon next to the program info confirms it.
Reminders list, management and deletion
If you would like to see the list of currently scheduled reminders, or maybe want to remove one or some of them, here’s how:
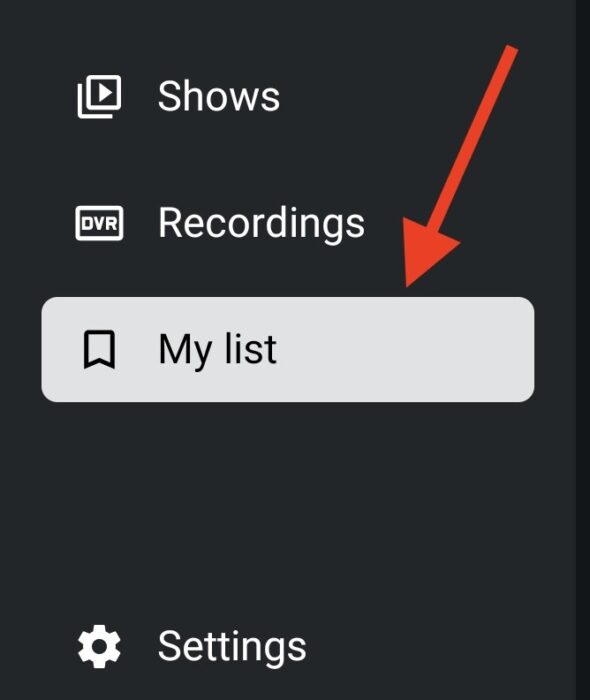
1- From the left side auxiliary column click My List.

2- Choose My Reminders. All your reminders should appear here. Now if you want to delete it, go with the next step.

3- highlight the desired reminder and click OK on it.

4- Clicking Delete with remove the item from the list.

5- You can do this while on EPG table, too. Simply find the program which is already has a reminder set for, click it and from the right column choose Delete Reminder.
How to record a TV channel on Tivimate premium?
Among all applications out there, Tivimate IPTV player has the best recording function undoubtedly. Let’s configure the general settings first and then see how we can actually record.
Setting up the general recording configuration
1- From left column, click the Gear icon.
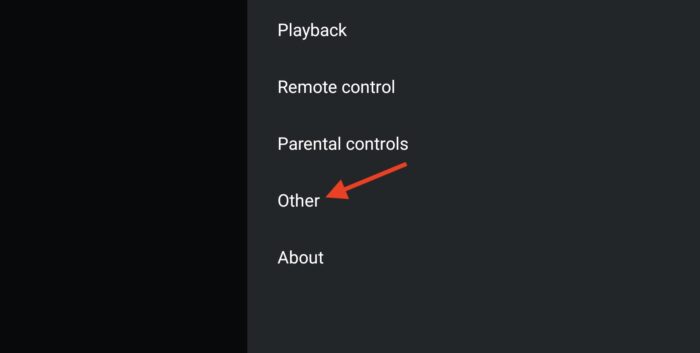
2- Choose others.
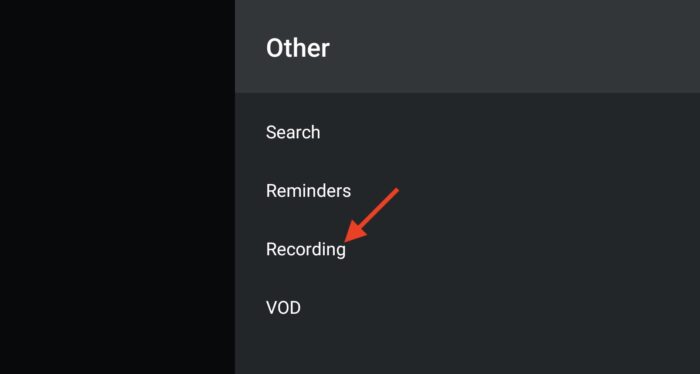
3- Click Recording.

4- And here are the general settings of the recording function on Tivimate IPTV player. You can move over each (highlight them) and click OK to modify them.
- Recording Folder: Choose where the recording file is stored.
- Start Recording before Program start (min): How long (in minutes) before the start of the desired program should the recording process initiate.
- Stop Recording after Program end (min): How long (in minutes) after the end of the desired program should the recording process stop.
Now that we have reviewed our recording configuration, it’s time to practice the recording function. There are two ways you can record with.
Instant recording on Tivimate premium
In this method, the process starts immediately right after you click the Record button. This is good if you come across something happening live and want to have a copy of it instantly.
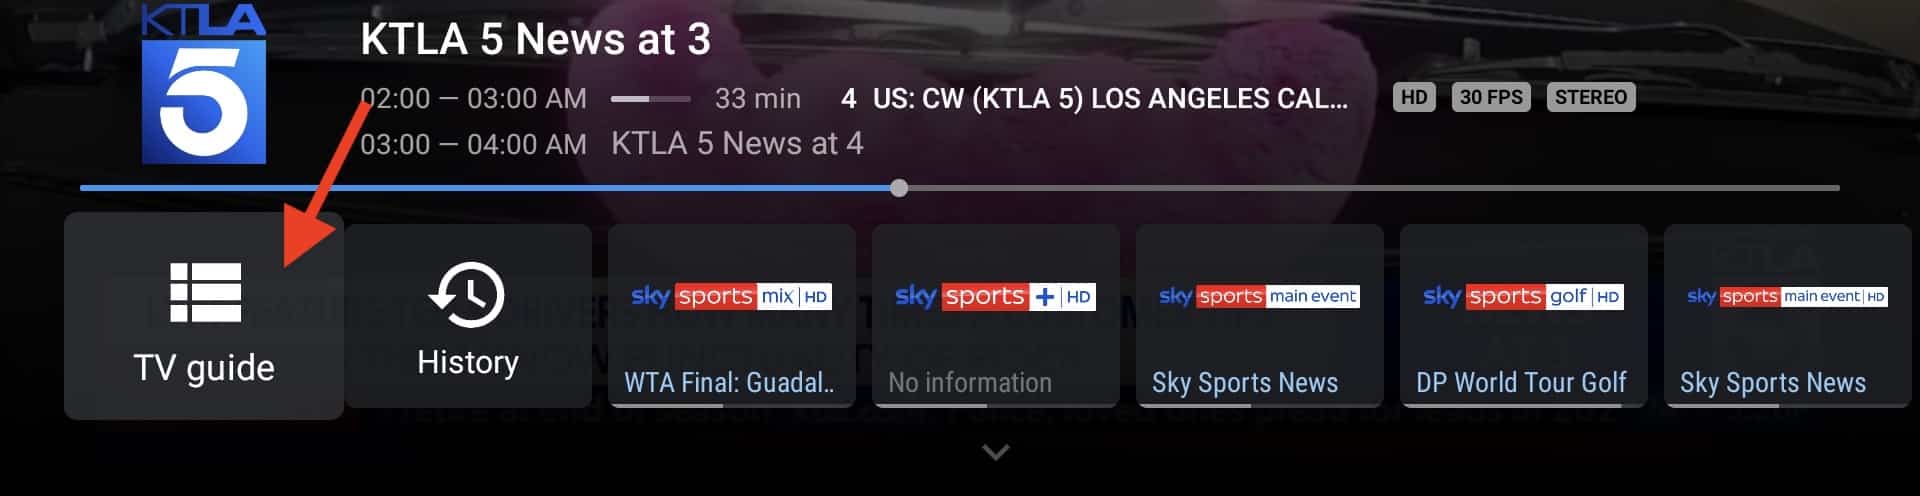
1- While watching a Live TV channel, press OK once so the bottom toolbar appears, then choose TV Guide.
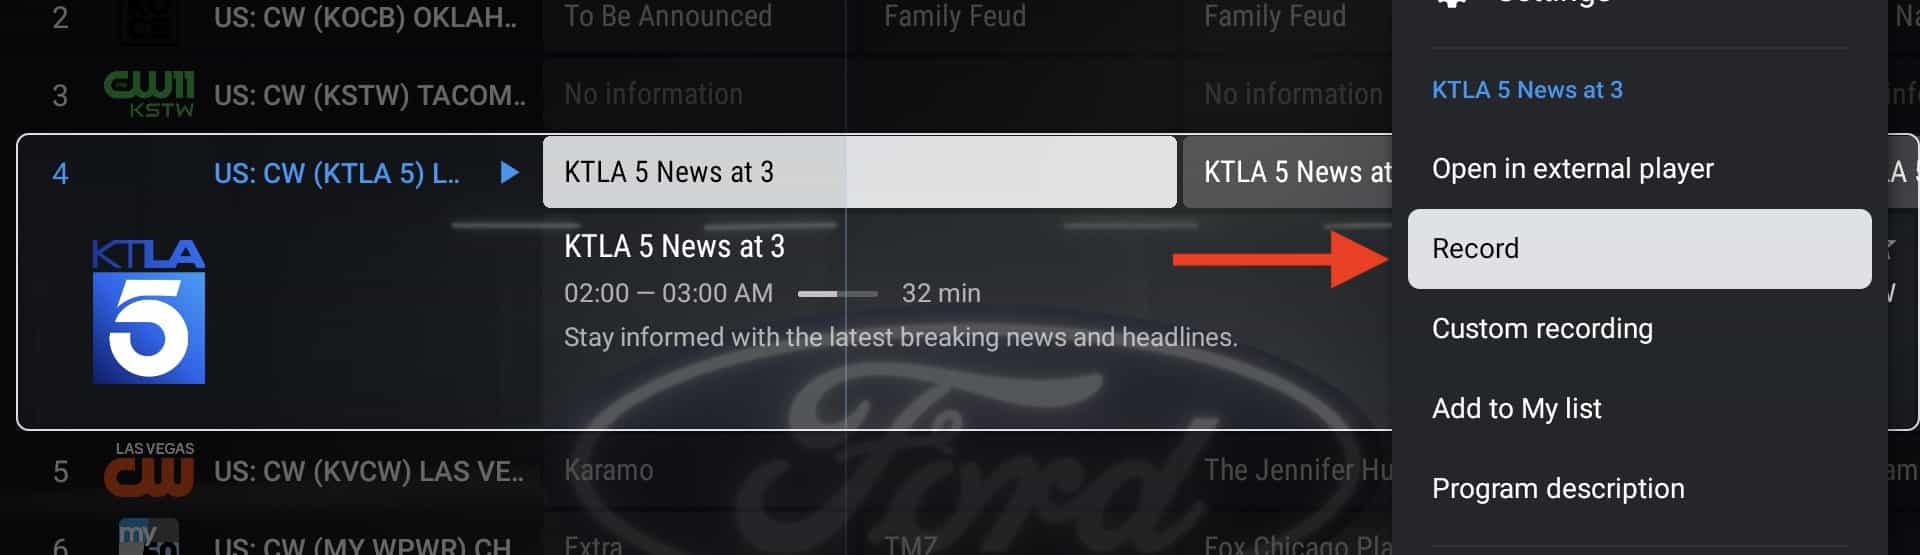
2- When the TV guide Table opens up, press and hold OK button on a channel that you want to record. After seeing the right menu bar, choose Record.
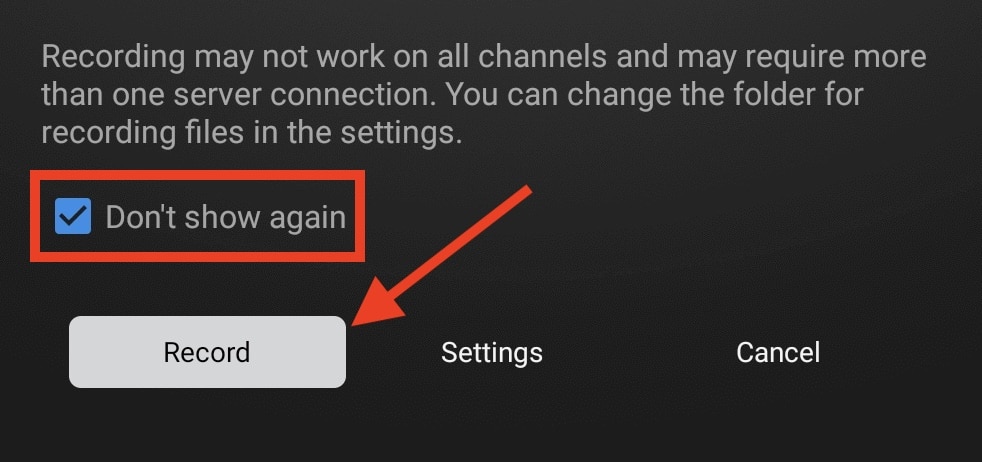
3- For the first time recording, the above message will show. It’s reminding us of two key points:
- Some channels might not be recordable as providers may prevent that.
- To be able to record a channel on Tivimate Premium, you must have at least 2 connections on your account; one is for viewing and the other is used for recording in the background.
We have also properly reviewed our recording configuration so no need to check Settings. You can safely tick the box so this notification doesn’t show again, as doing so we result in immediate starting of the record, which is what we want in the Instant mode. Click Record.
identifying the recording status

4- As you are redirected back to the channel list, you will see there are Red dots beside the channel for which we applied recording. This confirms that the process has started.
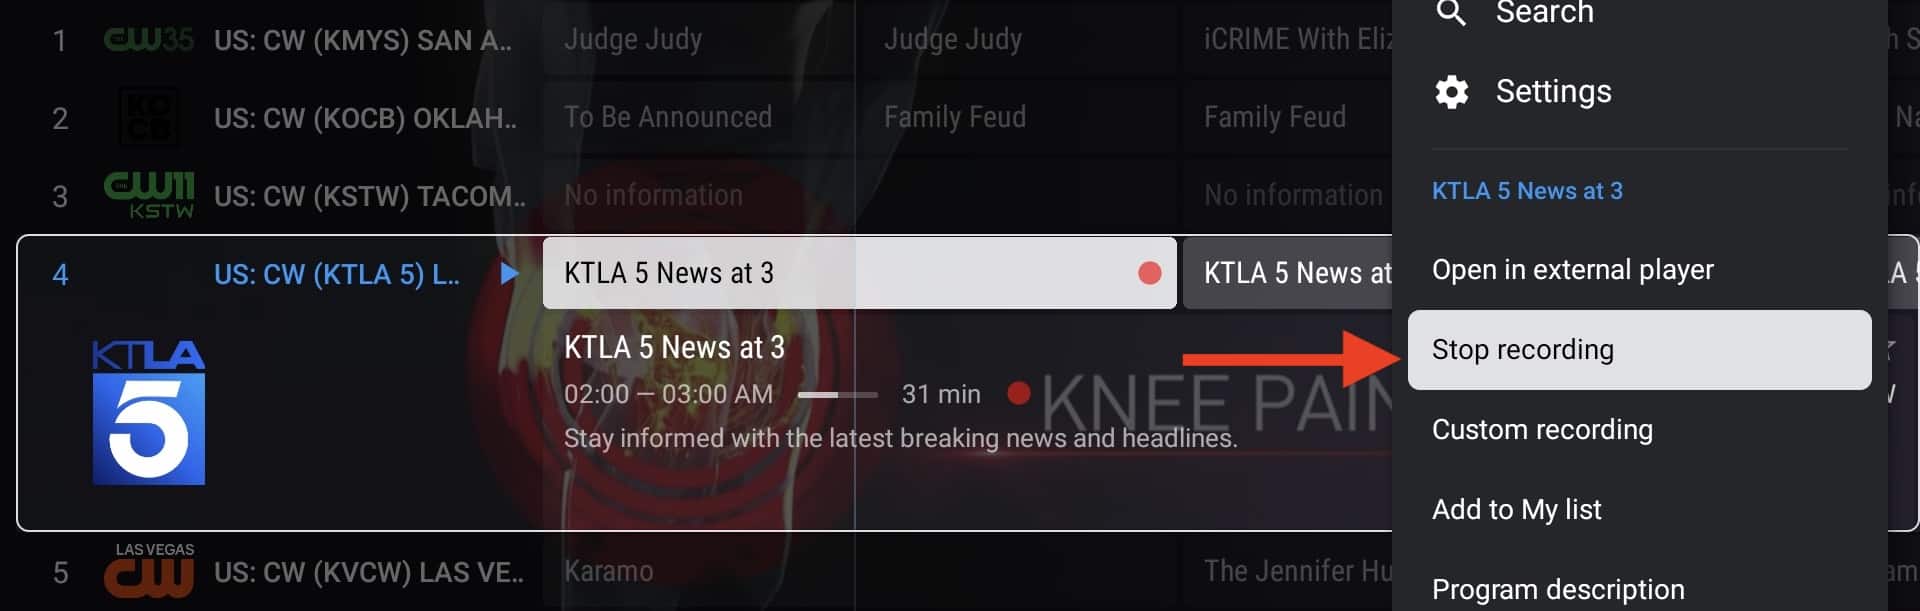
5- Same steps can stop a recording if we know which channel has it on.

6- Click Stop and the recording process with end and a file of the content will be stored in the designated folder which we assigned in settings.

7- There is another way of checking ongoing recordings. While on a channel in full screen, Long press OK button. Then from the bottom menu bar choose the section.

8- In this list we see 2 rows. The one at the top, is a previous recording, while the one below that with a red dot confirms it is an ongoing recording. You can highlight it and by clicking OK it will stop.
How to do Scheduled recording on Tivimate? (Custom)
This is what everyone is looking for I am sure 🙂 This application allows us to appoint a recording process for an upcoming program or just a starting point on your desired time and date. It’s called Custom Recording in Tivimate Premium version.
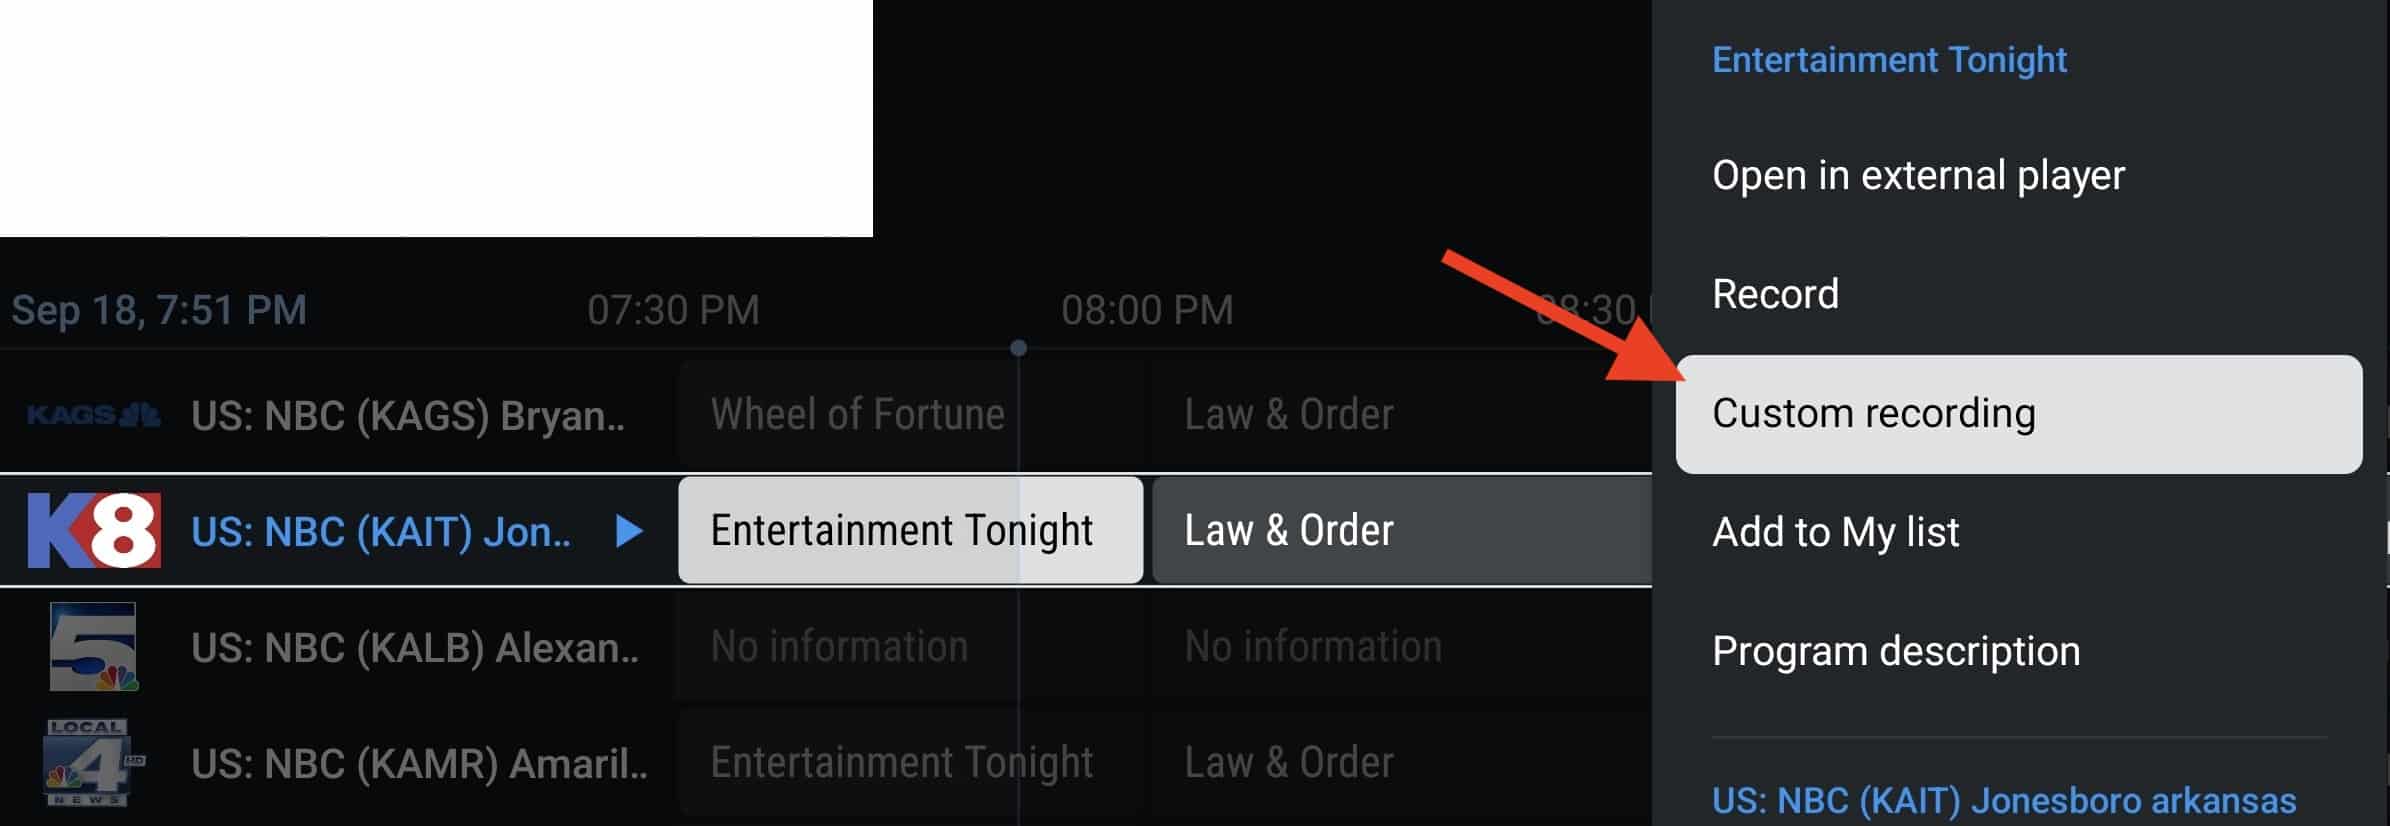
1- While on a channel list, long press OK button so the right menu bar appears, then choose Custom Recording.

2- Click New Recording.

3- You can now fine-tune the scheduled recording as you like:
- Start Date: appointing the day for the recording
- Start Time: setting an exact time as the initiation point
- Duration: how long you want the recording to be
- Repeat: If active, you can choose the days of the week so the same process is repeated by Tivimate IPTV player
- Name: You can click that and choose a desired name for the recording
Finally, click Schedule Recording.

4- It’s safe to tick the box and proceed.
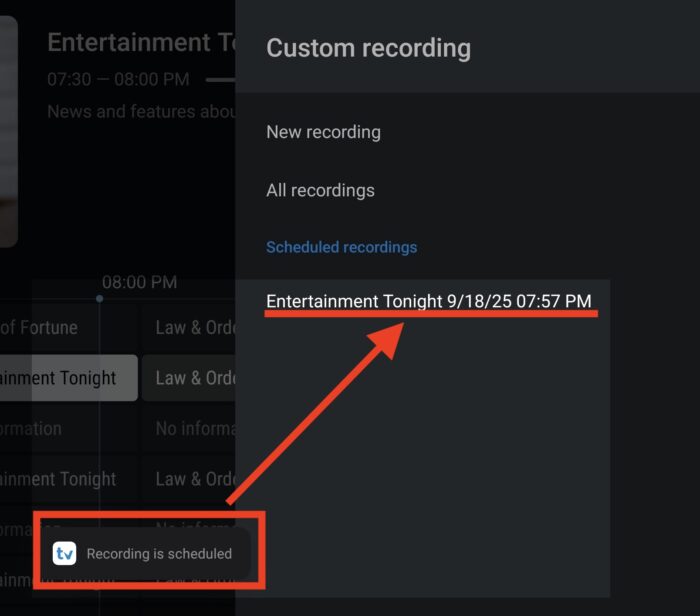
5- We’re all set. The recording is scheduled, confirmed by the small pop up message at the bottom as well as the name of it being shown in the list.

6- If you click Recordings from the bottom bar on full screen mode, you should see the above, the scheduled item is there and the red dot confirming the process has already begun.

7- Same as before, you can find your recorded files from the left menu bar.
How to use Multi-view on Tivimate premium? (Multi screen)
If your IPTV account has more than 1 connection, you can watch multiple channels at once thanks to the Multi-view function which you may also know as multi screen.

1- While on full screen mode, click and hold OK button until the bottom menu bar appears. Then choose Multiview.

2- Tap OK once so the menu window appears.
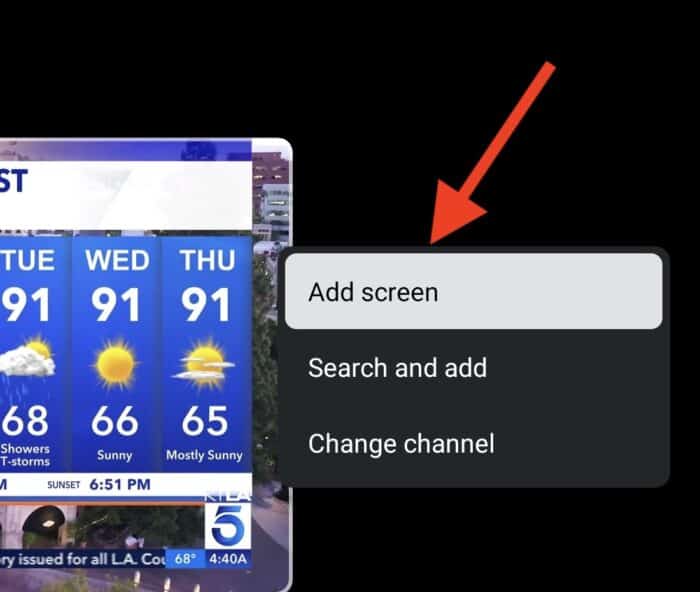
3- Click Add Screen.

4- Once the channel list appears, you can choose another station to add it in Multiview. If the categories don’t show up at first, simply click the leftward button on the remote to see it on Tivimate IPTV player. Touch screen users can use the back button or slide-in from the left edge of the screen.

5- We have added a second channel side-by-side to the original station which we were watching. Now we can enjoy viewing 2 channels at once.
You can see on the right screen there is a bright frame, that confirms it is the channel having the audio on. On multi screen mode you can only hear 1 channel. If you want to change that, simply move the frame to other screens.
Extra settings for Multiview

6- While in multiview, clicking OK will bring up extra options:
- Add Screen: Allows you to add more screens on Tivimate Premium player.
- Search and Add: You can search for a channel name and add it instead of going through categories and listing
- Change Channel: Changes the channel on the screen which is highlighted.
- Pause: Stops the streaming on the selected screen.
- Enlarge Screen: Maximizes the size of the selected channel and minimizes others.
- Full Screen: Full screen mode for the selected one.
- Remove Screen: Deletes the selected channel from Multiview.

7- For instance here, I have used the Enlarge option on one of the screen and set it to have the audio.

8- Tivimate premium allows you to add up to 9 screens.
How to use External Players on Tivimate Premium?
Although the built-in media player engine is very competent of playing almost any media content, Tivimate IPTV player allows you to play your desired Live TV channel or VOD using 3rd-party players. For instance you can install VLC Player on the same device and stream a channel using that instead of the default engine. I will show you how.

1- The quickest way to achieve this, is long pressing and holding the OK button on the remote on a channel when you are on channel list view. Once the right column menu appears, click Open in External Player.
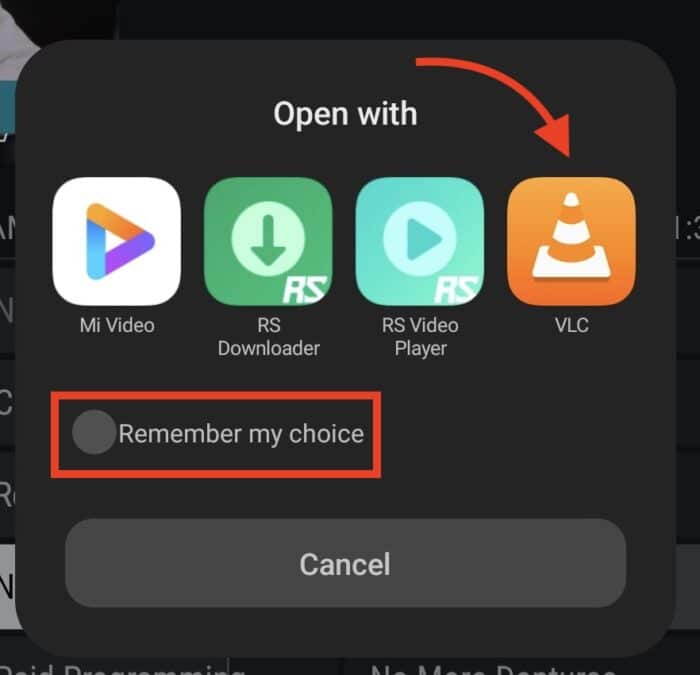
2- on an android device, like my Xiaomi tablet, it would bring up a small window like the above and allow you to pick from the available media players installed on the device. I did install VLC player on my tablet for this article just to show you how it would look on Tivimate IPTV player.
If you want to have this choice remembered by the device, click that check box then click on the desired choice of the player.
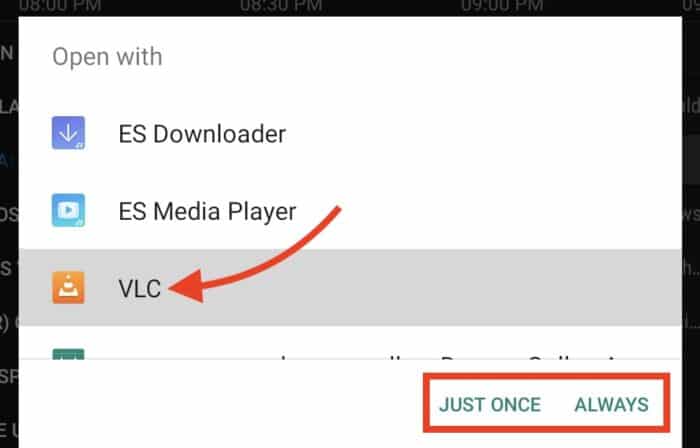
3- Above is how it would look if you do this on a Fire TV Stick / Cube. The only difference would be that on Fire stick you simply click on the player first and then choose whether you want this to be a permanent setting or just for once.
How to enable picture-in-picture on Tivimate Premium?
Picture-in-picture in this application translates to when you want to surf through your device dashboard or other apps and still want the streaming to be in front of you. I have checked this both on Amazon Fire TV Stick / Cube and Android tablet, it works flawlessly without any lagging.

1- While on a Live TV full screen, long press center button on the remote, on touch device you can simply hold the touch on the screen, and from the menu bar choose Picture-in-picture.

2- And just like that, the TV channel will minimize at the top right side of the screen, you can now surf through your device. To go back to app full screen, simply click the Tivimate IPTV Player icon on your dashboard.
3- You can see even when I go to settings page of my Fire Stick, TV channel is streaming perfectly fine.
How do Movies and Series section look?
Well, short answer is Great! The interface is almost the same as the Live TV and the built-in media player engine can deal with almost all audio and video formats.

From the left menu column click Movies. You should then see the section appear. Middle column is the categories which is totally relying on how your IPTV provider does their job right in terms of categorizing the movie content.

While clicking on a category, the movie info appearing at the top of the page is for the latest one in that folder.

Click on the category and you should see the movies inside that folder in full screen. Then you will also see Search and Sorting icons appearing at the top right. Search function looks among all movie categories and not limited to the one you are in. That on it’s own is a big help.

When you are playing a movie, long press OK button and the familiar bottom menu bar should pop up. Majority of the options are self-explanatory. However, One thing I really like about Tivimate IPTV Player is the fact that it shows the real-time video and audio streaming size per second. For instance this movie is streaming at 1920×800 on a roughly 2 Megabits /seconds bit rate. Audio streaming speed also visible.

The player is very neat and simple, media streaming info also available on the right side.

Series section is almost identical. But I want to point out something: To see through the season and episodes of a series, you must click the downward button.

And now everything clears. For instance, for this series, we can see that season one has 8 episodes, and we are highlighting/selecting the first one.
Understanding the Settings section on Tivimate
Any application that we have reviewed has had an important settings section inside which we have always found one or two handy features. Let’s see what Tivimate premium has in store for us.
When you click the gear icon, this is the sight you should see. Now, this is accessible from various places inside Tivimate IPTV Player. Basically whenever you click and hold OK button anywhere it should bring up a window and Settings is a part of that. In Live TV and VOD players, the far right option in the bottom menu bar is another place to find it. Let’s go through each section see what it does.
General Settings
This section contains the broad configuration of the app.
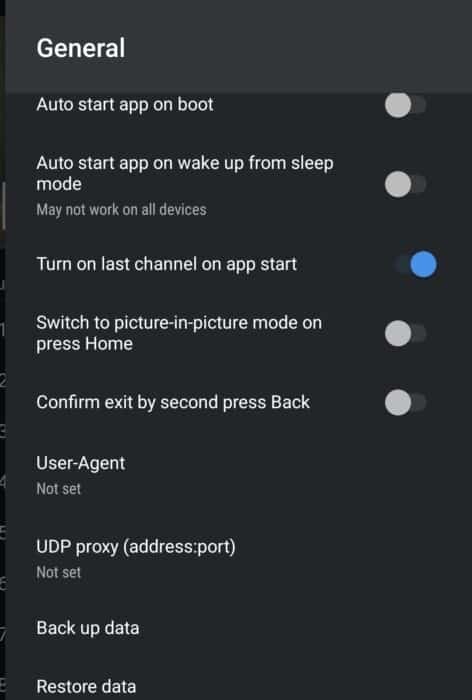
- Auto start app on boot: Enabling this will result in Tivimate premium launching whenever user turns the device on and fully loaded.
- Auto start app on wake from sleep: If the device goes to temporary sleep mode, once it wakes the application will load.
- Turn on last channel on app start: When the App opens, the last TV station you watched will resume streaming.
- Switch to picture-in-picture mode on press Home: By pressing Home button on your remote controller, the channel you are watching minimizes on top right side of the screen and you will be able to go through your device dashboard.
- Confirm exit by second press Back: Basically, if you press the back button on the remote controller twice, Tivimate closes.
- User-Agent: You can set a custom desired name here so you would pop up with that user agent identification on your provider’s server monitoring log. It’s best to leave it untouched as there are some services which white-list certain user agents.
- UDP proxy: You can assign a HTTP proxy here in IP:Port format. I tested it, did not notice much difference at all. I am going to ask Tivimate IPTV Player developers to apply something here. If they do that, it will be great. Will update this section if that change approves.
- Back UP data: If you want your settings, configs, favorites … backed up, for instance to move them to another installation of this app, you can use this section.
- Restore data: Where the previously backed up file can be restored.
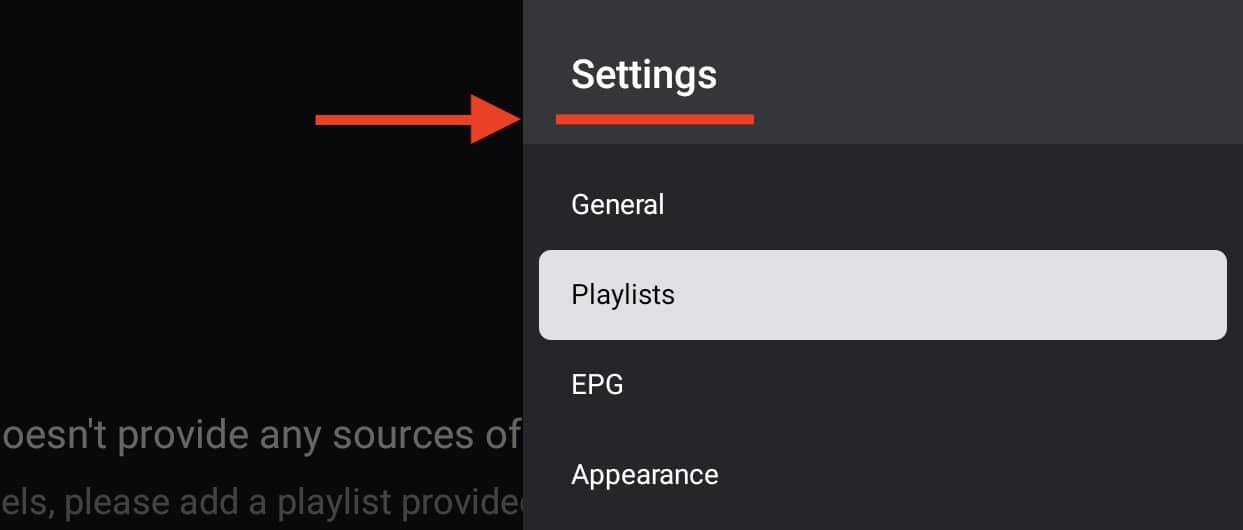
Playlists
Here you can manage the IPTV playlists, or should I say services.
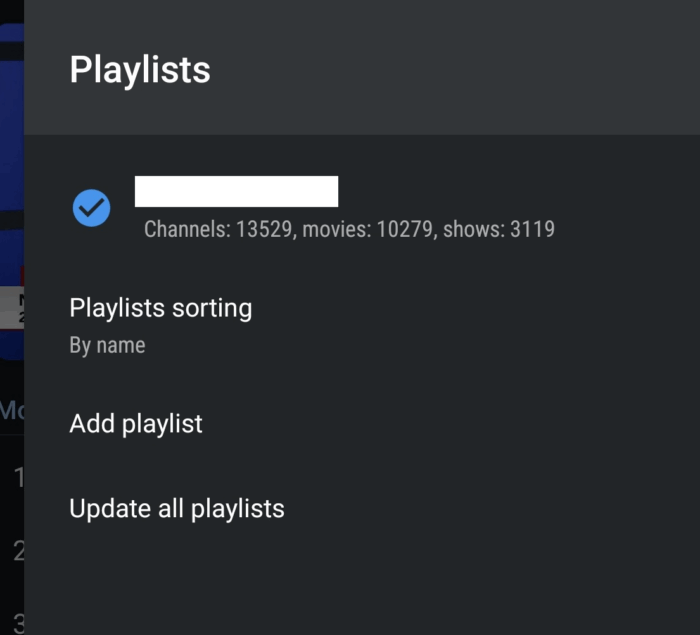
- Current Playlist: The one which has a blue tick next to it shows the active playlist. The number of Live TV, Movies and Series are also visible.
- Playlist Sorting: You can change the order of the channels whether alphabetically by name or manually.
- Add Playlist: If you have another IPTV account, here is where you can add it.
- Update all playlists: It refreshes the playlist data, useful when you want to push a reload on playlists.
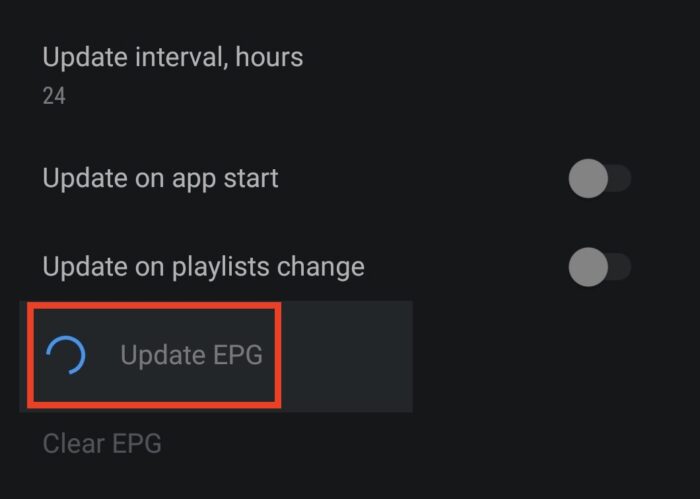
EPG
Electronic Program Guide is an important section of the Tivimate application. This is where you manage the TV guide.
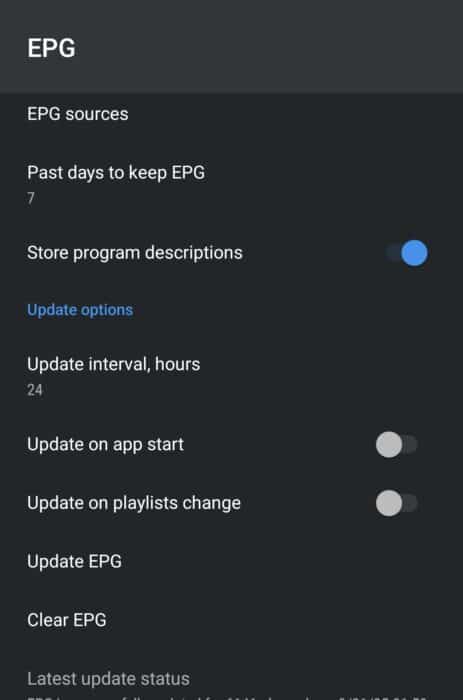
- EPG Sources: when you add an IPTV playlist, the app will automatically generate a feed from that playlist, Most services have built-in EPG and with a little tweak on the streaming line, program guide feed can be made. That’s how Tivimate IPTV playerdoes it. However, if you have other guide feeds, you can add them.
- Past days to keep EPG: The app can retain the data for x number of days, useful especially if your provider has TV Archive.
- Store program description: Each program guide has a title and a description, the extensive explanation of what the show is about. Enabling this feature will also retain the description.
- Update Interval (hrs): Determines how often (in hours) the data refreshes.
- Update on App start: When you open the app, EPG updates.
- Update on playlist change: If you have more than one service, upon switching the playlist, EPG will update.
- Clear EPG: Deletes all the guide data. After doing this, click the Update button above that to pull the fresh data. Give it at least 5 to 10 minutes to propagate.
Appearance
As the name suggests, you can have access to options to make changes to how the app looks.
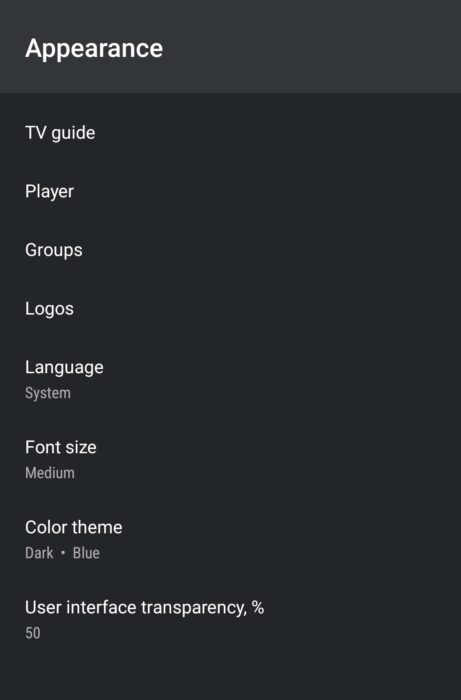
Each section covers part of the Tivimate IPTV Player. You can change how the TV Guide would look, to the size of the font, to the theme of the app. All options are self-explanatory. Changes do take effect immediately.
Playback
This is, in my opinion, the most important part of the settings.
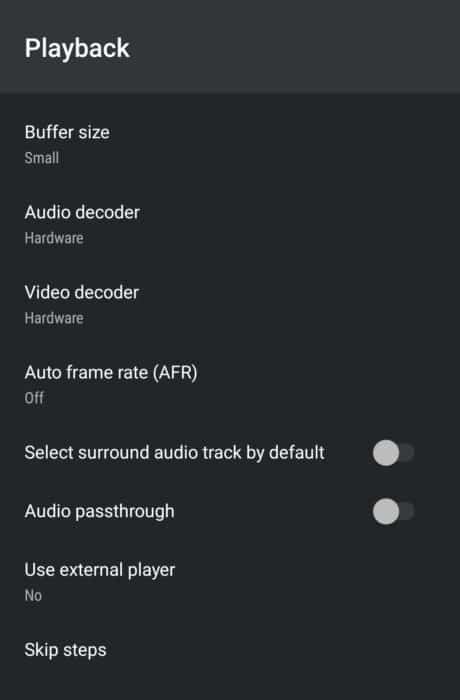
- Buffer Size: If you are having buffering issues on Tivimate IPTV Player, you can try this option. It allows you to change the size of the pre-buffer chunk from Small, Medium, Large to Very Large. The bigger the buffer size, the slower your channel may load but also, the more of a chance to fix your buffering issues. MY suggestion is, raise the level step by step and see if it fixes the problem.
- Audio decoder: It’s the function that makes the audio playable by your device. If it is done through the software engine it’s called Software Decoder, and the alternative is Hardware Decoder. Change it only if necessary.
- Video Decoder: Same thing as the above.
- Auto Frame Rate: Some channels or VOD content have varying frame rates. The changes in the refresh rate of the content causes lags and make it hard to watch. Enabling this option will ensure a smooth playback with a fixed and consistent frame rate.
- Select Surround Audio Track by Default: If the content you are playing supports surround sound system, like atmos audio, enabling this will let Tivimate premium to select that audio channel automatically.
- Audio Passthrough: Your app will not process audio and simply pass it the way it’s received from the server, in some cases this will result in an improvement of the audio quality.
- Use External Player: Enabling this will play the content only through the external player and not the default media player engine of the app itself.
- Skip Steps: This is related to the skip buttons on the player. For instance, you can choose how many seconds each skip be when watching a movie or series and holding the Fast Forward or Rewind buttons.
Remote Control
You can even customize the behavior of your device remote controller to sync specific buttons to the functions of Tivimate IPTV player.
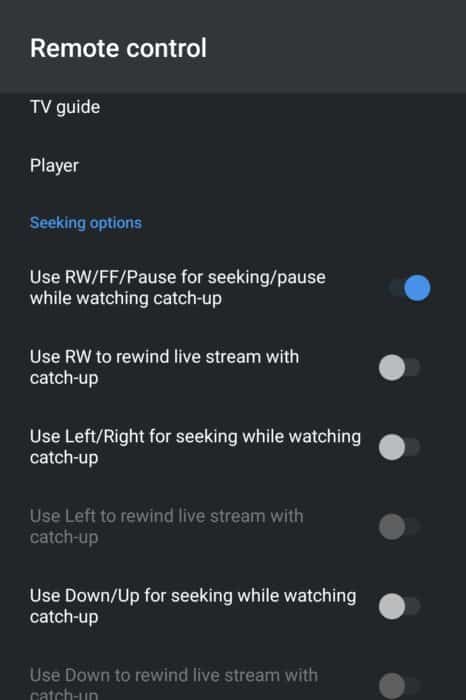
There are a lot of sub-directory options in this section. For instance you can click TV Guide or Player section at the top and personalize the functions. It’s an extensive option section, if you ever want to sync the remote buttons with the app, come to this part and play with the options.
Parental Controls
Concerned about the adult control side of things? worry not! you have a lot of settings which fine-tunes the configuration based on their preference on Tivimate Premium.
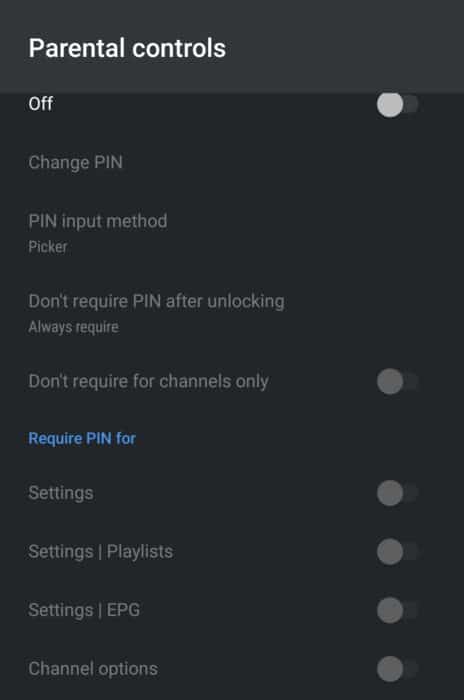
It’s possible to enforce PIN requirement for specific sections. You can also ease it a bit and let the app remember the PIN entry after first time.
Other
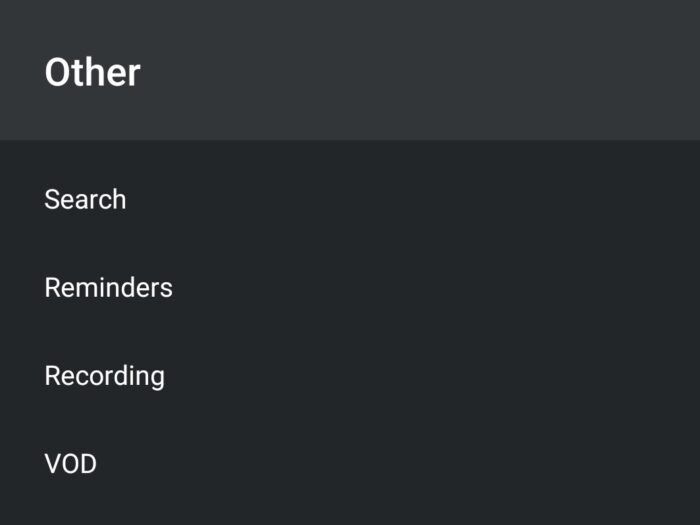
These are settings with less entries that’s why they are together. However, that does not mean they are not key parts of the app functionality.
- Search: It allows you to personalize the search function of the app: whether or not you stay on the search page while checking the results, preferring the voice search, showing the history and so on.
- Reminders: We did use this part earlier when explaining Reminders. Here, you can customize the reaction of the application when the time comes to remind you: how long before the program start you want to see the reminder, what happens after that and so on.
- Recording: Also the same as the above, users can adjust the functions and behavior of the related subject.
- VOD: has only one settings inside and that’s whether or not you want the next episode play once the current one finishes, related to the series section.
About
Here you can find information about the Tivimate IPTV Player version.
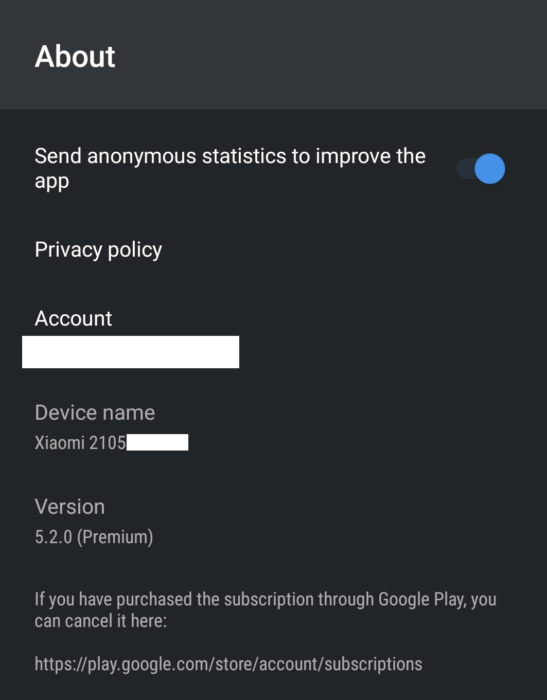
Your premium account details, the device info and whether you want to send anonymous info about application errors to the developers for bug fixing are things you can find here.
Troubleshooting
Tivimate IPTV application, like any other application in the world, may and will stumble into issues. Some of them make sense and some won’t. Thats why I though adding a problem-fixing section for this software would be logical.
All the issues, bugs and malfunctions of Tivimate are and will be posted here along with their solutions. If you have noticed a problem which is not added here, please let me know if the comment section. I will investigate and add guide of the resolution here.
How to fix Tivimate EPG not showing
You may one day open the app and see there are no program guide data although you are fully sure that the EPG source is correct. That happens mainly due to a cache problem. Quickest way to resolve this would be clearing the application cache.
Cache Clearing
The first ste is to clear the cache of Tivimate app on the device you are using. You might be using an Amazon Fire Stick / Cube device or an Android. Below I have explained both. Then we will move to in-app steps.
How to clear Tivimate cache on Fire Stick / Cube?

1- From amazon device dashboard, move over to Settings Gear icon and then open Applications.
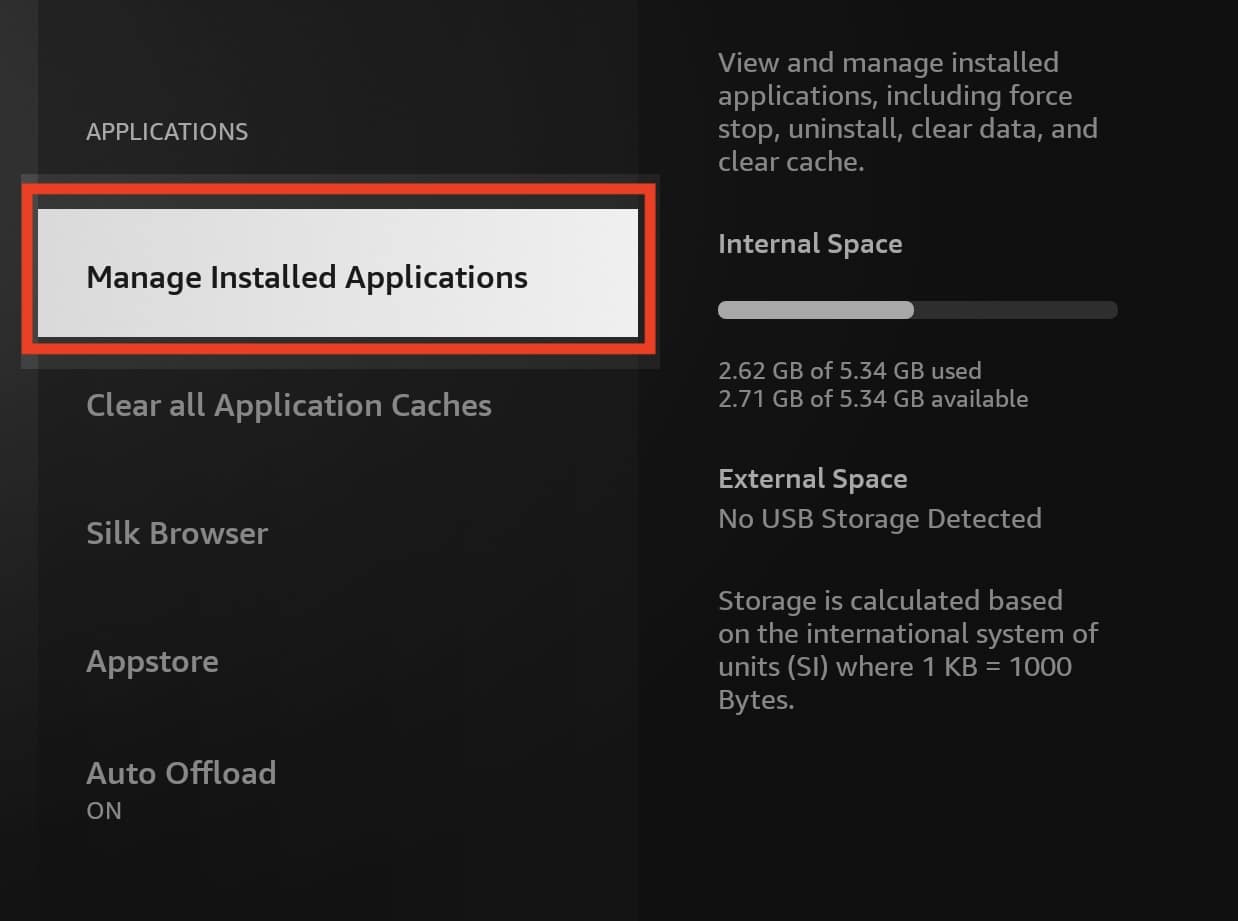
2- Choose manage Installed Applications.
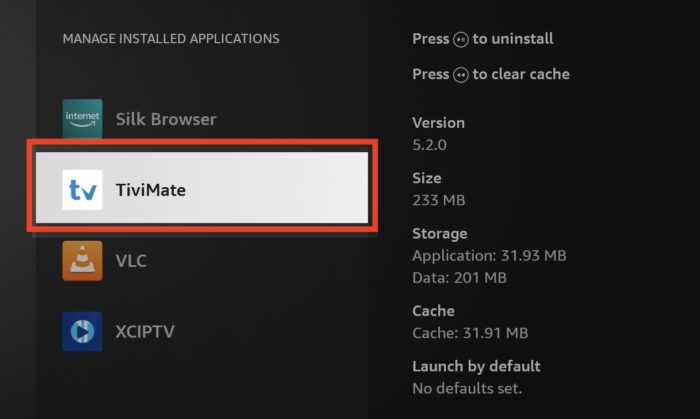
3- Select Tivimate IPTV player among other listed applications.
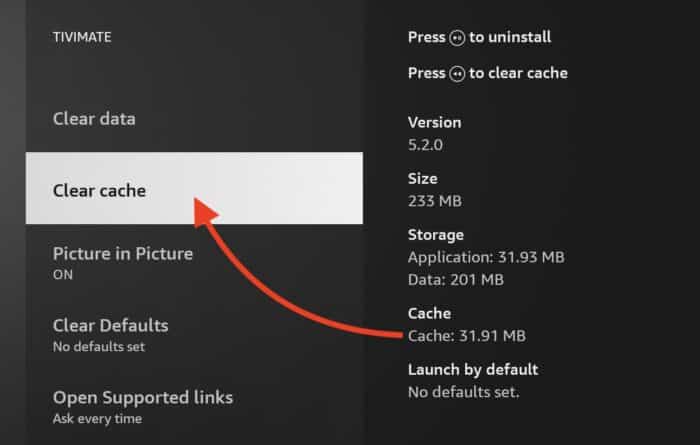
4- Now as you can see, my Tivimate has near 32 Mega Bytes cache. Click Clear button.
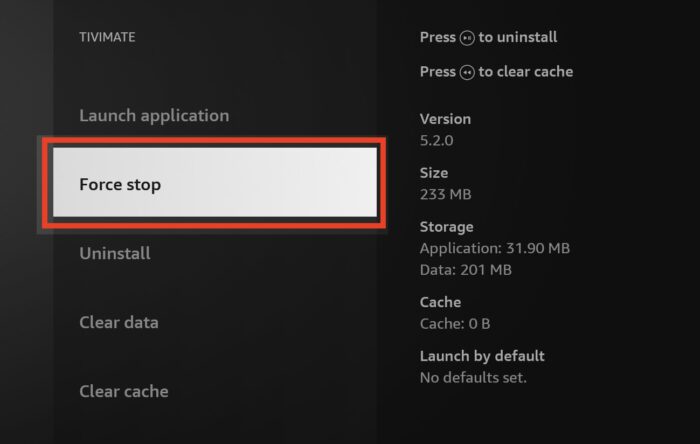
5- Just to be sure, Force stop the app as well.
Now skip to the next section which is Updating EPG Content on the app.
Clearing Tivimate cache on an Android device

1- open Settings on the Android device.
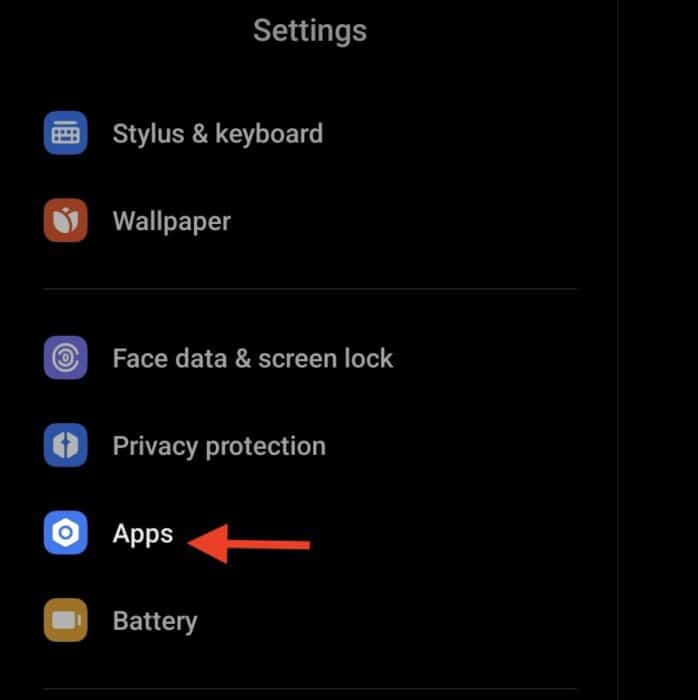
2- Choose Apps to open the list of installed application on the device.
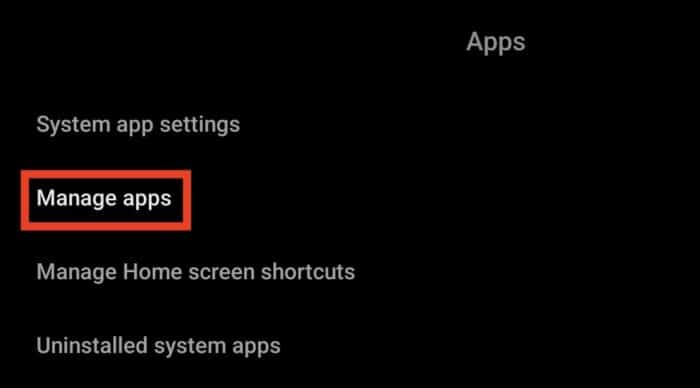
3- Open Manage Apps.
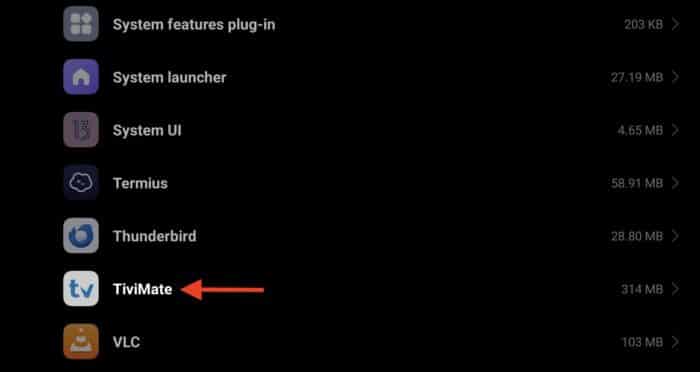
4- Choose Tivimate from the list of applications.

5- Click Clear Data at the bottom of the screen.
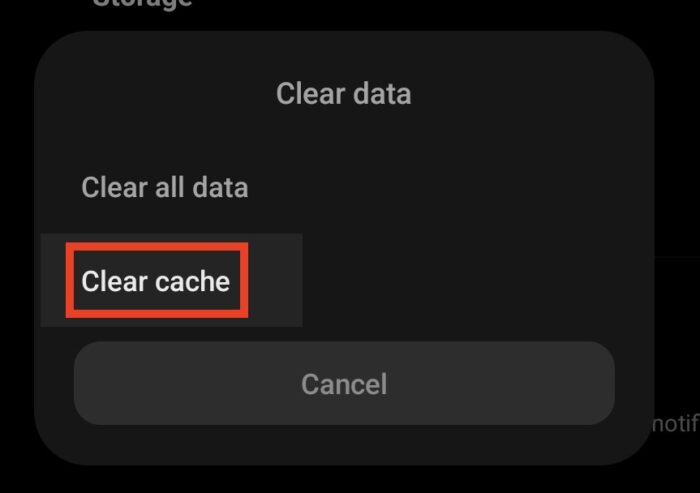
6- Click Clear Cache.

7- It’s also a good idea to Force Stop the application to ensure all functions are stopped.
Now we move to inside-app steps.
Updating EPG content
After clearing cache, we need to initiate the first program guide update from the source.
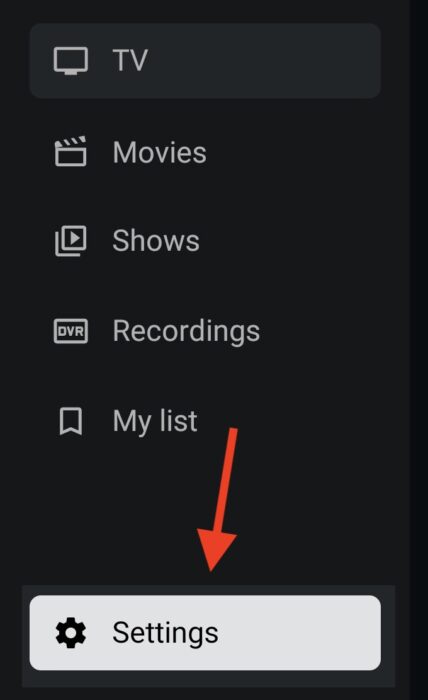
1- Back to the Tivimate application, from the left column menu, click Settings.
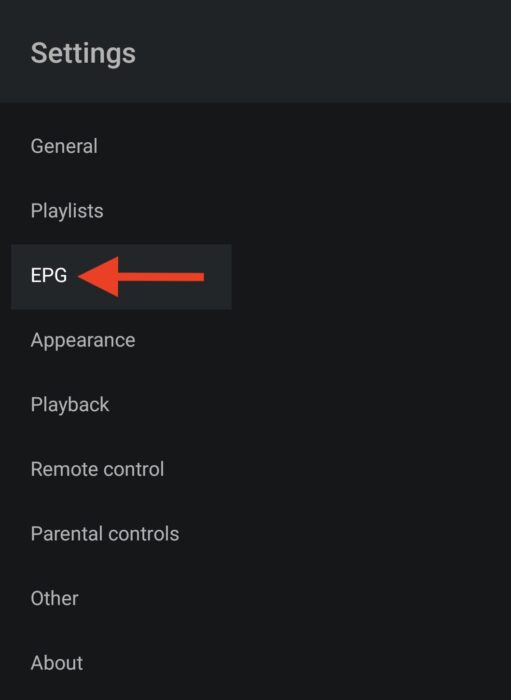
2- Click EPG to open up the program guide section.
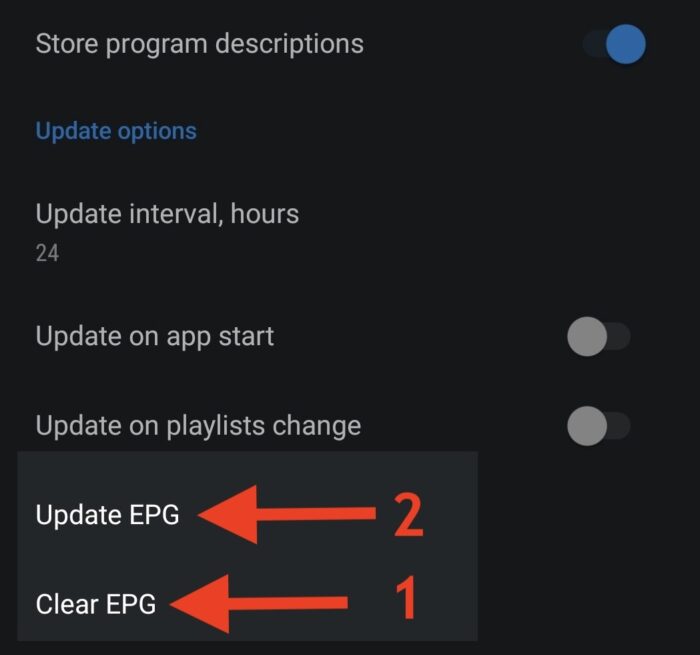
3- At the bottom of the page, first click Clear EPG to flush all the guide data, and then choose Update so we pull fresh data from the source.
After this step, the automation of program guide refreshing depends on the settings that you have on the top of this part, you can see above how you can set the Interval or ask Tivimate IPTV player whether refresh the data each time you open the software or when changing a playlists (switching between accounts).
4- The application is downloading fresh data from the provider’s server. It usually take up to 1 minute. You can move to other parts of the app as this process can continue in the background.

5- You can now see that Electronic Program Guide is loading perfectly fine on Tivimate and the EPG issue is resolved.
Conclusion
Honestly, I have not seen a better IPTV application than Tivimate in the whole market. The functionality is smooth and it gives you all the possibilities that you can ever ask for from an Android IPTV app. The Tivimate premium license being around €33.99 for 5 devices lifetime is absolutely a bargain. My advice? get a good android streaming device, or an android Smart TV or even a Firestick 4K, install Tivimate and stream happily ever after.
Frequently Asked Questions
Is Tivimate IPTV player the best application I can use?
This application has everything an IPTV user can ask for and if you choose it as your streaming software, it will never let you down. I highly recommend using Tivimate if you are looking for the ultimate viewing experience in every way.
Are all features available in free version?
No, Only the basic functions are available in the free version. Still works though, but full potential of the application is unleashed when premium license is applied.
Can I run Tivimate on non-android devices?
Unfortunately no, This software is only made available for Android devices. But they have made the right decision to limit this operating system. All other platform would have never allowed this application to run on it’s full power due to OS limitations.
Is it working on all android devices?
For the sake of this tutorial, I have tested it on almost all Android devices and it worked perfectly fine. Tivimate developers, however, insist on using it on big screen devices, like Android TVs, Fire TV Stick/Cube and media streaming boxes. But I made most of this tutorial with my Xiaomi Tablet, worked absolutely fine.
what playlist input methods can I use?
Tivimate allows you to add your IPTV playlist in various ways, including M3U streaming line, Xtream Codes API and Stalker Portal.
Is Tivimate premium worth it?
Oh 100 percent. An application with all possible features, smooth playback, versatility not even in function but also in appearance customization and more importantly, a solid responsible developing team, makes it an easy choice to go for the paid version.
do I need Tivimate companion app for premium purchase and activation?
No you don’t. One of the best thing creators of Tivimate did was launching the official website for this great application in 2024. You can now purchase the license through their website at https://tivimate.com/ and manage your subscription there.
How do I activate the Premium License on Tivimate IPTV player?
You simply create an account on their website, purchase the license and then log into the same account on your application. I have explained all the steps in the tutorial.
How much is the premium license? how many devices are supported?
The license would be a one-time fee of €33 euros (£29.99 and $33.99) with taxes if applicable in your region. It can be added on up to 5 devices.
What is the official website of Tivimate?
It’s Tivimate.com You can purchase the subscription and manage your devices there without the need of any 3rd-party application.
Can Tivimate IPTV player notify me on upcoming programs?
Sure, it has a function called Reminders and by setting that on your desired upcoming program through EPG table, you will be notified about it. This function is also very flexible, you can customize it as to what happens when the reminder time comes.
Is it possible to add my most-watched channels to a list?
Absolutely. You can use the Favorite function to add your most-liked channels to the list and quickly access them.
Can I hide unwanted channels or categories in live TV section?
It’s possible. You can use the Channel / Category Hide option to achieve this. It is reversible and you can revert this change later on if necessary.
Is it possible to adjust Tivimate premium functions to my remote controller?
You can go to settings and find the Remote Controller section. There you have loads of options to pair your remote buttons to the application functions.
Can I set PIN on certain channels?
Sure, You can use Block in the settings and assign 4 digit PINs to any channel you want.
How many IPTV accounts can be added into Tivimate premium?
As many as you like. Inside Playlists section, unlimited lists can be added.
I want to watch two channels at the same time, is it possible?
Yes, you can use Multiview feature on Tivimate and watch up to 9 channels at the same time. Make sure your IPTV account has enough amount of concurrent connections allowed.
Is it possible to record with Tivimate premium?
Definitely, This app has the best recording function among all IPTV applications. You can either use Scheduled recording or Instant recording.
No comments yet