OSCam runs based on configuration files. These files contain configurations of OSCam and what ever you save as inputs and settings on OSCam interface gets save there. Here we are going to talk about these files.
Basically, what ever configuration you assign to OSCam sections, they get written into config files.
Most common config files you might find in your OSCam folder are the following:
-oscam.conf
-oscam.server
-oscam.services
-oscam.user
Now let’s break it down piece by piece 🙂
How to access OSCam Web Interface?
If you want to manage OSCam the easiest way, you need to get access to Webif. It’s graphical, easy and makes more sense specially to newbies.
To do so, you need the following:
-IP address of the satellite receiver box (in the example here, we assume that our box IP is 192.168.1.9)
-OSCam Webif port
-Username and Password of OSCam Webif
Note: If you do not know how to connect to an Enigma 2 box via SSH/SFTP protocols and/or unsure how to use a FTP software, read this tutorial.
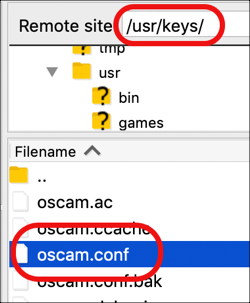
1-Connect to the box and browse /usr/keys/ and find oscam.conf file.
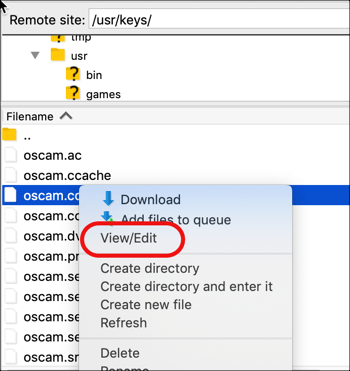
2-Right click on the file and click View/Edit.
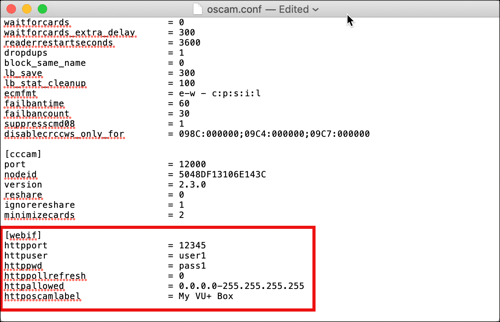
3-Once oscam.conf file opens, scroll down to see [webif] content. There you’ll see Username, Password and the Port number of your OSCam.
Note: httpallowed value should be set as 0.0.0.0-255.255.255.255 so any IP address be able to connect to webif unless you want to limit the access to specific IPs that you are aware of.
4-Now let’s connect to OSCam webif. Our box IP is 192.168.1.9 (as we assumed above for this example) and from what we have gathered from oscam.conf file above, Username is user1, Password is pass1 and Port number is 12345. Open a browser on your computer and type IP:Port (192.168.1.9:12345) in the address bar and hit enter. You’ll be prompted for login details and once typed in, another enter will load up the beautiful face of your OSCam webif 🙂
Note 1: The computer must be connected to the same network router as your receiver box so the IP range assigned to both devices be the same.
Note 2: If you can not make the connection to the box webif, make sure no firewall/internet security/antivirus is blocking the connection.
Now that we have access to OSCam webif, it’s time to learn most important parts of it.
Note: Pictures, configs and settings shown below are exemplary. Do not use or rely on them. If you have any questions about proper configs for your oscam, use comment section below.
-oscam.conf
This file includes all the major settings which are applied on OSCam. As you can see in the picture above, which is the Webif (Web Interface) of OSCam, Config part of OSCam is located there on the top menu. When we click it the options like Global, Cache / CW Cycle, Loadbalancer and … will appear. If any changes are made to the default/ empty fields of these sections, the inputed value will be saved on oscam.conf file.
Below you can see the content of an oscam.conf file:
# oscam.conf generated automatically by Streamboard OSCAM 1.20_svn SVN r11518
# Read more: http://www.streamboard.tv/svn/oscam/trunk/Distribution/doc/txt/oscam.conf.txt

[global]
logfile                       = /var/log/oscam/oscam.log
logduplicatelines             = 1
clienttimeout                 = 3500
fallbacktimeout               = 3500
maxlogsize                    = 1024
waitforcards                  = 0
preferlocalcards              = 1
dropdups                      = 1
lb_save                       = 300
lb_nbest_readers              = 2
lb_nfb_readers                = 2
lb_min_ecmcount               = 2
lb_reopen_seconds             = 10
lb_force_reopen_always        = 1
lb_stat_cleanup               = 1
lb_max_readers                = 4
lb_nbest_percaid              = 0100:3
ecmfmt                        = e - c:p:s:w
failbancount                  = 10
disablecrccws_only_for        = 098C:000000;09C4:000000;09C7:000000

[cache]
max_time                      = 16
max_hit_time                  = 60
wait_time                     = 0:210:210,05:570:570,098C:0,09:220:220,17:1520:1520,1802:1550:1550,18:750:750,01:1520:1520,0B:900:900,0D:1750:1750,1814:750:750
csp_allow_request             = 0
cacheex_cw_check              = 0:0:1
cwcycle_check_enable          = 1
cwcycle_check_caid            = 0100,1810,1801,1803,1805,1880,183D,1830,1814
cwcycle_maxlist               = 4000
cwcycle_keeptime              = 4
cwcycle_allowbadfromffb       = 1

[cs378x]
port                          = 12345
suppresscmd08                 = 1

[cccam]
port                          = 12345
nodeid                        = 11119F8260B2188G
version                       = 2.3.0

[webif]
httpport                      = 123456
httpuser                      = user
httppwd                       = password
httpshowmeminfo               = 1
httpshowuserinfo              = 1
httpshowcacheexinfo           = 1
httpshowecminfo               = 1
httpshowloadinfo              = 1
httpallowed                   = 0.0.0.0-255.255.255.255
httposcamlabel                = OSCam
If you pay attention, you’ll see some bracketed titled like [global] , [cache] , [cs378x] … These are the exact titles we have seen in Top Menu of the above picture earlier.
-oscam.server
Readers section is in charge of leeching ECMs from CCCam, Newcamd, cs357x, cs378x or what ever reader you have from your source to supply OSCam with.
Let’s make an example of how one should add CCCam Clines to OSCam Readers section:
–How to add a Cline to OSCam?
Let’s say our Cline set is the one below:
C: server1.myprovider.com 12345 user1 pass1We have already spoken about CCCam lines format and how they should be read. Now, let’s add it to OSCam:
1-While in Readers section, click Add Reader.
2-First, name your reader, then Choose the protocol as CCCam and then click Add.
3-Now we need to add Cline details in. Depending on your OSCam version and assigned Add-ons, a fairly long set of configs and settings will appear, but there are only few of them which need filling unless you are aware of the setting you want to enable. Let’s fill General Settings first!
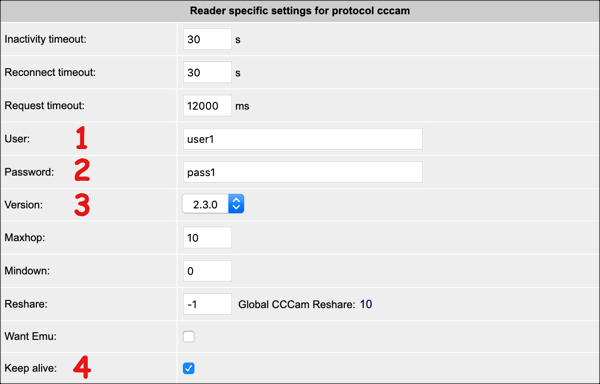
First set a Description, anything so you know who this line belongs to for future reference. Then make sure the reader is ticked Enabled. Device part is vital. Cline server address and port number go there, separate by a comma. Also set the group number as 1. If you are aware of grouping, use the desired number but default is 1. Now let’s scroll down till we reach “Reader specific settings for protocol cccam“
Except for the numbered sections, rest must be left as is in the picture if you are a simple end-user.
Finally scroll down to the bottom and click Save.
4-Now from the top click on Readers and you should see that your reader has successfully been added.
So, in this part we started talking about oscam.server file. Let’s have a look at this file now after we have added MyReader, see how it looks like in that file and how those values line up.
# oscam.server generated automatically by Streamboard OSCAM 1.20_svn SVN r11518
# Read more: http://www.streamboard.tv/svn/oscam/trunk/Distribution/doc/txt/oscam.server.txt

[reader]
label                         = MyReader
description                   = This is a test
protocol                      = cccam
device                        = server1.myprovider.com,12345
user                          = user1
password                      = pass1
inactivitytimeout             = 30
group                         = 1
cccversion                    = 2.3.0
ccckeepalive                  = 1
A simple comparison between the values here and what we have inputed through webif will give you the clearest picture.
This is also doable: you can type the values inside the oscam.server file, reboot your OSCam from Restart tab on webif top menu and reader will appear and starts working. This means a CCCam provider can send you oscam.server file and you place it or replace it with the same file which exists inside OSCam folder and then restart OSCam or even reboot the box or server. It starts working!
-oscam.services
This file is one of the handiest things that OSCam offers. It helps you to create rules for filtering, allowing or forcing(so that one reader stays in charge of the assigned package/card/channel) certain package/card/channel to be opened through a reader. Example below will shed some lights on this. The reader will be MyReader which we created earlier and the Service will be created for SkyDE package 098C caid.
First we need to create a Service:
1-From webif, click on Services.
2-Choose a name and click Add.
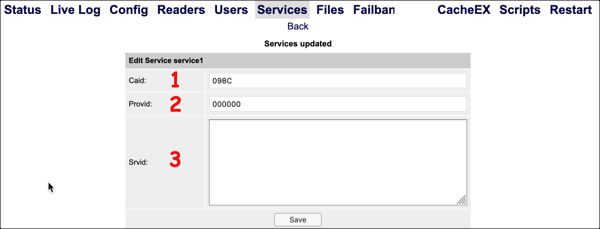
3-Set Caid, Provid and Srvid fields with the proper info of the card for which you want to create a service. Here we intent to make a service for the whole SkyDE package on caid 098C.
Note: If you have no clue about the above terms, read this tutorial.
4-Click on Services from top menu and you should see that Service1 is added.
Now it’s time to assign this service to our desired reader.
5-From top menu, click Readers and from the list of readers click your desired reader.
6-Scroll down till you reach Reader Services Settings part.
(Bare in mind our Service1 has config for whole SkyDE package on caid 098C)
With_Services: Will set this reader to answer 098C:000000 requests and ignore other caid requests.
Not_Services: Will set this reader to ignore 098C:000000 requests but answer other caid requests.
LB_Whitelist_Services: Will set this reader to be always whitelisted in Loadbalancer ECM calculation for caid 098C:000000 (if loadbalancer function is enabled) and even if this reader gives too many bad ECMs for 098C:000000, loadbalancer still send requests to the reader.
Let’s say we want this reader to be only in charge of 098C:000000 requests so we need to check the box of With_Services. Finally scroll down and click Save.

7-Now it’s time to see how the created service looks in oscam.services file. From the top menu click Files and from the lower row of menus, mouse over Other Files and click oscam.services .
# oscam.services generated automatically by Streamboard OSCAM 1.20_svn SVN r11518
# Read more: http://www.streamboard.tv/svn/oscam/trunk/Distribution/doc/txt/oscam.services.txt

[service1]
caid                          = 098C
provid                        = 000000
srvid = 8-This is how the created service should look inside oscam.services config file.
But it does not end here. Since we assigned this service to the reader (MyReader), it’s config file must have received new values. Where should we check for that? Yes! oscam.server
# oscam.server generated automatically by Streamboard OSCAM 1.20_svn SVN r11518
# Read more: http://www.streamboard.tv/svn/oscam/trunk/Distribution/doc/txt/oscam.server.txt

[reader]
label                         = MyReader
description                   = This is a test
protocol                      = cccam
device                        = server1.myprovider.com,12345
user                          = user1
password                      = pass1
services                      = service1
inactivitytimeout             = 30
group                         = 1
cccversion                    = 2.3.0
ccckeepalive = 19-As you can see, below Password value, Services has been assigned to Service1 .
-oscam.user
This file contains user accounts which get their ECM requests directly from readers. CCCam providers who create accounts for their users make those accounts in User section. End-users who use OSCam on their Enigma 2 boxes need to create a user as well. Below is an example of how one can create user on OSCam.
1-From the top menu click Users. To add username, click Add User then type the desired username and finally click Add.
2-Set the Password, Description and Expiration Date. Make sure the Disable part is unchecked!
3-From the top menu click Users and our created user should appear there.
4-To check oscam.user file content, click on Files from top menu and then oscam.user .
# oscam.user generated automatically by Streamboard OSCAM 1.20_svn SVN r11518
# Read more: http://www.streamboard.tv/svn/oscam/trunk/Distribution/doc/txt/oscam.user.txt

[account]
user                          = user1
pwd                           = pass1
description                   = This is a test
expdate                       = 2020-05-07
group                         = 1
5-And this is how our created user looks like in a config file.
OSCam is beyond easy! as a friend who is actually a part of OSCam team once said, “You can leave a hole in it and it still works fine!”.
You can ask any card holder or any professional player in cardsharing about their most trusted emulator, they’ll tell you OSCam, period!








No comments yet